How to Create an Easy DIY Heart Rag Wreath

February is a great time to spread some love.
Well, actually, anytime of the year is a good time for that.
But when Valentine’s Day comes around it’s an extra reminder, and this week’s project is an easy way to add some heart to your home decor.
Because our homes need love too.
And the love that you give your home, it will give back to you.
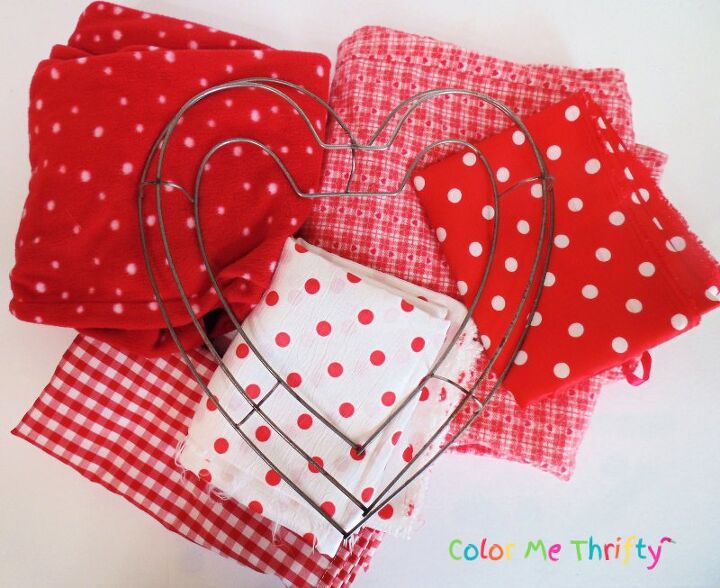
All you need for this project is some scrap fabrics, a wire heart wreath form.
To create my rag heart wreath I’m using five different red and white fabrics.
My local thrift stores often sell odd sized pieces of fabric for relatively cheap, and when I see a pattern I like I pick it up.
But remnants aren’t the only fabrics that can be used in projects like this.
The two polka dotted fabrics are the remnants. The checkered fabric is a small tablecloth, and the other two fabrics are what John and I call happy pants that are too small.
The polka dot pair of happy pants is make of polar fleece, and the pair in the back right is a light flannel and actually has little hearts on it. So fun!
Every piece of clothing is a potential fabric for something, if I like the pattern enough.
Any fabrics can be used for this project as long as they aren’t too flimsy.
I cut all the fabrics into strips, one inch wide by eight inches long, measuring the length first and then just cutting the strips by eye.
The strips don’t have to be prefect. Actually, it’s better if they’re not.
I honestly thought this was going to take me forever, but it only took me about an hour and a half.
Doubling up the polka dotted fabrics made it a lot faster, but the two checkered fabrics had to be cut in a single layer because of the patterns.
If you have a rotary cutter that would speed up the cutting, but I didn’t find it difficult to do with just regular scissors.
To attach the fabric strips onto the wreath frame you first fold the strip in half.
Wrap it around the metal wreath frame and pull the ends through the loop.
Then you just pull it tight.
You want all your knots to go the same way, on top, so you have a nice neat look.
Once I had all my fabric strips cut, I piled them into a bundt pan to take them downstairs to watch TV while I created my wreath.
When I started I thought that the raised wreath frame was going to be a problem, and I almost didn’t do this project at all.
But I went for it anyway, and I discovered along the way that the exact opposite was true.
It was actually going to make the wreath more fun and interesting.
Sometimes you just have to go for it anyway, even when you have doubts.
You’ll see what I mean when it’s done.
I did the first layer in under an hour while watching a Hallmark winterfest movie.
During a commercial break I ran upstairs to take a pic of my progress.
I didn’t follow any pattern, I just winged it as I went.
You really don’t need to think about it too much.
I thought I was going to be ok with the shape of the wreath, but at this point I decided I wanted to fix it a bit.
So I grabbed some tools and bent the top metal layer into more of a heart shape.
I thought it would work much better for the look I wanted to achieve.
You can find flat heart wreath frames, but I had to work with what I had.
And I started attaching fabric strips to that part of the frame.
During another commercial break, I ran upstairs to take another pic of my progress.
Once I finished that layer, which you can see is now at the bottom, I started to attach the strips to the final part of the frame.
I also added fabric strips to the metal pieces that join the main parts of the frame. This makes them completely disappear.
And I ran upstairs to take another pic of my progress.
Thanks goodness for commercials. lol.
When both my heart rag wreath and the movie were finished two hours had passed, and I had a fabulous Valentine’s Day heart rag wreath to show for it.
And a little extra exercise too. lol.
The cool thing about the raised wreath frame is that it makes the wreath reversible, with two different looks.
Which is a lot of fun.
The side above gives you the double layered sort of framed view of the middle heart shape.
And this side gives you a completely different view.
The heart middle looks exactly like I envisioned when I bent the part of the frame into a more defined heart shape.
And the different textures of the fabrics add some dimension and interest.
At this point you can do some pruning with scissors if you think you need to, and also trim off any loose threads if you like.
My easy DIY heart rag wreath is hanging on the inside of the kitchen door, so I’ll see it all the time.
My kitchen is red and aqua so this red and white heart wreath is perfect for my kitchen decor.
I used just five fabrics with the same colors in them, but you could use as many fabrics as you like, and as many colors too.
Go crazy if you want to! Different colors would look amazing too.
The possibilities of the look you can get are really endless, depending on the patterns and the colors you use.
To give you an idea of how many strips you’ll need, I cut between fifty and sixty pieces from each fabric. When I was done I had five or six pieces of each fabric left.
I hung my rag heart wreath with jute twine, and if I want to turn it over I’ll just cut the twine and use a new piece.
All in all this super easy Valentine’s Day wreath took about four hours to create, which for me was creative time very well spent.
My kitchen door is wearing some love, and is giving it back to me every time I see my heart rag wreath.
You still have time to add a little extra love to your home by creating a wreath like this. It takes a little time, but it’s very easy. Just grab some scraps, or some happy pants that are too small, lol, and start cutting.
If you enjoyed this project you can find more Valentine's Day projects on my blog here.
Enjoyed the project?

Comments
Join the conversation
-
-
 Tuula - Color Me Thrifty
on Jan 03, 2024
Thanks very much!
-
-
-
-
 Tuula - Color Me Thrifty
on Jan 18, 2024
Thanks Pinky!
-
-















Frequently asked questions
Have a question about this project?
Where it you get the heart frame?
how long did you cut your strips of fabric