Create These Dreamy Decorative Wall Mirror Panels in Five Simple Steps

When it comes to creating an interior you love, it’s not enough to pick out pretty paint swatches or source fashionable furnishings from your nearest shop or thrift store. You need to add your own unique elements to the space around you, in order to develop rooms that really reflect who you are as a person.
One of the best ways to do this is by designing your own interior accessories – ones that absolutely no one else will have. Not only can these be made exactly to spec to suit your styling, but they also have another major upside: you won’t need to break the bank if you’re working with limited funds.
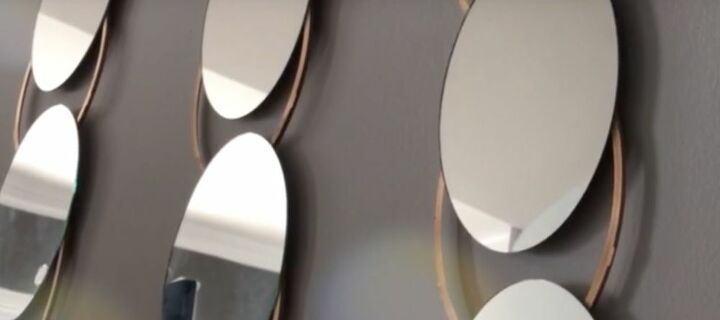
This is one of my favorite parts of creating DIY home accessories: that I can set myself a budget and know that I won’t have to exceed it to get what I want, and these wall mirror panels are a perfect example. Costing me just $18 for a set of three, they look super chic and stylish, but barely set me back at all.
Here’s how I made them for anyone who wants to give the idea a go.
Tools and Materials
If you want to try your hand at making these wall mirror panels, you're going to need a few things first. These include:
- Six handheld mirrors from Dollar Tree
- A mini flathead screwdriver
- Spray paint
- E-6000 adhesive
- A 90-degree angle ruler
- Picture hanging hooks
Before you can create your round wall mirror panels, you'll need to start at the beginning by gathering together the various items you’ll require in order to make them, so head on down to your local Dollar Tree. Once you’re there, the first thing you’ll have to pick up is a selection of handheld mirrors, which will bear very little resemblance to the finished product, but will look great once you’re done with them!
Before you make your trip, be sure to check around your home to see if you have a mini flathead screwdriver. If you don’t, these can be picked up pretty cheaply from your local hardware store or else as part of a pack while you’re in store (look out for the Precision Screwdriver Set that’s sold at Dollar Tree).
With these essentials all ready, there are only a couple of items left to add to your basket, including spray paint for your frames, glue, and picture hooks. While I personally opted for a gold coat, you could add your own twist by choosing a different color option, so don’t be afraid to experiment. As long as you like the finished aesthetic and it complements your interior, it really is a case of anything goes.
Once you’ve gathered together everything you need to make your large wall mirror panels, it’s time to get crafting, and the first thing you’ll have to do is remove your mirrors from their frames. Luckily, this is a lot easier than it sounds, but I’ll talk you through it anyway.
You’ll need to keep both the frame and the mirror to use later, so it’s important to ensure that you take care when removing them, as it can be quite easy to damage the plastic. The best tool for achieving this without any cracks is a screwdriver, and the mini flathead screwdriver you’ll find in your Dollar Tree pack is ideal.
What you’ll want to do is locate the little inserts on the side of the mirror and then stick your mini screwdriver in next to them. Once the head is in place, gently pry the frame away from the mirror, being careful not to damage the plastic or scratch the surface as you do so.
You’ll need to repeat this process six times over, in order to ensure you have enough frames and mirrors to create your wall panel and achieve the finished look. However, you’ll only need five of the mirrors for the project itself, but I find it handy to put one aside as a spare in case you need a replacement at any point.
Now that you have your mirrors and frames ready to go, it’s time for the fun part: adding your own individual twist to the finished aesthetic. You’ll see that the handheld mirrors I originally picked up came with cheap-looking plastic frames in a rather lurid shade of green, and if yours are the same, chances are this won’t fit with the sort of style you’re going for.
Luckily, there’s nothing to say you have to stick with this color palette, which is why you picked up your spray paint. While I personally opted for a metallic gold option from Krylon, feel free to experiment with different patterns and shades to create your own take on the look.
In my opinion, a good way to do this is to begin by studying the rest of your room, to get an idea of what sort of color and look would work well. Pastel-hued palettes, for example, can be the perfect pick for feminine interiors, while metallic options can suit spaces that have more of a minimalist vibe.
If you’re a little artsier than me, there’s nothing to say you have to stick with solid shades – instead, you could incorporate a pattern or some hand-drawn illustrations. If you’re not great with a pen and pencil, but like the sound of this, you could even stick some lightweight accessories onto the frame, such as white feathers or a series of pearl-effect beads – the possibilities really are endless!
Whatever you decide, however, remember this: the golden rule is that you need to like the finished effect, and that it should complement your interior styling and overall home aesthetic.
Once you've given the paint sufficient time to dry, you'll need to take your individual components and think about attaching these together to create your wall mirror panels. Luckily, it's a pretty simple job. Before you get started, however, you're going to need your glue. I chose to use E-6000 adhesive, but most long-lasting and durable glues will do the job, so long as they're clear enough that they won't show once dry.
Taking the frame, I flipped it over so that the flat side was facing up. While this may not seem like a big deal, it's much easier to attach your mirrors to this type of surface, so do make sure that you have the plastic the right way around before proceeding.
What you'll want to do at this point is to take two frames and place them end on end, so that one is sitting above the other. If you want to make sure these are properly aligned, a trick I use is to take a 90-degree ruler so I can accurately line them up against this.
Once I'm happy with their placement, I move onto gluing the pieces together, by taking my E-6000 and applying it to the edges of both frames in the area where they meet (you can see this demonstrated in the video). You'll want to avoid covering too much of the material, as the glue only needs to be applied to the spots where the mirror will sit.
With your glue application complete, place one of the mirrors at the intersection where the two frames connect and press down. You'll have to repeat this process for each mirror you add, and do make sure that these are all spaced at least 0.5 inches apart.
While I chose to use three mirrors in each of my panels, it's up to you if you want to incorporate more of these into your design, but be aware that anything in excess of five is likely to be too heavy to stay on your wall without falling down.
Once you're happy with the end result, give the panel at least one day to dry (I personally left it for 48 hours just to be on the safe side).
Now that your home accessory is finished and ready to go, the only thing left for you to do is to mount your mirror panel on the wall, and this is super simple. All you'll need are some strong and sturdy picture hooks, which you can paint to match your frames if you want to achieve a properly professional finish. Voila! Project complete.
When it comes to adding your own unique twist to your interior, DIY home accessories are a great way to do it, as this gorgeous mirror wall panel shows. Why not give it a go to see how it enhances your styling or send it to a friend with a flair for art and fashion? Whatever you do, don't forget to share your attempts in the comments section below!
Don’t forget to subscribe for new videos every Tuesday - https://goo.gl/gWrdq3











Frequently asked questions
Have a question about this project?
What about the raised edges of the notches used to hold the mirrors in place originally? I can see them in the pictures after the frames are painted. I watched the video but it didn't address that issue. A full picture of the completed project would be nice as well. I like this concept. Thank you.
can we see it done?
Would love to see the finished product