DIY Scrap Wood Mosaic Cutting Board

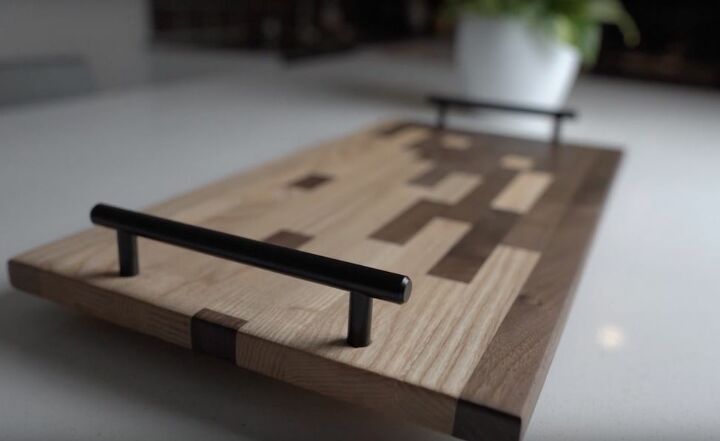
I had a bunch of leftover wood sitting around my shop, so I decided to make a scrap wood mosaic cutting board. It’s a relatively easy build and one I wanted to share, hoping to inspire you to make this cool looking serving tray yourself. It didn’t really take that long to do, but the results will make you look like a pro! So let’s get started!
Tools and Materials
- Ash wood 1x4
- Walnut wood 1x4
- Wood filler
- Wood glue
- Table saw
- Miter saw
- Sanding block
- Plastic sheeting or drop cloth
- Thickness planer
- Sander
- Router
- Measuring tape
- Blue painter's tape
- Rag
- Handles
- Screwdriver
- Screws
- Eye protection
- Mask
- Gloves
Cut Wood
I used ash and walnut so there would be a nice diversity of color in my piece. They’re also good choices for a cutting board. I used 2 - 1x4” boards and ripped each of them into four 1” strips using my table saw, but not before I put on my safety gear. Then I used a miter saw to cut off any jagged edges and chop the wood into random size lengths.
Sand
I used a small hand sanding block to sand each piece, one at a time, to clean up and smooth out the sides. It was a tedious, time consuming task, but important since I needed each block of wood to fit very closely to the pieces next to it.
Cover Table and Measure
With my wood all prepped and ready to go, I used a large piece of plastic sheeting to cover my work surface and secured it with tape. Next up, I knew I wanted my board to be 12” x 20” so I grabbed my tape again and marked those measurements on the plastic, creating a template for my build.
Make a Pattern
This was the fun part. It was time to use my creativity. When it comes to the design, there really aren’t any rules here, except you want to stagger the wood pieces a bit, so the seams don’t line up right next to one another. The board will be more stable that way. I moved pieces around until I had a pattern I was pleased with and then I was ready for glue.
Glue and Clamp It
To keep my pattern in place, I just rolled the boards on to their sides and added wood glue. I didn’t add glue to the ends of the pieces, and I didn’t smear it or spread it. I just rolled the boards back into place and then clamped them together. I clamped the board until a little bit of glue squeezed out between the joints, if it didn’t, I tightened the clamps a bit more. Then I let it dry for about 45 minutes.
Plane It
The next step was to put my newly created wooden board through my thickness planer, to completely smooth and even out the surface. By running it through the planer a few times, adjusting the blades a little lower with each pass, I could do it easily. Of course, I have a shop with access to this tool. If you do not, you can still get the job done by using a wide belt drum sander. It will just take a little longer.
Sand It
I started with sanding with 80 grit sandpaper on my palm sander. Then I sprayed it with water to bring the grain up, so the wood would swell. Then I went over it again with a finer sandpaper for a glass-like finish.
Trim the Ends and Soften the Corners
Of course, the board looked great now, but it wasn’t square yet. To do that, I used my mitre saw to cut both ends, so they were perfectly straight. Once that was done, I needed to take care of the edges, since they were a little sharp. I fixed that by going over them with my router to soften all the corners.
Add Handles
Here’s a little trick to add handles. Turn the handles upside down, take a piece of tape and put it over the bottom. Then grab a pencil or a screwdriver and poke holes through the tape, where the screws would go. Then peel the tape off, place it on your wood and drill your screw holes in the places you marked the tape. Super easy!
Apply the Finish
Moving into the home stretch it was time to seal my new board. I applied butcher’s block oil, which is food safe, to protect the cutting board and bring out the grain in the wood. I dipped the rag into the oil and rubbed it on in the direction of the wood. Once it dried, I was done!
In less than a day, I had a really beautiful new accent for my kitchen or dining room. My DIY scrap wood mosaic cutting board, or tray, is functional and attractive. It was an easy build, great for beginner woodworkers, and I hope that I’ve inspired you to give it a try.
To keep your board clean, read this guide on how to clean a wood cutting board!
If you do try this one out, be sure to let me know in the comments!
Enjoyed the project?


Frequently asked questions
Have a question about this project?
Did you use the butchers oil after putting the handles on?
Did you put pads or feet on the underside? It looks raised a little in the final photo.
Do you sell these? Wonderful Job!