DIY Large Farmhouse Clock at a Not so Large Price !

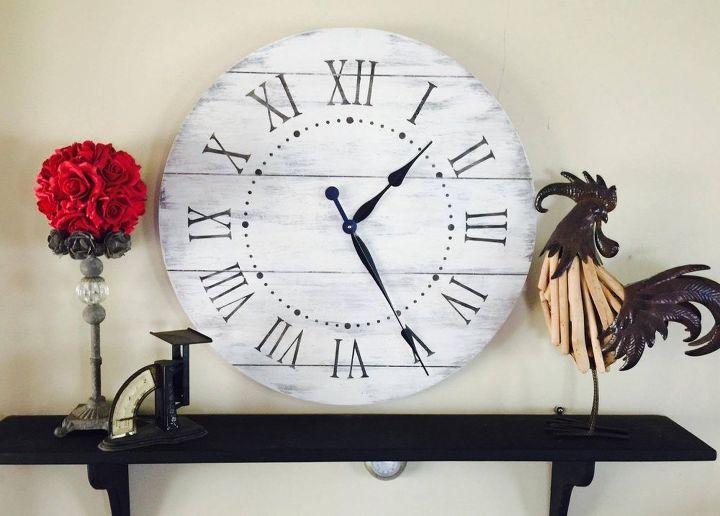
I wanted a large farmhouse clock for our home but didn't want to pay the large price....answer.....make my own, from a coffee table :)
The inspiration for this piece came from Jennylynn Pringle from Fusion Mineral Paint !!! - https://www.youtube.com/watch?v=6tc_F8FCHcE
Hometalk Recommends!
We bought this large solid pine Ikea coffee table off kijiji for $15 and used the top piece to make our own outdoor checkerboard and game pieces: http://www.hometalk.com/diy/build/furniture/checkers-anyone-summertime-fun-for-the-whole-family-29813210
And then we used the bottom piece of the coffee table to make a large Farmhouse Clock
Step 1: I wanted the maximum size farmhouse clock I could get from the coffee table and we were able to make a circle that was 26" in diameter and drilled a hole through the centre to accommodate the clock mechanism.
Step 2: We made these groove marks through the clock to make it look more like pallets or pieced together wood.
Step 3: Next the magic begins !!! I used Homestead House Milk Paint Stain in Sherwood Brown to create a gorgeous base colour for the clock. Mix equal parts water to milk paint stain but I thinned it out farther with about 2/3 water to 1/3 milk paint stain. You can't make any mistakes...either add more stain or water until you get the look you want and just use a cheap chip brush to apply.
Step 4: I LOVE how the wood takes the stain in unique ways through the piece ! It dries pretty quickly to a matte finish and is so gorgeous !!!!
Step 5: Don't forget to stain the sides ....I find it helpful to put a few blocks under the piece to make it easier to stain or paint. You can see the top is in different stages of drying...love it!
Step 6: Next to add colour and texture !!!! I love how easy it is to add texture to any piece using Fusion's Fresco! You simply add it to Fusion Paint and voila ! Instead texture
Step 7: You can add as little or as much fresco as you want to the Fusion Mineral Paint....I used about 3 parts paint to 1 part fresco and you'll see how much texture it added in the next pic...a little goes a long way !!! It takes about 25/30 minutes for this to dry before you begin to stencil.
Step 8: Cool, eh ??!! (can you tell I'm canadian :) Again just use a cheap chip brush and throw it out when you're done! Fresco hardens to such a hard finish that it's not worth trying to clean it out of a brush
Step 9: Here's the farmhouse clock base after I applied the Fusion Raw Silk with Fusion Fresco. I intentionally went with a lighter hand in some areas and heavier hand in other areas. I really wanted a barn board look. I also made sure near the edges that I did it with an extra light hand.
Step 10: Next it's time to stencil the clock face ! I used this gorgeous clock face stencil from Muddaritaville ! Amazing quality and image ! I also used the Staalmeester Round brush and just put elastics at the base to pull the bristles close together (rather then buying another brush for stencilling) It worked AMAZING !!!!! I used Fusion Mineral Paint in Coal Black for the clock face
Step 11: Next I took 220 grit sandpaper pad and lightly scuffed up some of the clock face and also to make the numbers look more aged rather then a freshly painted look
Step 12: To add even more of an aged look to the clock face I added Homestead Espresso Wax randomly and then wiped it off with a lint free cloth. If you end up with more espresso wax then you like just use homestead clear furniture wax and it will remove any of the espresso wax.
ALL DONE !!! All that was left to do was to add the clock hands and mechanism! I love the look of this farmhouse clock and once we had the circle piece ready the actual Farmhouse Clock took less then an hour to finish !!!!












Frequently asked questions
Have a question about this project?
Stunning clock!! I am interested in how to make the rooster? He is gorgeous!!!
Thank you!
That looked more like red cedar than pine from the pictures?
HOW did you hang it, what with? I love it and want one.👍️♥️♥️