How to Get an Elegant Floral Look on Furniture With Video Tutorial

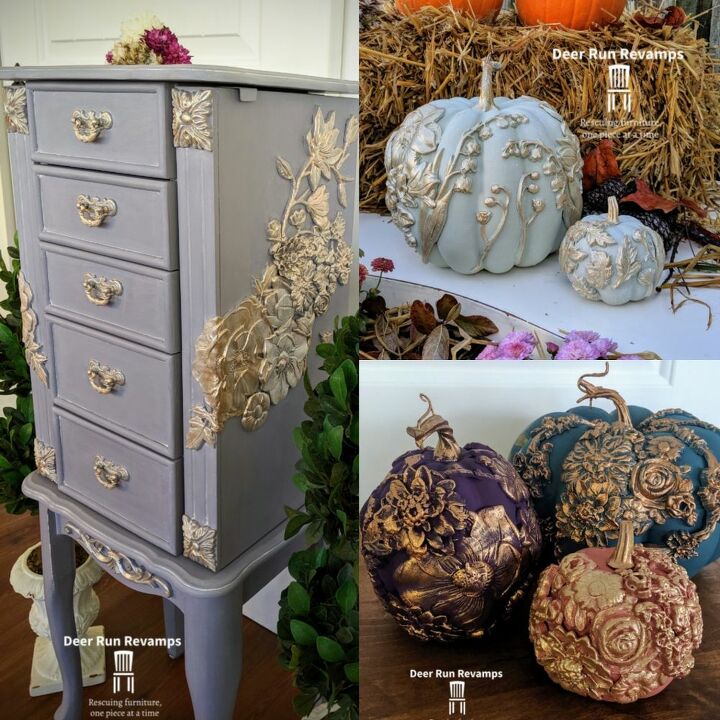
Last week, I did a tutorial on creating elegant foam pumpkins and everyone loved them so much but many were left asking the same questions...do you have a video tutorial and can this technique be done on furniture?
So I decided to create this jewelery chest using the same techniques as the pumpkins....and make a video to go along with it 😉
Hometalk Recommends!
Want to save?
Get your 30-day free trial of Amazon Prime today before the biggest sales of the year start July 16th-17th!
Tools and Materials
- Paint
- Floral molds
- Sugar soap
- Corn starch
- Paintbrushes (you'll need a few)
- Metallic paint
- Wood glue
- Paper clay
- Sand paper
Prep Your Piece
First things first...
Prep your piece. Your finish is only as good as your prep 😁
I cleaned the piece using Sugar Soap, a nontoxic cleaner made by Frenchic Furniture Paint that removes dirt, grease, grime, even nicotine!
Once the piece dried, using 220 grit sandpaper, I did a quick scuff sand of the entire piece.
Then I wiped down the chest using just plain ole' water to remove sanding dust and any Sugar Soap residue.
This chest was a very dark wood with hints of red. If you're using a different paint, I'd recommend priming first. But it is not necessary with Frenchic Furniture Paint
Time to paint 😁
Using Frenchic Furniture Paint's petite oval paintbrush (great brushes and they make a size for every project), I painted the piece in Frenchic's "Stormy" , a beautiful Lavendar/Blue/Periwinkle color.
To get around the edges and not get any paint onto the gorgeous pink felt, I used a smaller detailed brush
Create the Molds
Once you have your piece painted, you can start making molds!
I used many different decor moulds for this project...
- Bell Orchids
- Winter Blooms
- In Bloom
- Forest Flora
- Estruscan Rose
Redesign with Prima offers dozens of decor moulds, pick your favorite(s) and have fun creating a design!
You'll also need wood glue, corn starch, paper clay, and 2 flat detail paintbrushes, one for the glue, and one for the corn starch.
Brush with Corn Starch and Fill with Paper Clay
Brush the mould with corn starch. You don't want it piled up, just lightly dusted all over.
Tear off a clump of paper clay and squish it in your hands to warm it up a little.
Then press it down into the silicone mould. Make sure you get into the corners, and remove any excess clay as you press down. It's easier to remove the excess while still in the mould.
Flip and Slowly Peel
Now, flip the silicone mould over and slowly peel it back while carefully helping the paper clay mold out.
Add Wood Glue
Once you have the paper clay mold out of the silicone mould, carefully flip it over and brush wood glue all over the back. Don't gunk it up too much, as you press it down onto the furniture, the glue will ooze out. So keep that in mind while applying the glue.
Now press the clay mold into place on the furniture.
You can overlap clay molds, just be sure that it is adhering well.
Take the brush that you used to brush on the corn starch and brush off any excess glue that oozed out. Then wipe off the brush.
If at any point the paper clay molds seem to not be staying in place, you can either lay the piece of furniture down so that the surface that you are applying the clay molds to is flat and horizontal...or carefully add a piece of delicate frog tape to hold it in place for 12 hours.
Continue on making and gluing clay molds until you have a design that you're happy with.
Allow to Dry and Paint
Allow the clay to dry for a minimum of 12 hours, preferably 24 hours until the clay is hardened.
Now take your base color and paint the paper clay molds, making sure you get into the details and all around the sides.
Add Metallic Paint and Wax
Once the paint has dried, brush the molds with Frensheen ❤️
Frensheen is a mineral metallic pigment made by Frenchic Furniture Paint. These pigments are unbelievably bright and shimmery. And a little bit goes a long way so one jar will last quite awhile!
You can use Frensheen in numerous ways..add it wax for a metallic colored wax...add it to paint for a subtle shimmer...or my favorite way, add it to Frenchic's Finishing Coat, an extremely durable waterbased top coat. This creates an easy to use glaze. For this project, I mixed both Gorgeous Gold and Sexy Silver Frensheen with a bit of Finishing Coat.
Using a flat detail brush, I lightly brushed the Frensheen over the raised areas of the hardened paper clay molds.
If you accidentally get some Frensheen on the Furniture itself, just take a small brush and go over it with your base color.
I then went over the entire piece with clear wax and added a little white wax into the corners of the drawers, and a bit on the legs to give it more if a French Country look.
(Forgot to take photos applying the wax)
I like to use foam car wax applicators to apply wax to furniture. I'll use a brush to get into any details.
When using chalk/mineral paint and then applying a colored wax or glaze, always apply clear wax first! The chalk/mineral paint is very porous. By applying clear wax first, you form a barrier between the colored wax/glaze and the paint. This will give you a lot more work time with the wax or glaze.
That's it! You have a unique one of a kind piece of furniture ❤️
Look for Deer Run Revamps on Facebook and Instagram to see more unique pieces
You can find all of these products, including the jewelry chest (sold), in store or online in my Etsy shop and some in my eBay store.
Be sure to check out my previous tutorials right here on Hometalk!
Feel free to reach out with any questions 😉
Has this project inspired you to transform your home with a designer touch?
Enjoyed the project?
Resources for this project:
See all materialsComments
Join the conversation
-
-
 Fwd3141685
on Jan 06, 2024
Love it, I found some moulds on Marketplace for cheap
-











Frequently asked questions
Have a question about this project?
this is gorgeous, but when you press the clay to the furniture, how do you avoid fingerprints in the clay?
I am a little concerned about the resistance of the clay appliqués. I would like to use them in an armoire that I have in my room, do you recommend it!?
how lovely. truly. i’ve had awful experience w wood glue accepting paint. have use weldbond. is there a brand you’ve found that accepts paint without heartache?!
thanks
lisa