875K Views
Onward Kitchen Soldiers! Crown Moulding and Floating Shelves

by
Delusions of ingenuity
(IC: blogger)
5 Materials
$100
3 Hours
Medium
My kitchen headway was temporarily interrupted by an unseemly skin tag. But we can't let these pointless appendages get in the way of progress. Check out our lovely crown moulding!
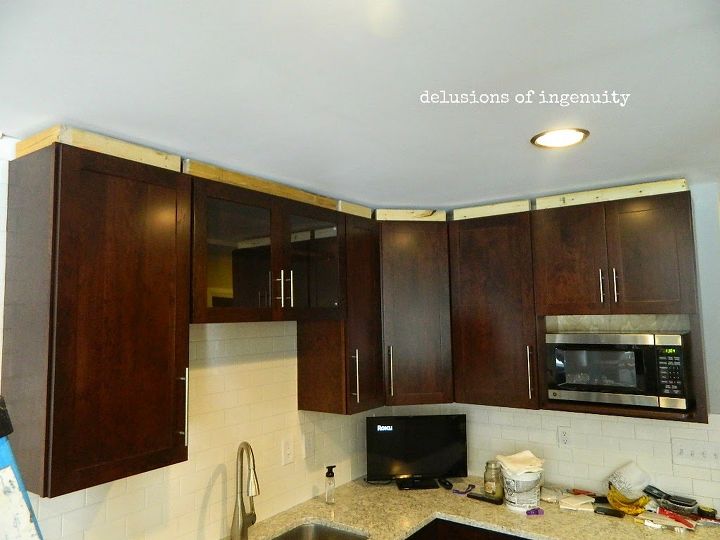
Hahaha... it's just blocking, but I had you going, didn't I? I wanted the cabinets to reach the ceiling, both for storage, as well as to achieve a more professional look. We had about a 4-inch gap between the tops of the cabinets and the ceiling, and the crown moulding wasn't tall enough to fill that space without a little help. My favorite Kitchen Soldier (Philly) cut 2x4 lumber to length and made a frame against the back side (inside) of the cabinet face frames and sides. These were held in place with cabinet mounting screws straight up from inside the cabinets--very solid. Then he cut stained frieze boards to sit on top of the cabinet box and mitered the corners to make what would basically be an extension of the top of the cabinets. Because both edges were factory cut, the joints disappeared. Now the stained cabinets were within a quarter of an inch of the ceiling.
Using the Kreg Crown Pro, each piece of crown was cut and fitted in typical fashion and attached with finish brads. Crown moulding! Is it "molding" or "moulding"? I like "moulding." It makes me feel British. And intelligent. Whoa. British Intelligence. Do you see my Pot Farm pokin' out?
More lovely crown... I'm pretty sure that's Robert Irvine on my TV. Would he approve of my new kitchen?
Remember my blank wall surrounding the range hood and pot filler? Philly came up with an ingenious design of his very own to install the floating shelves I had drawn into the kitchen plan. Most commercially available floating shelf hardware is designed for shelves that are at least an inch and a half thick. We had solid wood shelves that measured a true one inch thick and eleven inches deep. The biggest problem was coming up with mounting hardware that could fit inside of the shelf and yet be strong enough to not sag. One of the keys to Phil's success was having one end of each shelf butt up against a cabinet to ensure side support as well as support from the back of the shelf. He ripped the depth so the shelves were tight against the wall cabinet on one side and also fit snugly behind the inch edge of the face frame of that cabinet. He purchased some long lag bolts about 7" long and 5/16" diameter. He cut the heads off and that (now) smooth end of the bolt would be inside the shelves after they were drilled, and the coarse threaded part of the bolt went into a wall stud.
The height was critical, but the side-to-side wasn't. The shelves are 24" long, and since wall studs are every 16", he knew he would have support somewhere between the middle and the end of the shelf. Once carefully measured and marked, the wall studs had pilot holes drilled for the lags.
The shelves were drilled for depth using a drill press so the holes were perfectly centered in the boards. After the shelves were drilled to accommodate the lags, it was time to fit them. He put some construction adhesive in the holes of the shelves and slid them over the lags. While holding them level in both directions, he marked, drilled, and screwed the end of the shelves to the cabinet side. Using two screws inside each cabinet a couple inches from the front and back of the cabinet made for strong, level, and very solid shelves that appear to be floating against the tile. Bam!
Hey...someone get that squash out of the photo shoot. The shelves seemed to have acquired a bit of clutter.
Here's the before:
And the after!
See the full blog post in the link below, and thanks for visiting! Watch out for those squash!!
Enjoyed the project?
Resources for this project:
See all materials
Any price and availability information displayed on [relevant Amazon Site(s), as applicable] at the time of purchase will apply to the purchase of this product.
Hometalk may collect a small share of sales from the links on this page.More info

Want more details about this and other DIY projects? Check out my blog post!
Published April 10th, 2015 3:00 PM
Comments
Join the conversation
2 of 281 comments
-
 Michel Romage
on May 14, 2023
Beautiful, I am sending this to my daughter and huby. They are in the process of building a home in MA.
-
-











Frequently asked questions
Have a question about this project?
Lovely, but you do realize that (especially with your range hood sucking up) all that stuff on your shelves will soon be coated with grease? I don't even fry anything and the clock above my stovetop is always getting sticky. I do like your "Pot Farm" though! Best of luck!
This looks great! I love the cabinet color!
I don't understand the thought process of ANY builder or kitchen designer who does not build the cabinets all the way to the ceiling! Same with open shelving, which is all the rage now. Who wants to periodically take the all the dishes and things off the shelves, clean the dust and grease off the shelves, then put it all back, only to repeat that process later on? It makes no sense to me.
It does look wonderful........but I always wonder about 'grease' so close to stove?