Built in Bookcase Hack Using Kitchen Cabinets and Bookcases

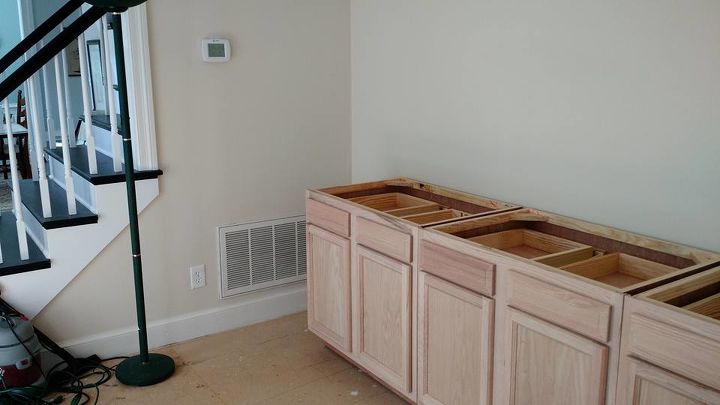
Used 3-36" unfinished kitchen cabinets, and 3-36" unfinished bookcases. I installed base cabinets, added 2x4's under toe-kick to fill in toe-kick area, then added baseboard as I wanted a more built in look. I put price @ $2200 for cabinets, bookcases, countertop, paint, trim, hardware. Plus I replaced basic euro slides with soft close ball bearing slides. If you replace slides, do this before you install cabinets. I sprayed 1 coat of primer and 2 coats of paint outdoors. Prior to installing.
cut bottoms of bookcases, to desired height, taking into account the crown molding I was going to use. I added blocks of wood to top left and top right (front) corners of bookcases, so I had something easy to nail crown molding to later. Added crown molding to entire room, and added fluted casing between bookcases; along with plinth blocks and rosettes. Also added small fluted strips to seams of base cabinets.
I salvaged the baseboard. I could not find a match anywhere. So rather than re-baseboard the entire room, I cut the baseboard off the wall, and moved this to the front. Since this had to be longer for the front of cabinets due to miter's.. I cut extra away from wall. I took the side baseboards from an upstairs closet. The wall baseboard was not a bit too short, and difficult to mitre the inside corner properly. So I made little inside corner/plinth blocks for the inside corner to get around this problem.
Make sure you buy sturdy base cabinets. The ones off the shelf at the big box stores were falling apart on the shelf. I got mine in Chesapeake, VA at Home Emporium. Bookcases at Goodwood Furniture in Virginia Beach. Fluted casing, plinth, rosettes and hardware I got online at Home Depot. I pre-drilled all items including molding before nailing or screws to prevent cracking. The best tool to have on this project and around the house in general, is the Rockwell Oscillating tool; best tool I ever bought (even used the scraper attachment to remove old caulking around my garage doors). I Chose the Rockwell brand, as any brand blades will fit this tool.
Cut bottom off bookcase's, as I wanted a continuous countertop/hutch look.
3 unfinished bookcases after I cut bottoms off of them. Just dry-fitting here; before I paint them outside. These bookcases from Goodwood Furniture were perfect. I could actually unscrewed the bottom shelf assembly. Then I ripped the bottom shelf, and reused the strips for back support for bottom area of the plywood back. Then screwed to the wall and screwed the front faces together. The seams between the bookcases were perfect size for using the 2-1/4" fluted casing, plinth blocks, and rosettes (all House of Fara brand from a Home Depot)
I would have preferred to go wall to wall with bookcase, but as you will in pic's, we had air intake grate(with filter behind) on one wall that we need to keep access to; so we centered this project on the wall.
Inside corner plinth block, installed, as I had shoe molding vertically from top near crown, down to counter top.
Then ring pulls and knobs. Before installing base cabinets, I removed the Euro-drawer slides that came in cabinets, and replaced with soft-close ball bearing slides. Top is a butcher block slap, I primed and painted (I primed all sides, especially bottom, and then painted. I painted everything before installing with primer, and 2 top coats of paint, then, after touch up painting, re-coated outside once more when I was done. I also had an electrician install 3 outlets on the wall prior to installing anything, so I could pull them forward into the bookcase (be sure to use a spark guard if you do this, it's a sleeve that fills the gap, so no wires/outlets etc., is exposed to wood backing).
Ring pull and knobs
Some shelves installed, we have a few more to use if we want.
I do plan to do a similar project in another room. Here I wanted deep counter-top; hence kitchen base cabinets. In other room I'm going to do, I'll build a low platform with 2x4's on floor, then use upper kitchen cabinets as my base cabinets (18" deep, no drawers), then put counter top on top of "base cabinets", and 12" deep bookcases on top.
Enjoyed the project?
Suggested materials:
- Kitchen Cabinets (Home Emporium)
- Bookcases (Good Wood Furniture)









Frequently asked questions
Have a question about this project?
I love this project and how it turned out...simply ingenious solution for building a beautiful bookcase from scratch.
I have a question, would it be possible to space the bottom cabinets apart enough and use a wider shelf between cabinets and bookshelves to incorporate a desk with a kneehole for an office chair? In other words, create a book case that one also use as an office desk in a study?
Thanks for your suggestions and advice.