


DIY Ottoman From Old Coffee Table
$60.00
2 Hours
Easy
Make a chic DIY ottoman from your old coffee table; Bringing new life to old pieces
Turning something old and nonfunctional into something new and usable is a great way to recycle some old pieces that you may have laying around your house or at your local thrift shop. The best part: you can turn them into anything you want! My daughter, who moved back in with my husband and I after switching colleges is saving up money to move into her first apartment after graduation so we are beginning to make pieces for her new place. The best part about this chic DIY Ottoman project is that there are no rules, you can do whatever you’d like.
Here are the basics of what you will need.
-Old coffee table (square, rectangle, or circle)
-Furniture cushion 3-4 inches thick (this can be bought at the craft store or even your local Lowes)
-Mod Podge (or some other adhesive)
-2 yards of fabric of your choice
-Staples
-Staple gun
-Decorative nail heads
-Paint of your color choice
-Hammer
-Hot glue gun and glue sticks
-Cambric fabric
-Scissors
Here are the steps you will need to take to turn an old coffee table into a chic DIY ottoman:
1. Paint the coffee table the color of your choice, this will bring new life to a boring old piece so you can make it your style.
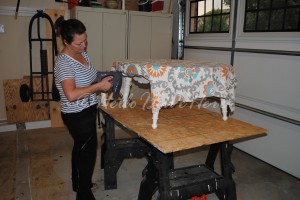
2. After the table is dry, lay the furniture cushion on top of the table and trim the cushion so the top is covered in the cushion. (We already had our cushion glued on before we painted)
3. Glue the cushion down to the table top.
4. Place the fabric over the glued down cushion to make sure it is centered the way you want if there is a pattern. Then life up a corner at a time and spray Mod Podge glue over the cushion in that are and smooth it out. Make sure to do this on all sides so the fabric doesn’t move around.
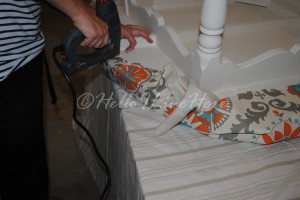
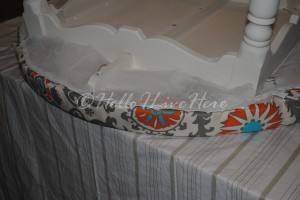
5. Once it is placed the way you like shoot a couple of staples into the underneath of the table to hold the fabric into place. Flip the table over so the fabric is on the counter (make sure the counter is covered with a clean sheet or covering so the fabric doesn't get dirty) and begin stapling the rest of the fabric to the bottom of the table.
6. After the fabric is all stapled to the bottom place the cambric fabric over the whole bottom of the table and glue it down with the hot glue so the underneath will have a finished look. (If you are not familiar with cambric fabric it is usually seen on the underneath of upholstered furniture as a finishing.)
7. Once the cambric fabric is glued down flip over the table so it is standing on its legs. Hammer in the decorative nail heads around the side. We used a nail head roll where you only put in nail head every few inches but the whole thing will look like it has nail heads around the whole piece.
8. Place in front of the couch and enjoy your new DIY ottoman!
This whole project took my daughter and I about two hours to complete and we spent less than $60. A new ottoman of this size can cost you upwards of $300, making your savings around $240. Not bad to get this chic piece for your new space.
I hope you enjoyed this how to!
Happy DIY Everyone!
-Linda and Crysta
Turning something old and nonfunctional into something new and usable is a great way to recycle some old pieces that you may have laying around your house or at your local thrift shop. The best part: you can turn them into anything you want! My daughter, who moved back in with my husband and I after switching colleges is saving up money to move into her first apartment after graduation so we are beginning to make pieces for her new place. The best part about this chic DIY Ottoman project is that there are no rules, you can do whatever you’d like.
Here are the basics of what you will need.
-Old coffee table (square, rectangle, or circle)
-Furniture cushion 3-4 inches thick (this can be bought at the craft store or even your local Lowes)
-Mod Podge (or some other adhesive)
-2 yards of fabric of your choice
-Staples
-Staple gun
-Decorative nail heads
-Paint of your color choice
-Hammer
-Hot glue gun and glue sticks
-Cambric fabric
-Scissors
Here are the steps you will need to take to turn an old coffee table into a chic DIY ottoman:
1. Paint the coffee table the color of your choice, this will bring new life to a boring old piece so you can make it your style.
2. After the table is dry, lay the furniture cushion on top of the table and trim the cushion so the top is covered in the cushion. (We already had our cushion glued on before we painted)
3. Glue the cushion down to the table top.
4. Place the fabric over the glued down cushion to make sure it is centered the way you want if there is a pattern. Then life up a corner at a time and spray Mod Podge glue over the cushion in that are and smooth it out. Make sure to do this on all sides so the fabric doesn’t move around.
5. Once it is placed the way you like shoot a couple of staples into the underneath of the table to hold the fabric into place. Flip the table over so the fabric is on the counter (make sure the counter is covered with a clean sheet or covering so the fabric doesn't get dirty) and begin stapling the rest of the fabric to the bottom of the table.
6. After the fabric is all stapled to the bottom place the cambric fabric over the whole bottom of the table and glue it down with the hot glue so the underneath will have a finished look. (If you are not familiar with cambric fabric it is usually seen on the underneath of upholstered furniture as a finishing.)
7. Once the cambric fabric is glued down flip over the table so it is standing on its legs. Hammer in the decorative nail heads around the side. We used a nail head roll where you only put in nail head every few inches but the whole thing will look like it has nail heads around the whole piece.
8. Place in front of the couch and enjoy your new DIY ottoman!
This whole project took my daughter and I about two hours to complete and we spent less than $60. A new ottoman of this size can cost you upwards of $300, making your savings around $240. Not bad to get this chic piece for your new space.
I hope you enjoyed this how to!
Happy DIY Everyone!
-Linda and Crysta
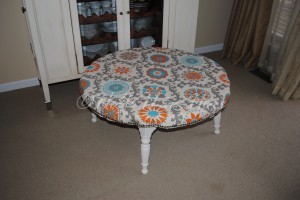
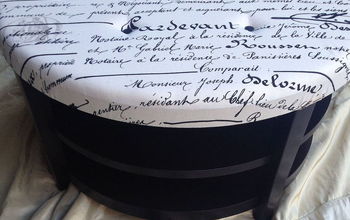
Finished DIY Ottoman from and old coffee table made by Hello I Live Here
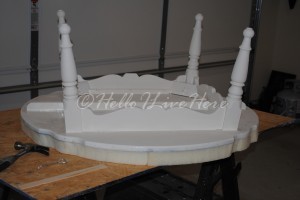
Painted table upside down after putting on foam and cutting to table shape (used spray adhesive.
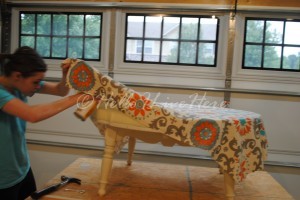
Crysta adding the adhesive to help fabric stay in place
Crysta smoothing the fabric
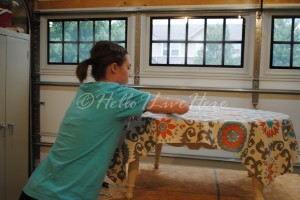
Stapling the fabric.
Linda adhering the fabric
Adding the under fabric to cover your staples.
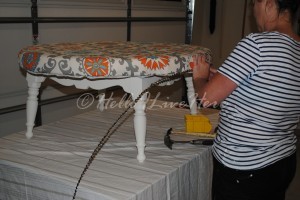
Adding the nail head trim purchased from Joann's Crafts.

Want more details about this and other DIY projects? Check out my blog post!
Comments
Join the conversation
4 comments
-
Cool!!!
-
LOVE IT.....THANK YOU FOR SHARING.....


Frequently asked questions
Have a question about this project?