Turn an Old Rake Into a Kitchen Utensil Hanger

by
Rob & Courtney M, Hometalk Team
(IC: paid contributor)
6 Materials
$5
1 Hour
Easy
Just like our pots and pans cabinet, our utensil drawer is a hot mess! In our six years together, we've acquired all kinds of kitchen utensils, but we have a handful that we use on a regular basis so I (Courtney) thought this would be a unique (and of course rustic) solution to our mess. We had this broken rake laying around last year and I thought eventually I'd make it into something (yes, Rob had thrown it away and I had gotten it out of the trash, because one man's trash is another man's treasure, right?), so I hid it away in our garage and then rediscovered it this week.
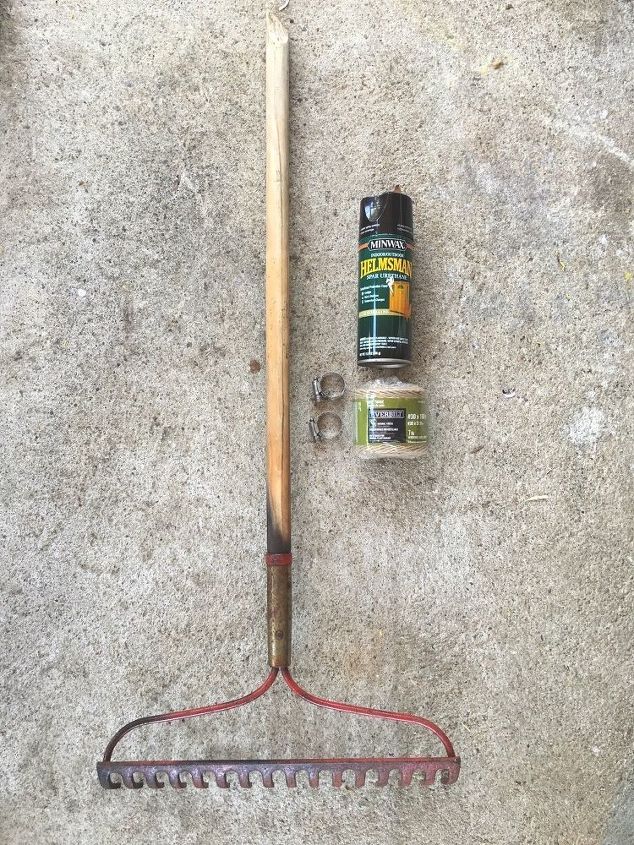
Supplies: -metal rake (If you have a broken one laying around, great! If not, you can grab one at a hardware store, or maybe even a yard sale or thrift place--not sure if they sell stuff like gardening tools.) -spray Spar Urethane -jute twine (or leather) -hose clamps (You'll find these in the plumbing section of a hardware store--I used 1/2" x 1-1/4" clamps.) Not Pictured: -drill -screws/anchors -chop saw -sharpie -wire brush *This project only cost me $5 because I had all supplies on hand except for the hose clamps and twine.
STEP 1: Cut handle Before I did anything else, I cut the rest of my handle off. I didn't measure it out or anything--I just eyeballed how long I wanted it to be and cut.
STEP 2: Prep rake Next, I took a wire brush just to knock off any debris on the rake, then sprayed my sealer to protect it. It's ok to spray the wood and the rake end.
STEP 3: Plan and place your hose clamps After my rake dried, I measured where I wanted my hose clamps to be. I would recommend flipping your rake over on the side that will be against the wall and marking your clamps themselves so you know exactly where you want to drill your hole. *Note: I would have mounted my rake upside down, but the claws weren't curved enough to hang my utensils which is why I chose to mount it the way I did.
STEP 4: Attach hose clamps Next, I opened the hose clamps and pre-drilled a hold where I wanted them to mount to the wall (not pictured because it was such a pain in the behind to do that). Then, I screwed the hose clamps to the wall; I didn't have to use anchors because there was a stud where I mounted them.
STEP 5: Attach an extra screw for support (optional) Just to be sure that my rake wouldn't sway or move, I added an additional screw under the claws. You don't have to do this step but I wanted to be extra certain my rake didn't move at all once I hung up my utensils.
I'm really happy with how this hanging rake turned out.
Hindsight, I would probably use leather for hanging instead of the twine but I do like the way the twine looks--I'm just thinking for cleaning purposes, the leather may hold up longer. Either way, I love the unique look of the rake holding my most-used utensils.
Enjoyed the project?
Suggested materials:
- Rake
- Helmsman spray Spar Urethane (Home Depot)
- Jute twine
- Hose clamps
- Drill (Home Depot)
- Screws (Home Depot)
Published July 13th, 2016 10:02 AM
Comments
Join the conversation
2 of 98 comments
-
 Pamela Foster
on Apr 08, 2019
I'm going to use a much used family rake, complete with its last handle, very rustic, we'll say. I am covering the tines, very crooked and well used, with shrink-tubing. Very protective, especially if utilizing it for glassware. Plus mine will be hung with handle up.
Great project!
-
-
 Ann57600157
on Feb 21, 2024
For safety reasons I think it is a bad idea to hang anything with metal prongs sticking out unless above the head level of even a tall adult…
-








Frequently asked questions
Have a question about this project?