How to Make a Wind Chime: Abalone Shell Wind Chime Tutorial

by
The Magic Crafter
(IC: blogger)
6 Materials
$16
1 Hour
Easy
What do you do with an Abalone Seashell? These magical looking shells are without a doubt one of the most beautiful treasures that you'll find in the ocean (or at your local arts & crafts store) but... what can you do with them? As a professional mermaid and a long-time crafter, I've pondered this question many times. One day, while gathering materials for a completely different project, an idea occurred to me. I was looking at an abalone shell in one of the isles of a local store (when I should have been looking at beads) and the thought popped into my head that the rainbow-hued shell in my hand would make a gorgeous wind chime.
So... at that very moment, my mermaid instincts kicked in and I emptied the basket of materials I had collected for my other project and got to work on developing a technique to bring to life the nautical home decor piece that was swimming in my head. Here's what I came up with.
Here is how to make an abalone shell wind chime.
{
"id": "4102352",
"alt": "",
"title": "",
"video_link": "https://www.youtube.com/embed/Np1bOxaAgLs",
"youtube_video_id": "Np1bOxaAgLs"
}
{
"width": 634,
"height": 357,
"showRelated": true
}
Above, you will see a video. That video is a tutorial showing you how to make the fun mermaid-y craft I have been talking about. This is great if you don't feel like reading a ton of words... Otherwise, you can keep scrolling down to read the step-by-step explanation of how to DIY your own wind chime. Personally, I like videos, since I have the attention span of a ferret. But hey... you have choices!
STEP 1: GATHER YOUR MATERIALS:
Before you even think about making this delightful sounding beauty, you want to make sure that you have all of the materials that you'll need. Take this list with you to the crafting store so that you remember why it is that you came in there in the first place.
MATERIALS:
- ONE Abalone Seashell (You should be able to find one in the isle of your arts & crafts store where other shells, starfish and fishing net is found. Make sure the shell you purchase has at least 5 holes at the top and that it feels quite sturdy. BE PICKY!)
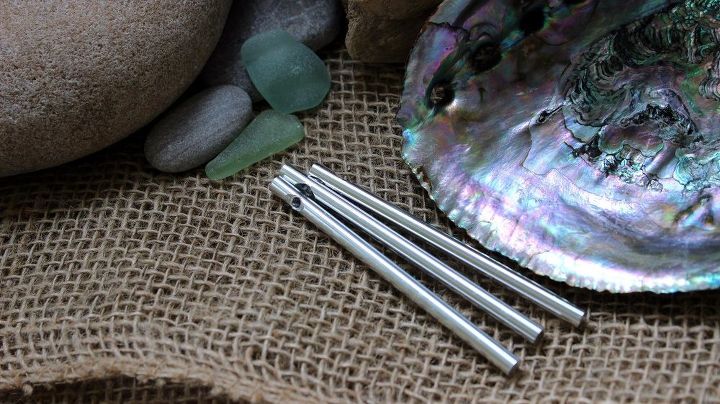
- THREE Small Metal Wind Chime Pieces (I bought a cheap pre-made wind chime and disassembled it.)
- VARIOUS beads of your choice (I primarily used glass pearls and mixed in a few crystal/gem looking beads for variation. While I stuck with a blue-toned color scheme, feel free to mix it up. Soft purples, grays and greens would compliment the color of the abalone shell too!)
- WHITE hemp cord (Hemp cord is a mermaid's #1 choice, since it is water-proof... but you can use another material in place of the hemp if you would prefer.)
- CLEAR transite string
- SCISSORS
STEP 2: ADDING THE CHIMES:
Measure out approximately 2 feet of the clear transite string and thread it through one of the metal wind chime pieces. Line the two ends of the transite string up and allow the wind chime piece to fall to the center of the string. Now tie a basic loop-shaped knot to secure the chime onto the string. (See 1:47 of the video if you need help understanding how to do this.) Tie a few additional knots on top of your first knot to make one really big knot. This will keep any added beads from slipping over the knot and butting up to the end of the chime. Don't worry! It'll make more sense in a second.
STEP 3: DECORATE WITH BEADS:
Now is your time to let your creativity shine! Add some beads to your string by pulling both strands of the transite string through each bead. To make the beads appear as they are floating, tie a few knots in your string every so often. You can refer to part 2:40 to watch my technique. Use whatever colors, sizes and shapes of beads that suit your fancy. This is all about making it fit your desired look, after all. I'm simply giving you a basic template from which you can modify. Experiment! Have some fun with it!
STEP 4: CONNECT THE BEADS TO THE ABALONE SHELL:
When you are satisfied with the look and length of your beaded wind chime strand, go ahead and take the two strands of transite string at its end and pull them through the first hole in your abalone shell. You can see this being done at 3:20 of the video.
To secure the bead strand to your shell, flip the shell over so that its rough side is facing you. Grab the ends of the transite string that should be poking through the first hole of the shell and drop a medium sized bead onto the strings. This bead should be larger than the hole of the abalone shell. Loop the ends of the string back through the bottom end of the bead and up through it's top. Tie a few knots so that you KNOW that there is no way that string will come undone. This is a bit confusing to explain in writing, so if you're feeling confused, try watching 3:40 of the video tutorial. Trust me... it makes more sense when you see it being done!
STEP 5: REPEAT STEPS 1 THROUGH 4:
Since you have the basics down, I want you to create two more beaded wind chime strands using the techniques shown above. They don't have to be the exact same as the first one, however. In faaaact... I think variation makes the completed project much more interesting!
STEP 6: CREATE DECORATIVE STRANDS:
There are two empty hole on your abalone shell: hole #2 and hole #4. What I'm going to have you do next is very similar to what you've been doing in the previous steps. Cut yourself about 2 feet of transite string and basically follow steps 1-4 again... but this time using a special bead of your choice in place of the metal wind chime piece. If this sounds unclear to you, please watch 5:27 of the tutorial video to get a better idea of what I mean.
Just as you did with the other fancy beaded pieces that you made, you need to attach your wind-chimeless bead strand to your abalone shell. I used a pretty gem-like bead to keep the string from slipping through hole #2. I think it helps add interest (and some extra sparkle!) to the back of the wind chime. Again, do whatever feels right to you.
Do the same thing for the fourth hole of the abalone shell. And then... only one more step!
STEP 7: HANG YOUR WIND CHIME:
I obviously can't see it, but I know your wind chime is looking great! We have to make sure you can hang it though, so now is the time to pull out your hemp cord. For this step, measure out about 3 feet of the hemp cord. Working from the outside of your shell, pull one end of the cord through the first hole of the abalone shell and the other end through the fifth hole. When you are doing this, you will want your bead strands to hang in front of the cord, so bring the cord behind them. Line up the two ends of your cord and let the shell fall to their center. Next, make a loop with the hemp cord using the same type of loop that you used to hang your metal wind chime pieces on to your transite string. (Watching 8:36 of the video may help you to understand this better.) If you have super long bits of extra cord hanging down, you can feel free to cut them off.
Congratulations!! Your abalone wind chime is complete! You now have a beautiful piece of beachy home decor that is fit for a mermaid. You can hang it in your room, hang it in your mermaid-cave, or hang it anywhere else in your house that could use a seaside flair. (I put mine outside temporarily to take a photo of it... since my indoor lighting is terrible! But I haven't actually kept mine outside for long stretches of time. Do so at your own risk. It should hold up fine, but I'm honestly not sure!  ) Also, while I USUALLY like to have the inner part of my abalone shell facing outwards, the textured back is equally as stunning as the shell's rainbow-hued interior. This wind chime is totally reversible, so hang it however you like it best!
 ) Also, while I USUALLY like to have the inner part of my abalone shell facing outwards, the textured back is equally as stunning as the shell's rainbow-hued interior. This wind chime is totally reversible, so hang it however you like it best!
 Thanks for spending some time to craft with me. I hope you enjoyed this project! If you want more videos like this (and the odd mermaiding video or two) then please check out my other videos, which can be found on my YouTube Channel. You can also visit me at my website, which is www.themagiccrafter.com
Have a magical day! ♥
XOXO- Mermaid Phantom
Enjoyed the project?
Suggested materials:
- Abalone Seashell (Crafting Store (Or online. See links in video))
- Metal Wind Chime Pieces (Salvaged from an old wind chime)
- Glass Beads and Faux Pearls (Crafting Store)
- White Hemp Cord (Crafting Store)
- Clear Transite String (Crafting Store)
- Scissors (Crafting Store)

Want more details about this and other DIY projects? Check out my blog post!
Published July 29th, 2017 1:51 PM







Frequently asked questions
Have a question about this project?