


Bathroom Vanity Sink Room Remodel

4 Materials
$2000
4 Months
Advanced
We bought this home 2 years ago and had our BR in the formal dining room while tackling one room at a time. The real MBR was our work room the entire time, had the miter, scroll saw, hand tools, saw horses, and all the trim pieces in there. We finally started on this 4 room (MBR, dressing/sink area, walk-in closet and shower/toilet area in Jan. 4 separate posts due to the huge undertaking. Click on my name to see the other postings as I upload these!
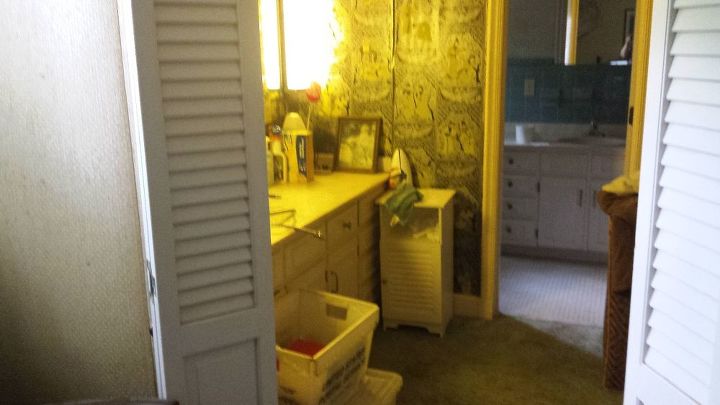
First pic of the room when we were looking at this house for the first time, prior to purchase. You can't see it, but the wall paper was geisha girls, in shiny reflective paper; there were 2 four ft florescent lights on either side of the flat mirror, and a one sink vanity, wall to wall 80 inches. We had a wall paper party the week we closed, and our wonderful family came out to help us tackle every room in one week. The next step was removing the popcorn ceiling (after having it lab tested for asbestos).
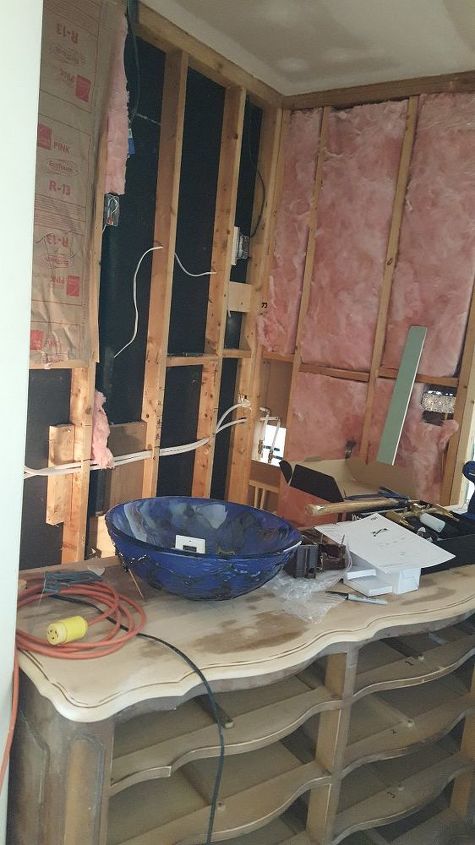
Hard to show all of the steps in the project with 15 pics, but we pulled down all the wall board on this side of the room. We moved the water lines into the wall for the wall mounted faucets. The vanity I had planned seen in the forefront of this photo ($250 french provincial dresser). I have been carting around those sinks I purchased 10 years ago for my forever home (this is it!) We replaced the cast iron pipe in the wall for drainage and vent with PVC using a rubber transition. Increased the electric outlets for lights from 2 to 3 (hired an electrician for this) going across the wall. Moved the vanit in to see where I had to mount the faucets.
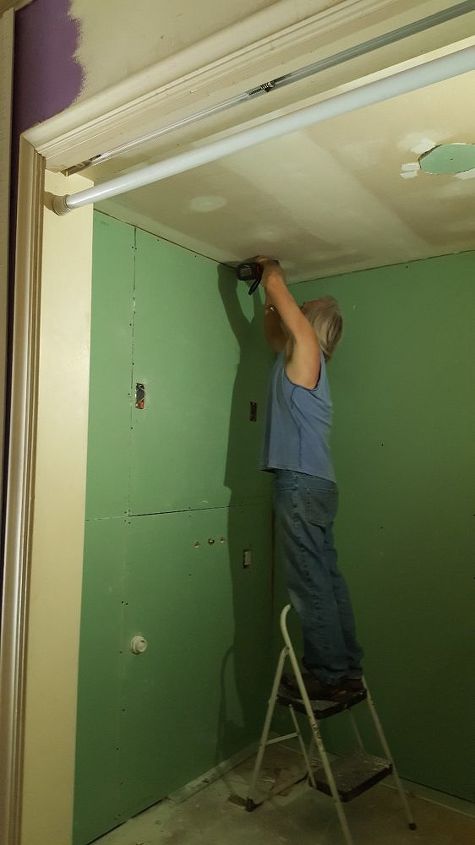
Faucets installed, electric boxes ready, drain installed, new and higher rated batting for insulation, and now the dry wall goes up.
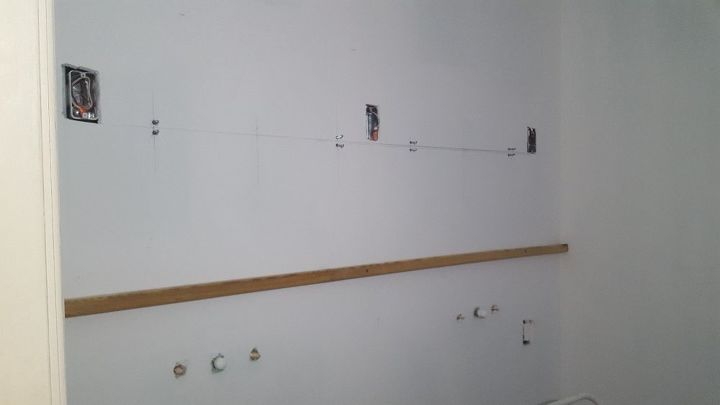
This is where I started prepping for the tile I wanted to install. We had bought 2 oval mirrors and I didn't want to drill tile afterward to hang them. We estimated where they would go over the faucets as evenly as we could given where the lights were mounted, and installed the hardware for hanging the mirrors into the wall.
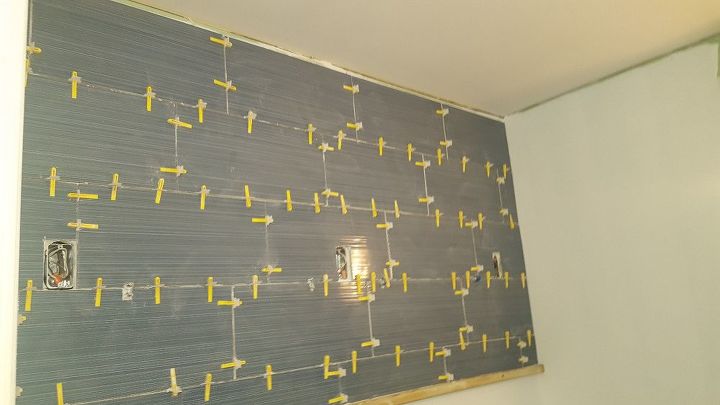
porcelain tile is up, the outlets for the lights were easy to cut in.
I used the clip system to install the tiles with thinset, buttering the back of each tile as I went. We actually had the tile saw in the BR on a couple of old shower curtains to cut as we installed. Having the hardware in place for the mirrors made this easy to trim out around the screws.
I used the clip system to install the tiles with thinset, buttering the back of each tile as I went. We actually had the tile saw in the BR on a couple of old shower curtains to cut as we installed. Having the hardware in place for the mirrors made this easy to trim out around the screws.
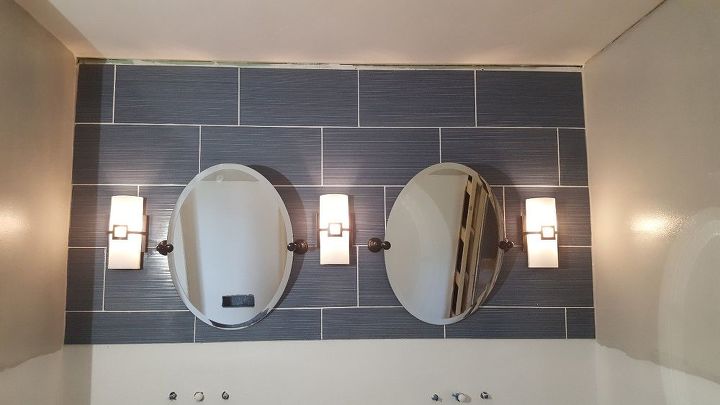
I chose white grout to highlight the tile and match the wainscoting I was installing below. Installed the lights and the mirrors.
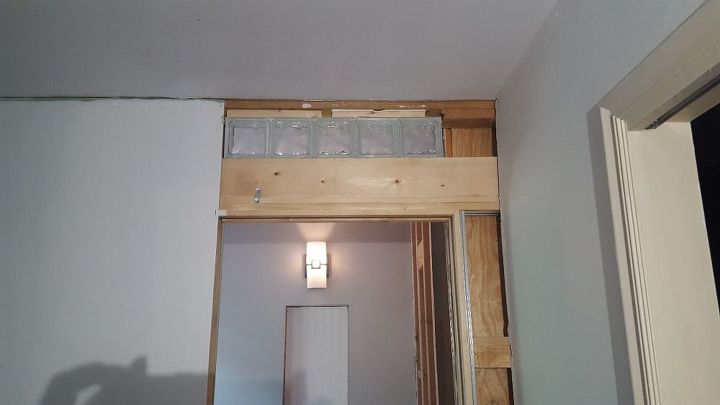
I wanted glass blocks up over the door leading into the shower/toilet room so I left that open when we drywalled and ordered 5 blocks. We had pulled the door off (24 inches) and increased the size to install a 30 in pocket door. I shimmed up around the blocks and installed them with adhesive grout.
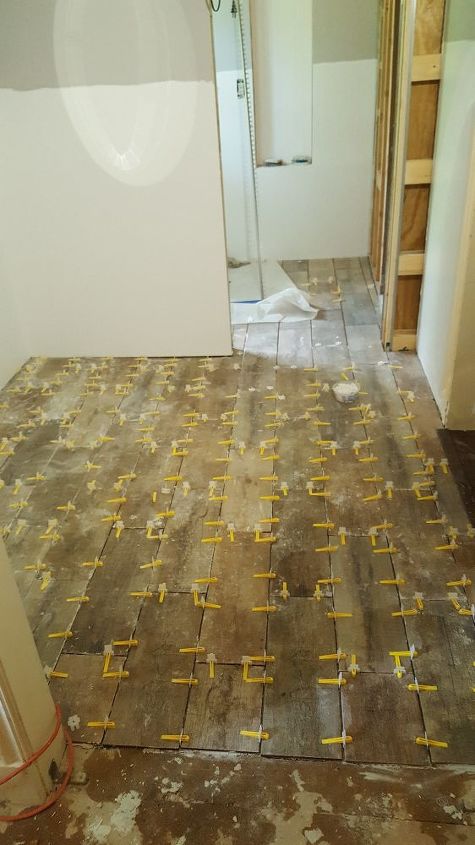
We laid the tile next, chose a wood grain look for both rooms. After the tile set overnight we used a gray grout to fill it in. The base of this floor was even (2 layers of plywood original) with the ditra I used in the shower room, so I just bought thin set for plywood installation.
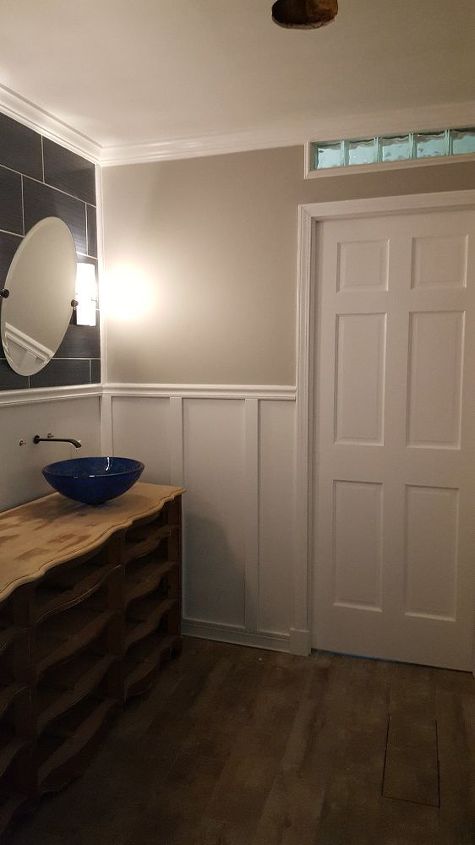
I intended to do wainscoting and purchased the kits from Home Depot (chair rail and baseboard) and 2.5 in boards for the horizontal. I set them on 13 in gaps and made both rooms even to where I installed the tile in the sink room. After the horizontal boards were installed, I caulked all four sides so no gaps could be seen, then painted it. Bought a doorway trim kit for this side of the wall, painted it and installed it around the opening. then installed the trim around the sides of the tile to give it a finished look. This was my first time installing crown molding.....as my intelligent brother in law Jerry says, "nothing is square in an old house, caulk and paint make it look what it ain't!"
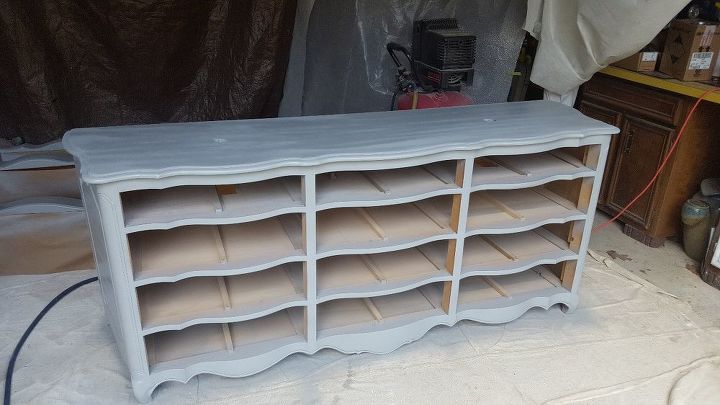
For those of you who hate it when someone paints wood, let me warn you the next few pictures are disturbing, I'd leave now! I did tons of research on painting this with automotive paint after seeing the same dresser in yellow on pinterest. Paint store employees tried to talk me out of it. I finally had all I needed to start. I wanted a chameleon paint (changes color as you walk by) that was blue, purple, and green. Always wanted a car painted this color so I did the dresser instead. I bought the motorcycle paint kit on line, from The Coating Store, figured it was enough to do this. Went to Sherwin Williams and bought primer, borrowed an auto spray gun from a friend, I already have a compressor. One of the blogs said to put down a coat of lacquer before the color coat, so I bought canned spray lacquer from Lowes. This is the primer, 4 coats.
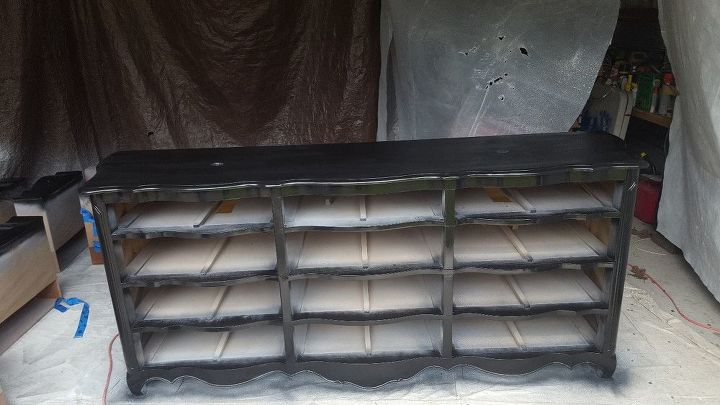
this is with the lacquer coat, (3 coats), the the base coat went on (3 coats), the color coat (psychotic illusions) 3 coats, then the clear coat (4 coats).

color coat on the drawers
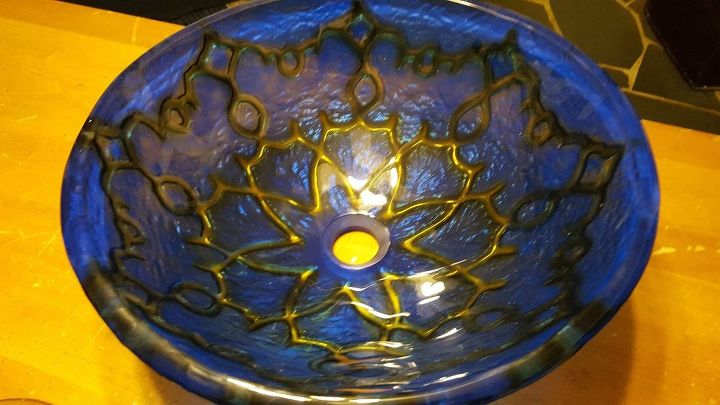
These were the bowls I have had for years waiting for my forever home!
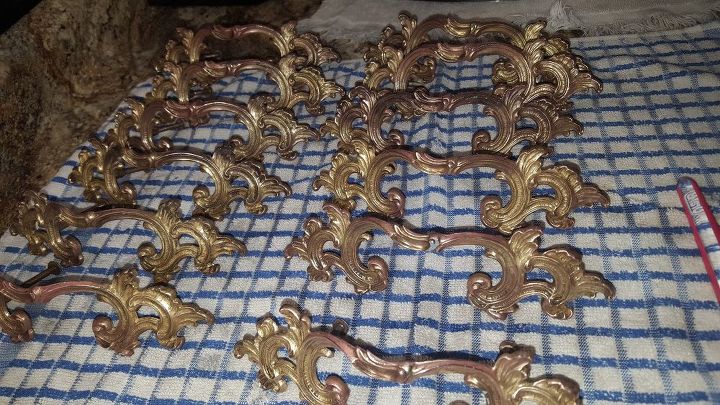
The handles were so tarnished you couldn't tell they were brass and copper. Overnight soak in vinegar and baking soda, the a quick brush with vinegar and baking soda paste, then with brass cleaner. They turned out beautiful!
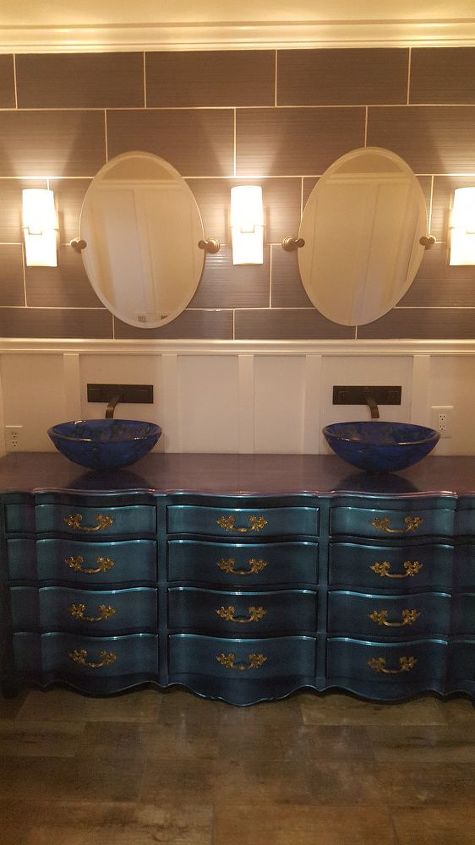
The end result, doesn't show the deep blue of the tile, or the color changing capabilities of the paint. But it turned out better than I imagined.
Comments
Join the conversation
2 of 3 comments
-
This is the best! I know there was lots of hard work behind it, but you nicely showed each step. I also love the color changing paint and wish it was on my car. Terrific job!!
-
Phenomenal paint job and I love that the faucets are on the wall, SOOOO much easier to keep clean. Nice work.


Frequently asked questions
Have a question about this project?
Did you use the same paint on the top as you used on the drawer fronts?
Those bowls are magnificent, as is your paint job.
Did you lose the use of more than the top row of drawers in order to accommodate the plumbing for the bowls? Were the top drawers removed and only the fronts of
them glued onto the front?
What did you finish the drawer pulls with to keep them from tarnishing again?