


Mercury Glass Style Mirror

by
Pamela
2 Materials
$25
3 Hours
Easy
I always liked the look of old distressed glass. This is how I turned an old window into a mercury glass styled mirror.

Flea market finds !
I found a turn of the century, dirty old window, that I knew would be perfect for my project. All the window panes were intact, without chips or cracks. I don't have a picture of the first step... it might not be necessary if the window panes are strong , but a couple of mine were loose , so I used some CLEAR silicone caulk to keep them in place securely , keeping the line as thin as possible so you don't see it from the other side. * make sure , before doing any work , you pick a side that you want to be the front of your mirror, then used the "back" side to secure and paint.

Cleaning off years of dirt !
After letting the silicone dry completely, clean off both sides of the window .
Turn the window so you are working on the "back" side. Now use painters tape to protect any wood that you don't want to get paint on. Since this is the "back" you don't need to tape off anything, if you don't want to ...I chose to cover the outer frame, but not the wood between the panes.
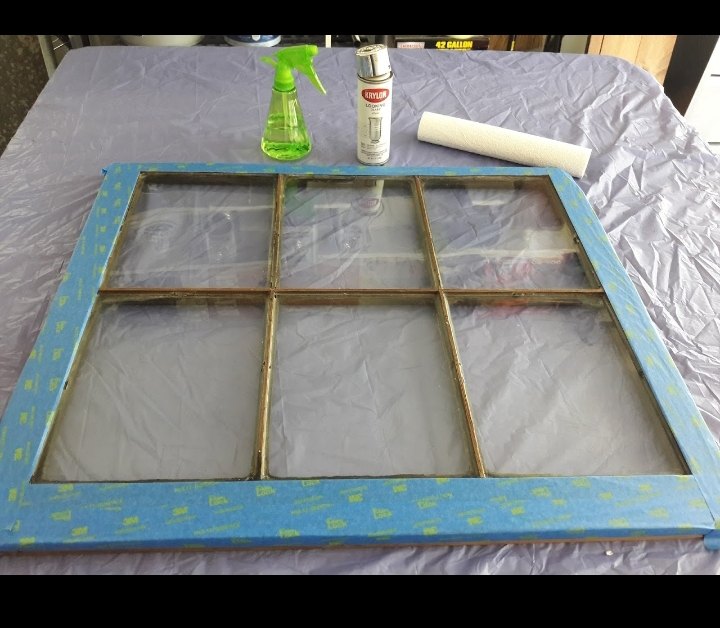
Next step, get ready to start the aging process by gathering all the supplies :
*Paper towels
*Spray bottle with a 50/50 mix of
White vinegar & water
*Krylon looking glass spray paint . This
Spray paint is a little more expensive
Then other spray paint and it's a
Smaller can.
* spray paint in brown or black for
Backing ( not in picture )

Next spray a light random spray of the vinegar/water mixture. You don't want it to look even . You want it heavy in some areas and light in others.

Next bunch up a few pieces of paper towel, set aside. Now following the instructions on the looking glass spray paint...(spraying over the vinegar/water)
Do a LIGHT even coat across the window.
Going back and forth until the window is covered lightly. Next take the bunched paper towel and randomly blot the window.

After vinegar and water spray
What it looks like after spraying looking glass paint over the water..
Now what it looks like after blotting it with a paper towel
Next repeat 2 or 3 more times , letting dry between coats ( it dries fast )
This is what it looks like after 3 coats

Now for the backing coat. Every tutorial
I've seen used a flat black spray paint for the final coat . This coat shows through from the other side where there is no paint cover. I decided to use some bronze / brown spray paint that I already had. I thought it would go better with the old wood of the window frame. For this last coat use even strokes back and forth completely covering the glass. Do a heavier
Coat than you did with the looking glass paint , but not too heavy , just full coverage.

Finished back, after tape removal
Now you can add whatever type of hanger you want to use .

Finished look
Now find a place to hang it ...

Comments
Join the conversation
4 of 6 comments
-
Wow what a great idea. I love it thank you
-
I will be doing this


Frequently asked questions
Have a question about this project?