


Transform Wood With Acrylic Pour Painting

My friend was planning to throw away an old end table and I was thrilled to take it to use it for an acrylic pour project. The unique, mesmerizing process and the gorgeous result makes acrylic pour painting one of my all-time favorite art activities. Acrylic pour painting has grown wildly popular and art studios often host group classes because the results are so universally loved. I love the process, the fact that I can share in creating the DIY project with my daughter, and of course- the end result! What could be more fun than mixing many different colors of paint in one container, pouring them out, then watching them flow and slide like molten lava into a beautiful piece of art?
You Will Need:
- Primer or Sealer for Wood Furniture or Panel
- Dropcloth or plastic sheeting
- Floetrol or other Acrylic Pour Medium
- Artists’ Loft Flow Acrylics Paint
- Water
- Plastic Cup
- Spray sealer
Step 1: Prepare the Wood
My table was very worn and I knew that it would be a casual, outdoor table so I very lightly sanded the surface before beginning the pour. If you are painting a wood panel or piece of furniture that you want on display, sealing the wood is very important. Use an artists’ gesso to seal the wood and then prime before painting. Sealing will prevent any moisture from warping or damaging your wood and primer will help the acrylic paints adhere to your surface better.
Step 2: Protect Underneath Painting Surface
I was painting outdoors and did not protect the ground from paint this time but to prevent messes, place a drop cloth or plastic sheeting underneath the painting area to catch the paint that will fall. The dropcloth may eventually turn into a painting you want to display!
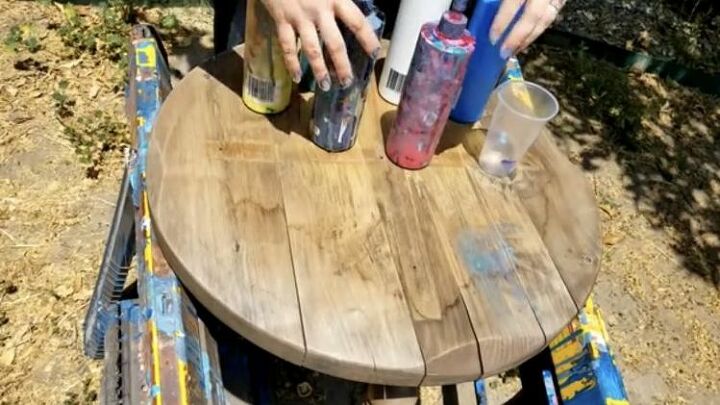
Step 3: Mix Paint for Pour
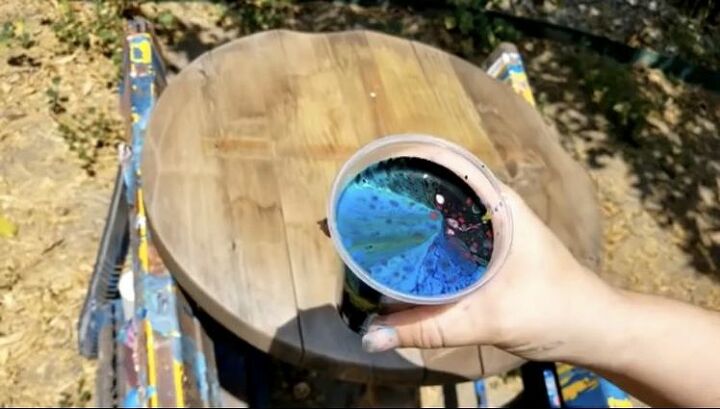
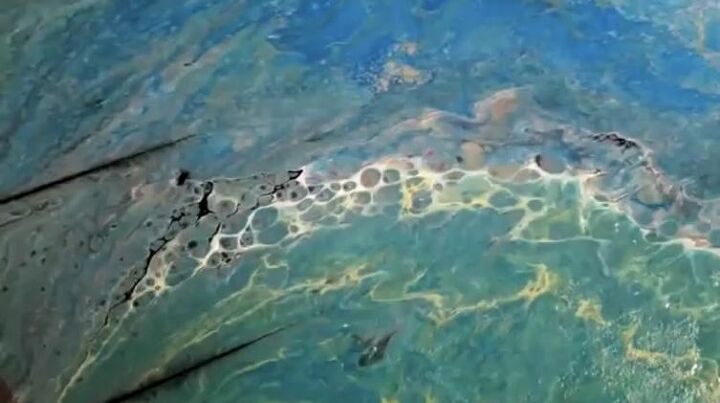
I mixed a pouring medium (floetrol) acrylic paints, and water in several separate bottles for my project. I mixed 5 parts floetrol, 3 parts paint, and 2 parts water in each container. I poured one color at a time into a plastic cup until it was filled. A pouring medium is used to thin and give movement to acrylic paint. It also helps the paint dry with a brilliant shine and is responsible for creating what looks like cells on the surface of the poured paint. You can use one part paint to one part pouring medium for the mixture and then adjust the amount based on the thickness you achieve and desire.
Step 4: Apply Base Color
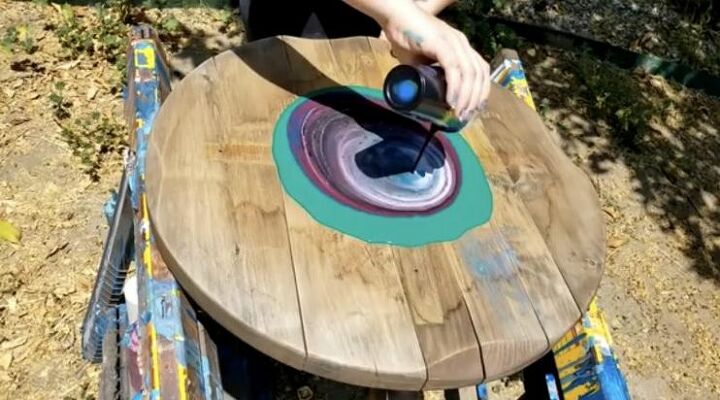
I started my pour with a base of green paint in the center because I have a lot of green paint and don’t use it that often. I poured in a circular direction and created a large round green base in the center of the table.

Step 5: Start Acrylic Pour Painting
I slowly poured the entire plastic cup of paint onto the green paint base. I poured onto the same spot rather than in a circular direction as I had poured the green base. Your paint will be moving and flowing already and mine was flowing in one direction base on the level of my table.
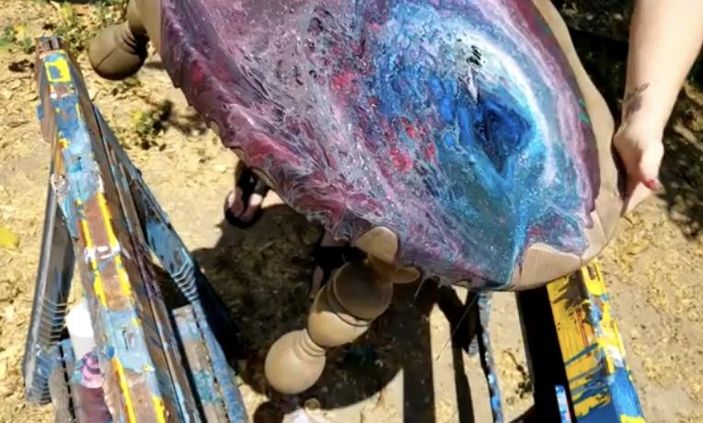
Step 6: Move Painted Surface
I lifted my table and gently tilted it side to side as the paint flowed from the center outward. My pattern had a very strong center pattern and I moved the table around keeping that in the center several times. When the paint is about to touch your hands, turn the surface in the opposite direction. The paint will be dripping off the table and that is fine. Tilt and move until your surface is covered with the amount of pattern and paint that you want.
Step 7: Adjust Pattern if Desired
I wasn’t completely happy with the initial pour and I decided to add more paint to my table and make another pattern on top of the first. This may happen when certain colors or pours don’t produce the kind of cells or lines you hoped to see. You may be thrilled with your first pour and if so, skip this step!
Step 8: Let Dry
The thickly layered paint will need ample drying time and as it dries, you will see changes in color and shine. The pouring medium creates a diamond-like shine that acrylic paint alone would not produce and enhances the look of all of the patterning and cell formation in the paint.
Step 9: Seal Finished Product
My table was going to be used outside and I wasn’t concerned about protecting it but if you want to preserve your artwork, be sure to use a spray sealer and heavily coat the entire surface to prevent nicks, chips, fading, or stains.

I was so excited about how beautiful my finished table looks. My friends and family can’t believe I painted the table and everyone wants me to show them how to do it. This easy project creates stunning, truly one of a kind works of art that couldn’t be recreated even if you tried. That is what makes the acrylic pour technique so special and so worthwhile to try. Even if you don’t have an artistic bone in your body, follow this acrylic paint pour tutorial and create something phenomenal for your own home!
Have you taken an old piece of furniture and completely transformed it with paint or used an acrylic pour to change the entire look and style of a room? Share your painting projects and best practices or find more easy ways to create beautiful modern art for any room in your home at Hometalk!


Comments
Join the conversation
-
Absolutely loved the pour!
-
Would like to try in the future on a worn round side table. Great idea


Frequently asked questions
Have a question about this project?
Very inspirational definitely thinking about trying this is there a reason you put all the colors into the same cup then pour them all at once ? Seems like I would have more control by adding one color at a time ?
I'm making trivets, pour painting on one side and wine bottle corks on the other. I sealed it with a clear sealing. Should I use gesso also?
I would love to try this out on some outdoor tables also. I presently do Resin pours for making stone coasters and mini rock gardens. However, I am not sure I understand where the Resin comes into play with your project. Is the paint poured into the Resin & Hardner mix Or do I apply the Resin pour onto the paint pour after it has dried?