


DIY Diamond Tufted Headboard

by
Sarah
3 Materials
$100
8 Hours
Medium
I don’t know about you, but my bedroom has always been my happy place. It is where I go to cozy up with a book, watch a movie on my laptop, and of course sleep. Needless to say, I spend a ton of time in there. So it wasn’t even a question when we moved into our new house that the bed would be a top priority. This DIY diamond tufted headboard was a much needed addition to our room and really created the upscale vibe we were going for!Disclaimer: In the name of full transparency, please be aware that this blog post contains affiliate links and any purchases made through such links will result in a small commission for me (at no extra cost for you). As an Amazon Associate I earn from qualifying purchases.Supplies
- 1/2″ plywood or MDF
- 2×2 board (for legs)
- 2″ foam
- Spray adhesive
- Batting
- Fabric- I chose a wheat colored linen from fabric.com
- Button cover and kit
- Total cost: I like to round up for possible variations in cost and will just say about $150. I know that doesn’t sound super cheap…but just do a quick search for diamond tufted headboards. When you see that they typically range between $800-1200, you’ll be back.
Getting StartedBut let’s start with the headboard, shall we?! Because honestly you could very easily get away with just making this one piece if you already have a metal bed frame or some other bed base. It is a tad time consuming overall, I won’t lie, but it is also really stunning and totally worth it! And it has held up really well, as I actually built this about three years ago and am just getting around to documenting it now. SMH. To be fair, I wasn’t blogging back then so it would’ve been a tad weird for me to document the whole process at the time. More in process pictures definitely would’ve been nice to have though!Anyway, as any self respecting DIYer would do when attempting a new project, I turned to Pinterest. I found and (mostly) followed this tutorial from Handmade by Carmona and it offers some really great tips! Definitely check it out for more step by step pics.Building the BaseFirst I started with a piece of 1/2 inch thick plywood the same width as my mattress. The height is totally a personal preference. I kinda eyeballed where I wanted mine to be on the wall and then made up dimensions from there. I also attached a 2×2 boards to the back side of each outer edge to create a leg (just attached straight through with screws from the back- you won’t see this anyway if it is up against a wall). Again, you can completely customize this part depending on how much height you want your headboard to have.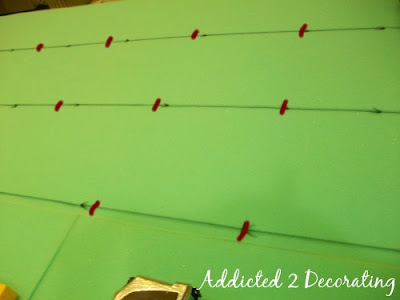
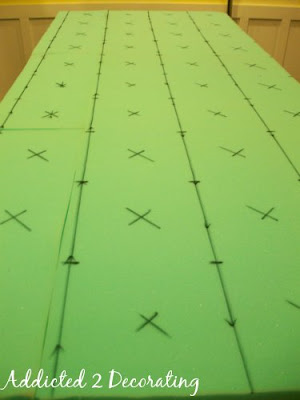
Add Fabric and Buttons-TuftingNow, the fun stuff begins. You will need to pick out your fabric and make sure you have a decent bit of excess (like an extra 18″ per side). You need extra because as you are tufting and folding, the fabric will pull in and you need to make sure to have enough to go back and secure the sides at the end.With the fabric you choose you will also need to cut an edge of scrap to cover your buttons that will go in the middle of the tufts. This is a tad tedious but really looks nice in the end! That said, if you have some fun buttons you like or want something with contrast you can really do it however you want. I used this Dritz button cover kit and it worked great!Again, refer to the above tutorials in regards to how to fold the fabric. But essentially you will need to start in the top row, center hole first. The top row has vertical folds and you do this as you go to help make sure you have enough slack in between each section. Try your best to get tight folds here. You can see below that mine definitely are not perfect, the linen was thin and a tad hard to work with.Use a long upholstery needle threaded with strong upholstery thread to come through from the back. You need this thread to be attached to something so it doesn’t pull all the way through your drilled hole. One of the above tutorials recommends using buttons on the back side. I did try that and it worked, for a while. But with time several of those buttons have popped and needed to be replaced. Therefore, I recommend using metal washers to keep it nice and strong and save you the headache down the road.
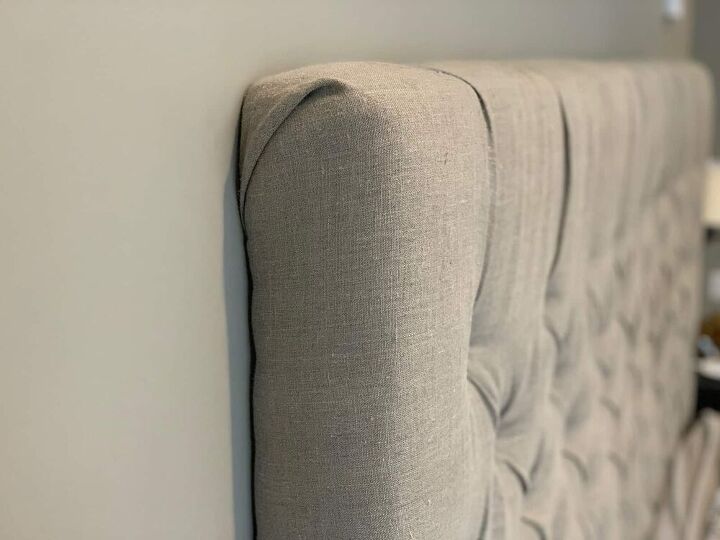
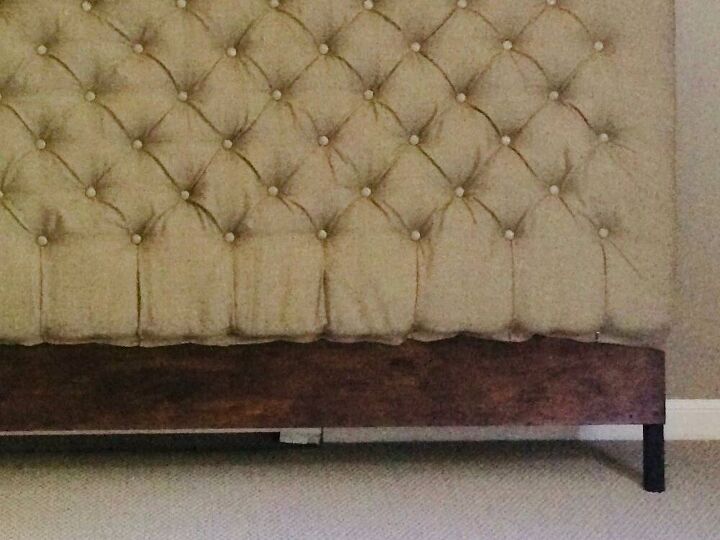
Staple the EdgesOnce you have all of your buttons pulled through and tied, (which is by far the most tedious part of the project), you then need to staple the edges of the fabric to the backside of your plywood board. At this point I also carefully stained the legs and bottom of the plywood with some general finishes Java gel stain (you could also do this ahead of time…whatever works). I then stapled the bottom of the fabric by folding under the edge and stapling right beneath the foam. If your headboard is shorter, you might also be able to wrap it around on the bottom. You can’t see any of this part anyway because the bed base pushed up against it here. For the top corners, I folded over the top portion to create a corner crease. This just gives a nice finished look without any sewing.
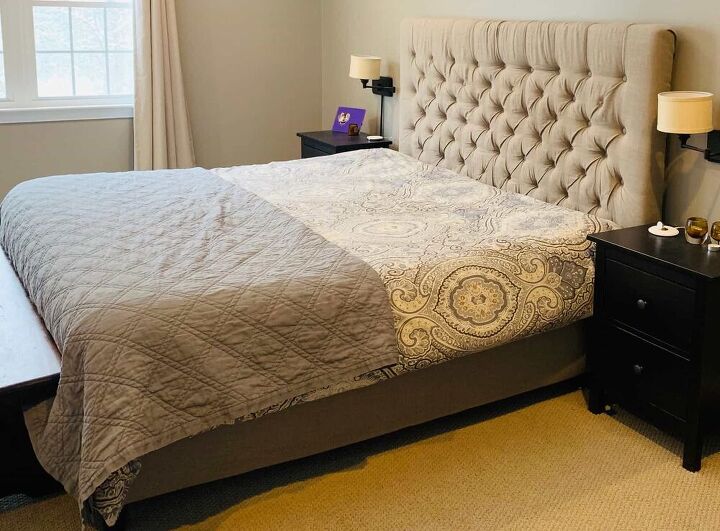
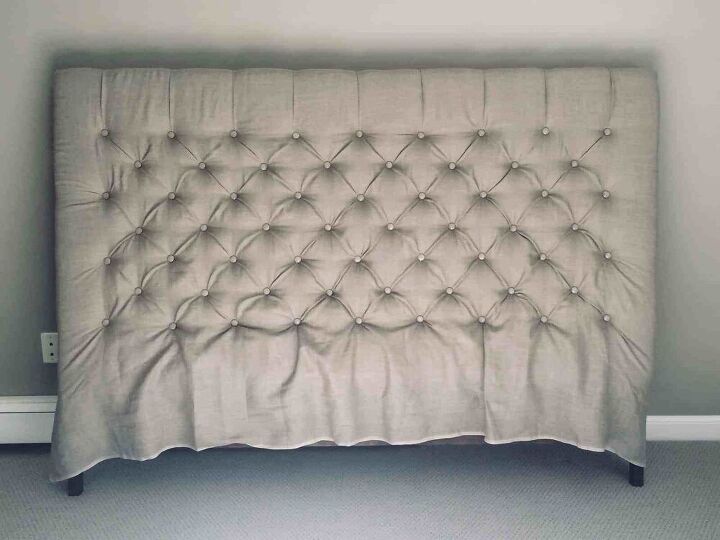
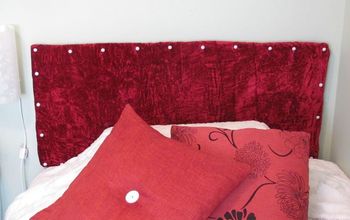
Finished ProductThere you have it, a DIY diamond tufted headboard! I hope this post gives you some good resources for getting started on your own! I would love to create a full tutorial at some point to walk you through all of the steps above without sending you off to other sites. Unfortunately at the time I made this I didn’t do a very good job documenting each step and I want you to be able to see the steps as you work through them. Next time, next time. Until then, happy making!!


Any price and availability information displayed on [relevant Amazon Site(s), as applicable] at the time of purchase will apply to the purchase of this product.
Hometalk may collect a small share of sales from the links on this page.More info
Want more details about this and other DIY projects? Check out my blog post!
Comments
Join the conversation
1 comment
-
You could also use this as a bench back. Nicely done


Frequently asked questions
Have a question about this project?