


DIY Farmhouse Dining Table
Are you in love with Farmhouse tables but the price tags keep you away? Learn how to make a stunning easy and affordable DIY Farmhouse dining table.
Ever since we agreed on our current home, I knew we needed a new dining room table that will seat more than just our little family of 5, in order to define our dining room. So I searched for months for a dining table that I liked but I couldn’t commit to any for one reason or another which lead us to a DIY Farmhouse Dining Table.
When we decided to build our own, I started looking around and compiled ideas from all the tables that I previously researched. After a few weeks, we had designed an affordable farmhouse dining table that we loved.
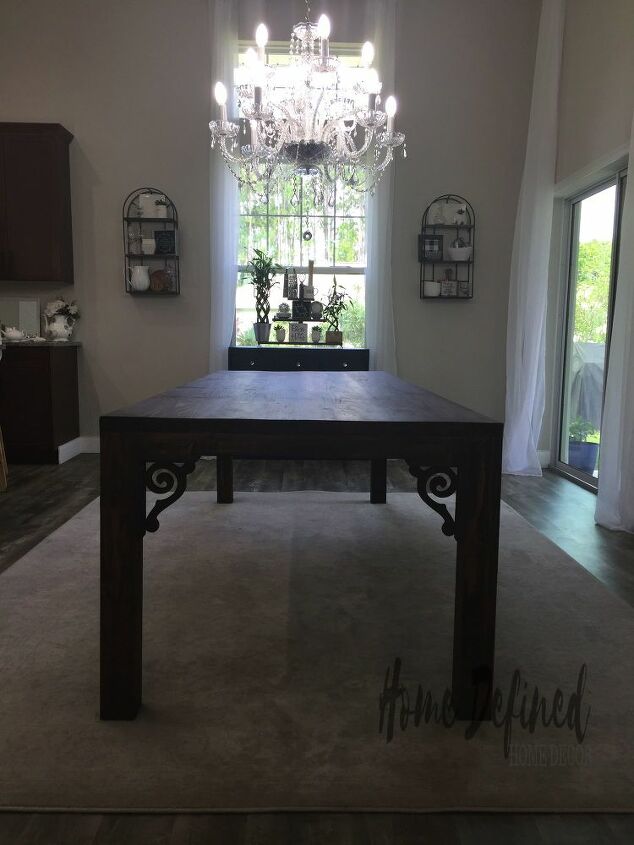
We are five and love to host, so we decided on a table that could seat 8-10 people comfortably. Our table measures approximately L 110 x W 44 x H 30inches- you can make it bigger or smaller to fit your family’s needs.

This how you can make a DIY Farmhouse Dining Table...
Supplies:
- 4 -2x12x10- common board
- 2 -4x4x8
- 5 -2×4x8
- 8- ornamental corbels
- 2 -boxes of pocket screws
- Wood glue
- 60/100/150 grit sandpaper
- Stain and poly
- Wood conditioner
- 000 steel-wool
- Stainable wood filler
- Brushes to apply finishes
- 4- 4" 3/8 Plain Steel Hanger Bolts
- 8- 3inch wood screws
Tools:
- Table saw
- Miter saw
- Drill
- Compound square
- Clamps
- Pocket hole jig
- Orbital sander
- Hand plainer
Step 1: Cut wood to size...
- Trim 1/4" from the sides of the 4- 2x12x10 to remove the rounded edges - this will help in creating a seamless joint when creating the tabletop.
- Cut 4- 29-inch pieces from the 4x4x8 - these will serve as legs.
- Cut 2 - 37 x 2.5 pieces and 2- 102 x 2.5 for the apron from the 2x4s - we went with a 2.5inch apron due to out chairs. You can adjust this based on your chairs- keep in mind the chairs' arms and whether you want the chairs to stick out or tucked under the table.
- Cut 3 - 34 x2.5 from the 2x4s. This will serve as extra support for the tabletop.
- Cut 4- 10-inch corner braces with 45° mitered end using there remaining 4x4 pieces.
Step 2: Assemble the tabletop...
- Arrange your 2x12x10 with the right side down. Mark every 6 -8 inches where you will be making the pocket screw. We made pocket holes every 6inches on alternating sides.
- Once you have done that, go ahead and use the pocket hole jig and make your holes.
- Continue with placing wood glue on the sides that will be joined to another board
- Proceed by inserting the screws into the previously drilled pocket holes.
Tip: Use clamps to hold the boards as you screw them together to make the boards as flush as possible.

Step 3: Assemble the table...
- Place the 4 legs on each corner.
- Predrill pockets holes on the precut aprons on each end and every 6 inches to attach to the tabletop.
- Put legs in place and attach aprons to legs, then to the tabletop using pocket screws. Tip: use a combination square while screwing apron to legs to keep table legs aligned and squared.
- Proceed to make pocket holes on the 3 braces pieces previously cut and attach to apron and tabletop at approximately 24 inches apart.
This image was taken prior to us deciding to share this project.
Step 4: Add gables...
Flip table right side up and place an ornamental corbel on each corner using wood glue and finish nails. This will give the table a more unique touch but it also helps make the table more stable.

Step 5: Sand, Sand, and sand some more...
- Use a hand or electric planner to smooth the tabletop.
- Proceed by sanding using the lowest sandpaper and working your way up. Sand until your heart is content.
- Finish by using the 000 steel wool to give it a more smooth buffed finish.
Step 6: Stain your DIY Farmhouse Dining Table...
- Use a wood conditioner prior to staining- this will allow for a more even finish. Follow the manufacturer's instructions. The one we used had to be applied no more than 2 hours prior to sanding.
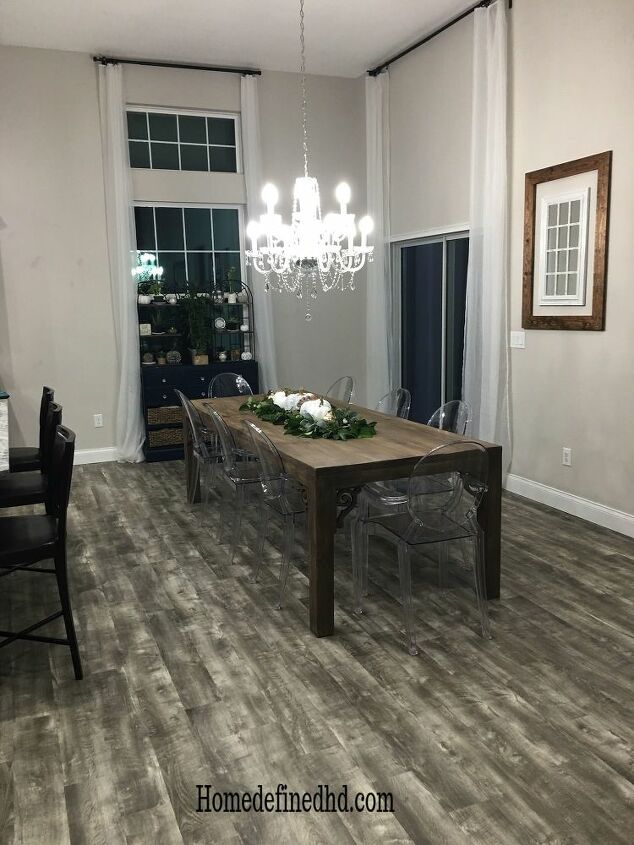
- Apply stain of choice- we used dark walnut to match the rest of our wood finishes in the house.
- Seal with a poly. We applied 3 coats of a fast-drying water matte poly with a synthetic brush.
Step 7: Enjoy your new DIY Farmhouse Dining Table!!
We love our DIY farmhouse dining table. It turned out slightly darker than we hoped for, but it is still doing an awesome job defining our dining area in our great room. We can’t wait to start hosting and creating memories on this table.
For more ideas on how to decorate your table see my FALL TABLESCAPE!
Don't forget to share!!!
Join us to receive our weekly newsletter!


Frequently asked questions
Have a question about this project?