Repurpose Your Kids Bunkbed When They Grow Out of It.

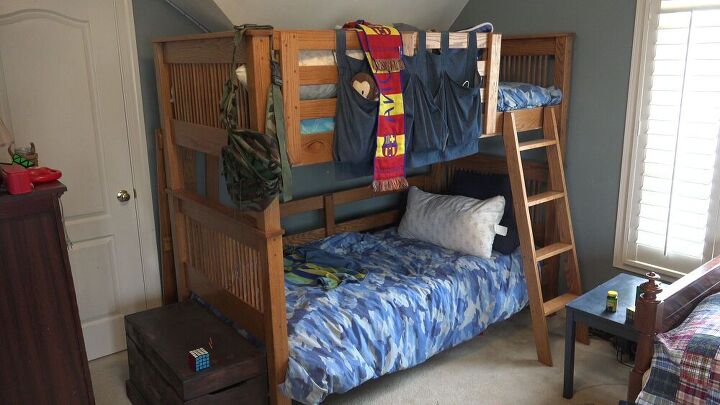
My kids no longer use the bunkbed in the play room and after a year of trying to sell it I gave up and decided to repurpose it. This bunkbed was real oak wood and I could not bring myself to putting this out on the curb.
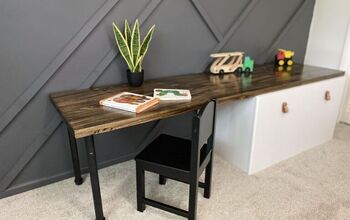
My son wanted it gone so he could get a desk in its place. So I decided to repurpose the bed into a desk. Here is how I did it.
Tools needed. You can complete this project with a circular saw but a miter saw makes it much quicker. You will need a pocket jig, cordless drill and a router if your bunkbed has locking brackets.
An additional pieces of plexiglass if you are going to be writing on the surface.
The first thing I did was measure the wall where the desk was going. I wanted it to be short of the window and take up all of the adjacent wall. It is with those measurements I started all my cutting. Your desk should be built to accommodate your space.
Start with the cross beams. Cut them 6 inches shorter than the measurements taken earlier. The two 3inch wide legs that these will tie into will make up for the 6 inches that I subtracted. My wife only gave one stipulation and that was it had to be able to be taken apart so we could take it with us if we ever moved. And with the joining brackets at each end of the cross beams, I thought in my head this would solve that problem.
The ends of the bunkbed were already designed to support the bed, so I would cut them down and use them to support the desk top. I made the top of the desk the standard 2 feet wide wide. I chose this do to my earlier measurements but what ever size you decide to make the desk top just ensure you cut your support legs a bit smaller so the top of the desk hangs over on each side. This will also allow you to push the top of the desk up against the wall without the legs being obstructed by wall trim.
You will be limited by the number of pieces you have to work with so just don't start cutting the wood apart. Besides hitting screws with your saw blade dulls the blades quickly. You will need to remove the plugs holding your bed together. So your first step is to take a small drill bit and drill a small hole through the center of the plug.
Don't use a bit that will destroy the plug or make it break apart. Then take drywall screws and screw them half way into each plug. With a shingle bar or cats paw simply pull up on the screw to remove the plugs to reveal the screws below. Take all your wood apart and stack it. We will try to use it all.
Cut down the bed ends and then reattach by screwing your matching leg back on. You are done your first end piece. Repeat that process to get the other side of the desk. You will only need two sides. The center support will be one post standing alone, joined by your cross beams.
(OPTIONAL)
Although the bunkbed wood is hard oak, I feared that having no support in the middle at the elbow would allow for a slight bend as I attached all the pieces for the desk top. So I bought a ply sheet to go under the desktop for extra support. In the end this is not really needed but it did make it easy to tie together and take the desk apart.
Your middle leg will be a stand alone leg. But it needs to be the exact same size as your other legs. So I laid it beside one end of the desk supports and marked it. I used a scrap piece to make sure I was flush before I made my mark. Also make sure you align your locking brackets. Next you need to take out on of the locking brackets for the adjacent side of your stand alone leg.
Take the stand alone leg and align it to the leg you just stole the bracket from. We are going to mark out the area we need to route using the removed bracket as a template. Simply trace out the shape. Remember this is done cattycorner not on the opposite side
The left over 2 cross supports that were not used have a natural lip on them. We will use them as the desk front edge. Cut your comers at 45 degree angles and join you pieces on the underside with pocket holes.
With the front complete add the rear edge lip to the table top.
Flip your desktop upside-down and begin filling in the surface of the desk top area from all the pieces that you have removed plugs from. Ensure all pieces are flush with the other boards. Use pocket holes to join the pieces together.
As you fill in your desktop, look for flaws in each piece of wood and ensure that those flaws are facing you. This will save you time sanding and staining areas of the wood that need to be fixed up.
(OPTIONAL)
Glue and staple down the ply sheet under the base of the desk top.
(Optional)
If the desk will be used for school/homework, cut a piece of plexiglass for the top of the desk to keep pencils from hitting beveled edges on the top pieces. If you think that trimming away each top piece to remove the bevels will give you a flat desktop, just make sure you have enough wood to complete the project. I would not have.
And that's it. Take your pieces to the room you want your desk in and reassemble.
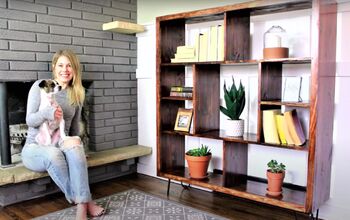
And if you are like me and really can't bring yourself to throw away good oak wood you can make a shelf out of the remaining wood. 
Snazzy.
Enjoyed the project?
Resources for this project:
Comments
Join the conversation
-
 Carol Cole
on Apr 26, 2024
What a fantastic job you did, better than what would have been bought. Beautiful, beautiful,👍️♥️❤️👍️ beautiful.❤️
-
-










Frequently asked questions
Have a question about this project?