Easy DIY Living Rosemary and Boxwood Topiary on a Budget

by
Heather
(IC: blogger)
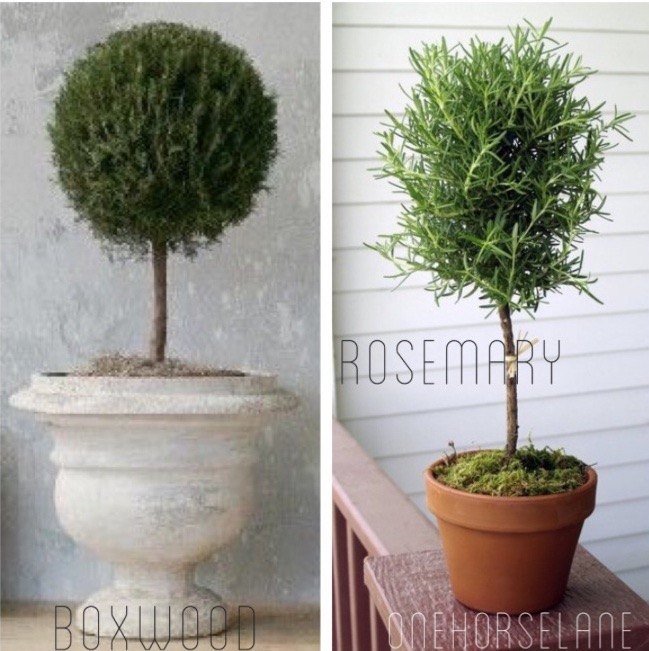
We've all seen these lovely little creatures... And I even have several preserved topiaries... But I decided it was time to add a few live topiary plants to my home.
After looking around a bit, I decided that $79 per topiary was much more of an investment than I wanted to make! (Mr. B would definitely not approve of such a purchase...) So, like I do when I get an idea in my head, I decided, I can make that for way less! 😬
So, I set out to find a Rosemary shoot (seedling) from a nursery to grow my own. To train it, and teach it to be the lovely little topiary creature I knew in its heart it wanted to be! Here's what it looked like when I bought it. (Cost: $3.95).
So, I set out to find a Rosemary shoot (seedling) from a nursery to grow my own. To train it, and teach it to be the lovely little topiary creature I knew in its heart it wanted to be! Here's what it looked like when I bought it. (Cost: $3.95).
She's so cute, right?
Next, I poured about a cup of potting soil into the pot, and watered it to remove air bubbles. Then, I gently removed my little Rosemary shoot and root system from her container... And placed her centered on the gravel. I added some tree and shrub potting soil all around and a little on top, and carefully pushed in a little bamboo stick next to her "trunk". (I used the bamboo skewers you buy for grilling... It's what I had on hand).
Next, I trimmed all her little "shoots" of leaves off the bottom until i got to the height I wanted the bottom of the lollipop topiary to be. I also decided on the total height I wanted her lollipop to be at this point, and trimmed off the top shoot so she would stop growing up and start to fill in as a ball (The gorgeous fragrance Rosemary gives off was so lovely during this part).
Now, it was time to secure her little "trunk" to the bamboo stake so I could teach her how to grow. I used twine i had on hand.
Gently pinch her trunk to the stake, and tie the twine (you could use raffia that you've soaked in water also... Just nothing damaging to her little trunk) in a figure 8 pattern around the trunk and the stake. Knot it, and trim off the excess. Do this in a few places until you have secured her trunk in a "straight" growing pattern.
I did the exact same thing with my boxwood plant... Here are a few pics to show the progression:
Place rocks in the pot for drainage, add your boxwood plant, add your soil, Trim,& insert the bamboo stick.
So, I made both topiaries for the cost of $18.00.
Hope this has been helpful! If you want more DIY tips, go can visit my One Horse Lane blog! Thanks for joining me!
Enjoyed the project?

Want more details about this and other DIY projects? Check out my blog post!
Published February 29th, 2016 5:20 PM
Comments
Join the conversation
2 of 48 comments
-
 Vic89320921
on Sep 10, 2023
I would like to try this project but never know what to do with them in winter.
-
-
 Ger69483387
on Feb 01, 2024
Rosemary would need to be inside and protected during winter, but boxwood can stay outside with a protective layer of straw or leaves to help keep the roots from freezing. Love them both!!
-












Frequently asked questions
Have a question about this project?
The question I always have that I can never find an answer to is “once potted, would these plants need to or could they be, grown indoors (in winter). Then put you out in summer?????