


How to Clean a Keyboard Safely and Effectively

By Marilyn Syarto
You may not think much about cleaning your keyboards. Maybe this will change your mind: The American Journal for Infection Control rang a warning alarm that keyboard contamination may transmit hospital infections in healthcare settings. Then the International Journal of Environmental Research and Public Health studied what germs live on our keyboards and personal devices, and found various unpronounceable bacteria, like MRSA and E Coli. Some research even points to our keyboards likely being dirtier than a toilet seat.
And health is not the only issue. If you don’t clean your keyboards, dust, grime, and grit can get ground into the spaces between the keys, which will eventually break down the technical components that send signals to your computer every time you type. Do you really want to miss a deadline due to crumbs in your keyboard? Don’t let this be an issue—we’ll show you how to clean your keyboard in this helpful guide.
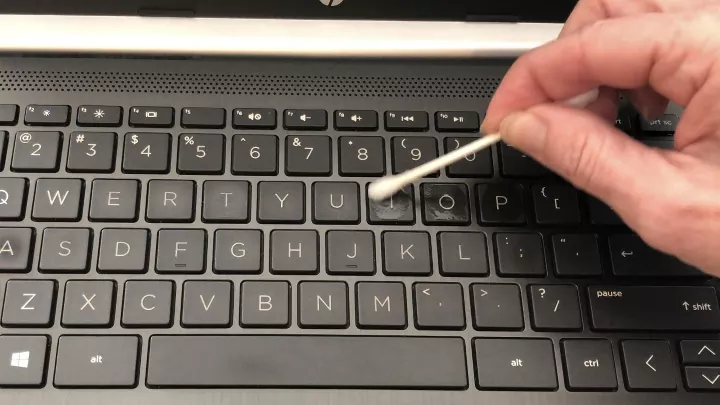
Photo via Chas' Crazy Creations
How You Know It’s Time to Clean Your Keyboard
You may notice a few crunchy noises coming from under your keys when you type, or that a key or two may not go down far enough to produce the letter or number on your screen. Or, typing feels plain icky because the tops of the keys are sticky or greasy to the touch. Sometimes a swipe with a wipe just won’t do the trick and your keyboard requires a deeper cleaning to get you productive again.
How to Clean a Laptop Keyboard or Stand-Alone Keyboard
Cleaning your laptop computer is almost like cleaning a stand-alone keyboard—it’s just easier to turn over your stand-alone keyboard. It’s fairly simple to do a quick, but deep clean on any keyboard, but we highly suggest that you do not remove the keys on your laptop or stand-alone keyboard unless you are proficient in doing so. Trying to remove keys on a standard keyboard is not always easy and you may end up breaking them. In addition, depending on the maker of your laptop or keyboard, you may or may not void a warranty by toying with the keys.
Tools and Materials Needed:
- Can of compressed air
- Keyboard brush
- Lint-free cloth or eyeglass lens cleaning cloth
- Cotton swab
- Capful of rubbing alcohol
- Disinfectant wipe
Step 1: Unplug the Laptop
Turn off and unplug your laptop or your stand-alone keyboard.
Step 2: Turn the Laptop Over
Turn over your laptop or keyboard. Gently tap on the bottom of the keyboard portion to initially dislodge crumbs and debris.
Step 3: Air Blast the Keyboard
Use a can of compressed air to further dislodge crud from under the keys. Make sure you are doing this outdoors or over a garbage can, because the blast of air will quickly blow a lot of gunk out of your keyboard and may make a swirling mess.
Compressed Air Advice
Step 4: Brush the Keyboard
Use a soft-bristled brush along the keyboard to dislodge the last of the debris. Try to do this while the keyboard is upside down so you don’t push debris further into the keys.
Step 5: Moisten a Cloth
Dip a corner of a lint-free cloth in clean, warm water and squeeze out excess water so that it’s just slightly dampened. Gently wipe it across the keys.
Step 6: Scrub With a Cotton Swab
Dip a cotton swab in a tiny bit of rubbing alcohol. Using the slightly dampened cotton swab, gently scrub any grime from the board (don’t do this directly on the keys or you may take off the letters and numbers).
Step 7: Disinfect With Wipes
Yes, you can use disinfectant wipes on your keyboard. But before using, aggressively squeeze out excess moisture from the wipe and avoid using wipes that contain bleach. Let any residual moisture from the wipe air-dry before plugging in and turning on your computer/keyboard.
Choosing Wipes
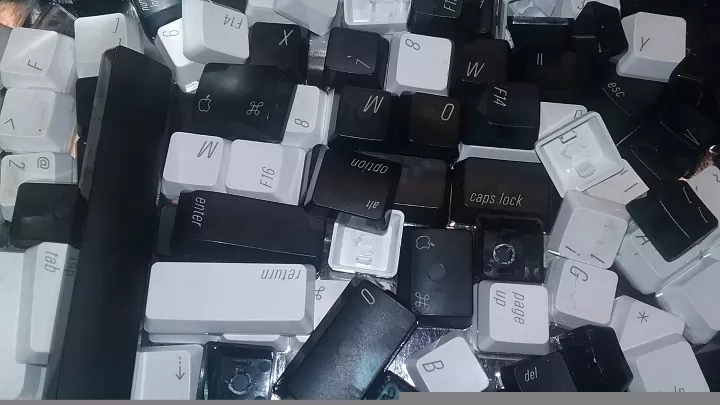
Photo via Karen Merritt3
How to Clean a Mechanical Keyboard
A mechanical keyboard is different from the stand-alone default keyboard you probably use for your desktop computer. It may look similar, but there are complex technical differences to how it’s made, and of course, that requires handling it differently when cleaning. A mechanical keyboard has spring-loaded switches underneath the keys which differs from a regular keyboard that has circuits under the keys covered by a flexible rubber membrane. Mechanical keyboards are a popular choice for serious gamers because they are sturdier and more tactile and responsive.
Tools and Materials Needed:
- Device to take photo of keyboard
- Keycap pulling tool
- Large bowl
- Few drops of liquid dish detergent
- Warm water
- Microfiber towels
- Soft bristle brush
- Cotton swab
- Capful of rubbing alcohol (optional, or use water)
Step 1: Unplug and Take a Photo of the Keyboard
Before doing anything, unplug your keyboard and then take a photo of it with your smartphone or another device. That way you’ll know where the keys go when you put them back after cleaning them.
Step 2: Remove Keycaps
Use the special keycap pulling tool to remove the keys. The tool makes it easier to grab the keys off of a mechanical board. (You will see just how furry and dirty the keyboard is once all the keys come off.)
Step 3: Soak Keys
Put warm (not hot) water and a few drops of gentle dish detergent into a large bowl that will fit all of the keys. Place the keys in the bowl of soapy water. Leave the keys in the water for about 20 to 30 minutes, swishing around the bowl every so often to loosen dirt and grime off the keys.
Step 4: Rinse Keys
Make sure your stopper is in the sink drain so you don’t lose any keys while rinsing. Put your keys in a colander and then rinse under a stream of cool water for about 30 seconds. As you rinse, jiggle the keys around a bit so you can rinse every crevice of every key.
Step 5: Dry Keys
With a clean, soft microfiber towel, dry all the keys. Tap the keys as you dry them to remove any droplets of water that may be trapped in a crevice. After drying with a towel, leave the keys on another dry towel for a few hours to fully air dry.
Step 6: Brush the Keyboard
While the keys are drying, use a soft bristle brush to brush off crumbs and hair from your keyboard. Since mechanical keyboards are so sturdy, brushing won’t hurt them.
Step 7: Spot Clean the Base
Dip a cotton swab in a tiny bit of rubbing alcohol or clean water. Run the slightly moistened cotton swab around the switches and keys and the board to clean any other sticky parts.
Step 8: Replace Keys on Keyboard
You’ll be happy you have a photo of your keyboard! Pop the dry keys back onto the board. Plug it back in and you’re ready to go. Pssst: Now’s a good time to clean your computer’s screen, too.
What to Do if You Spill Liquid on Your Keyboard
You can frequently fix a smartphone accidentally dropped in liquid (bring out the rice!). If a laptop or desktop keyboard is doused in water, coffee, soda, soup, or wine, here’s what to do. Hint: Do not put your laptop or keyboard in rice—it won’t work! Do this instead:
Tools and Materials Needed:
- Clean microfiber cloth or towel
- Dry towel for air drying
- Tools to open the laptop (optional)
- Name of a repair shop
Step 1: Shut Down
Timing is everything. Shut your computer down immediately—pull the cable or plug, and force shut it down. Do anything you can to prevent any short-circuiting of any electrical connections within the workings of your computer.
Step 2: Remove the Battery
Remove the battery from your laptop if possible.
Step 3: Mop Up
Wipe up any liquid along the keyboard with a soft, dry microfiber towel or cloth.
Step 4: Turn It Over
Turn the laptop or keyboard upside down.
Step 5: Air Dry
Leave your laptop or keyboard to air dry over a towel for at least 24 hours.
Step 6: Visit a Repair Shop
Bring your laptop to a repair shop to investigate if there’s still liquid in crevices that can corrode your computer. You don’t have to bring a stand-alone keyboard into a repair shop unless it’s a mechanical one that you’d prefer to hand over to a professional.
How to Remove Pet Hair from Keyboard
If you have pets, you need this hack. There’s a substantial amount of pet hair that can become lodged underneath the keys that no amount of tapping can release. If you don’t want to dislodge the keys, you can use run-of-the-mill clear sticky tape (do not use duct tape for this job). Turn your computer off and fold a piece of tape in half so the sticky side is sticking out. Fish the tape under the keys and the tape will grab the debris and hair. If you don’t have tape, use the sticky part of a sticky note to do the same job!
Some Important Don’ts for Cleaning a Keyboard
There’s plenty of advice on the internet about how to clean your keyboard, but what about things to avoid? Intel listed a few “don’ts” to cleaning your keyboard:
- Do not use steel wool or abrasive sponges to clean your keyboard.
- Do not use any household spray cleaners to clean your keyboard.
- Do not put a keyboard or laptop in a dishwasher or washing machine for cleaning.
- Do not put your keyboard or laptop in a dryer or oven (or microwave, for that matter) to dry any liquids that have spilled into them.
How to Keep Your Keyboard Clean
It’s not always easy to clean or take apart a keyboard, so upkeep is key. Besides the obvious—and most ignored—tip ever of never eating or drinking over your keyboard, here are some real tips you can use to keep your keyboard clean:
- Tap it: Every few days, turn your keyboards (laptop or otherwise) upside down, tap it gently, and dislodge the large debris.
- Brush it: Brush between the keys on your keyboard with a soft-bristled brush (like an old soft toothbrush) every week to dislodge crumbs. (Make sure your computer is off when you do this.)
- Gel it: Invest in a dust cleaning gel and use it on your keyboards every so often to grab gunk out of the keys. (It’s similar to crevice cleaning gel you may use to clean your car’s interior vents.)
- Vacuum it: Vacuum around your desk (not the keyboard itself) every few days. This’ll keep them from falling into your keyboard and you will be battling ants and other pests at the same time.
- Close it: Keep your laptop closed and your keyboard tray pushed in when you are not using your computer.
Washi Tape Hack
Have you recently saved a keyboard you thought was a goner because of some stuck dirt and debris? Let us know how you did it and if you have any other tips that have worked for you—we’d love to hear them!
Comments
Join the conversation
-
Great info. As luck would have it I spilled a bottle of water on my keyboard yesterday. I quickly lifted it up and turned it upside down and let whatever water was in there out. I then used a microfiber cloth and my hair dryer on low. Good as new.


Frequently asked questions
Have a question about this project?