Faux Pendleton Carry Blanket

Amanda C, Hometalk Team
by Amanda C, Hometalk Team
4 Materials
$20-35
3.5 Hours
Medium
I have been wanting to make my sister a gift lately, 'cause I love giving gifts, and I thought it might be nice to make an imitation Pendleton blanket considering she lives near Glacier National Park. I wanted to make it super easy to tote along, so I decided to make a blanket carrier to go along with it. This faux Pendleton blanket and carrier is a great thing to grab on the go whether you are headed out to go camping or just sit in the park on a chilly day. The greatest part is all you need is some fabric and some leather belts to make this cozy lookin' carry blanket. Plus, it's super cheap compared to the real thing.
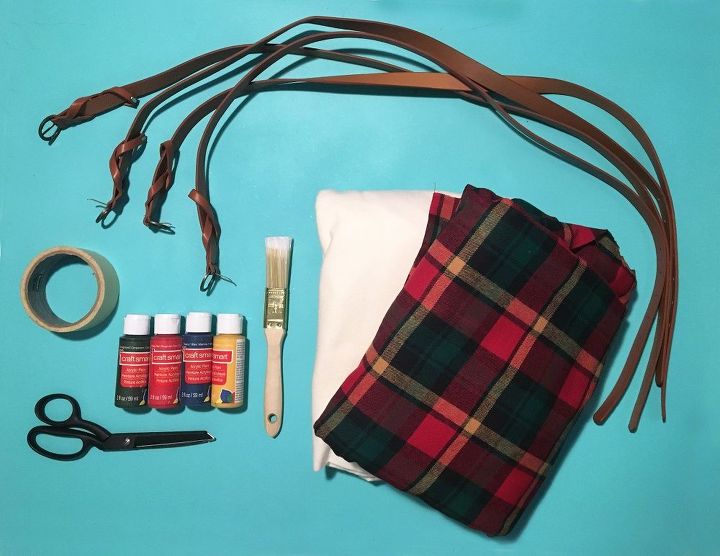
SUPPLIES:


-Tape


-Scissors


-Acrylic Paint


-Fabric Medium (not pictured)


-Paint Brush


-2 Fabrics (one plain, one print) 2.25-2.5 yds each - flannel


-3-4 Belts


-Sewing Machine (not pictured)
STEP 1: Paint your fabric


Tape out lines on your plain fabric. You can choose whatever color and combination you want. As I mentioned earlier, I wanted to make a homemade version of the Pendleton Glacier blanket, so I went with a cream for the one side and the classic navy, mustard, red, and forest stripes. To make my stripes, I started out measuring 9" up all the way across and placing tape in a straight line along my measurement. I then measured 1.5" between each stripe and allowed each stripe to measure 1.5" (I did do 2" for the navy). I did this on each end of the blanket.


Once your stripes are all taped out and ready to go, it is time to paint them in. Mix acrylic craft paint with some textile medium. Usually 1 part paint to 2 parts medium.


Now just paint your stripes in in the colors of your choice.
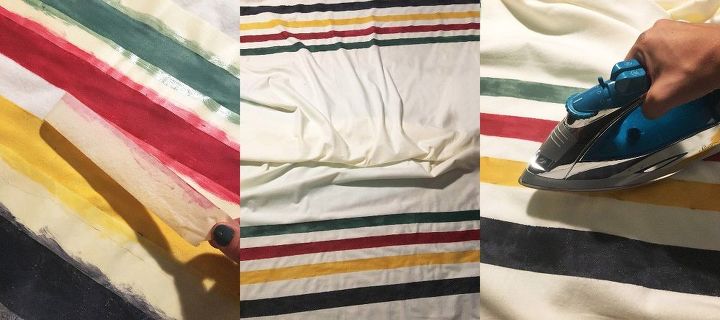
STEP 2: Once your paint has dried, remove the tape.


My blanket looked like the middle picture at this point.


Now you need to heat set the paint in place so that the blanket is washable. Simply take an iron and WITHOUT steam press over the paint, allowing the heat to really set in over the painted stripes.
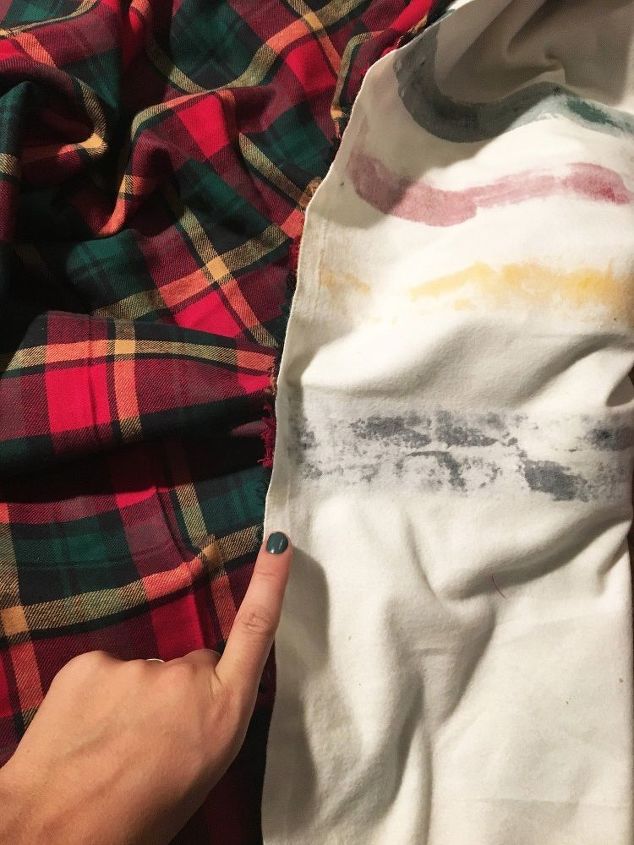
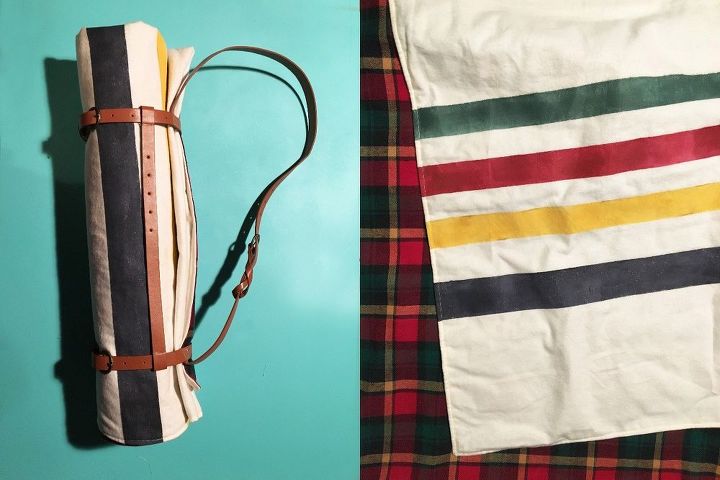
STEP 3: Sew your fabric together


Now it is time to sew your plaid or printed fabric to the plain painted one you just completed. Match the edges of the fabrics up right sides facing together. You will sew a seam all along the edge about 1/2" in, leaving a small gap so you can turn the fabric right side out.


Once you have made your way around the entire edge (save for the gap) Turn your fabric right side out. Press the edge so that there is a nice crease and sew another seam all the way around the edge again closing the gap you created earlier and sewing it shut.
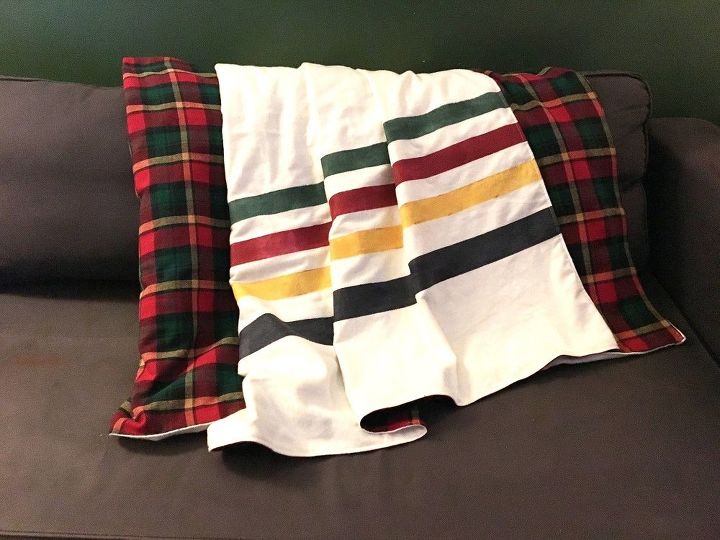
* If you don't care about a carrier you are done! Here is a nice little picture of the blanket once it was all sewn up!
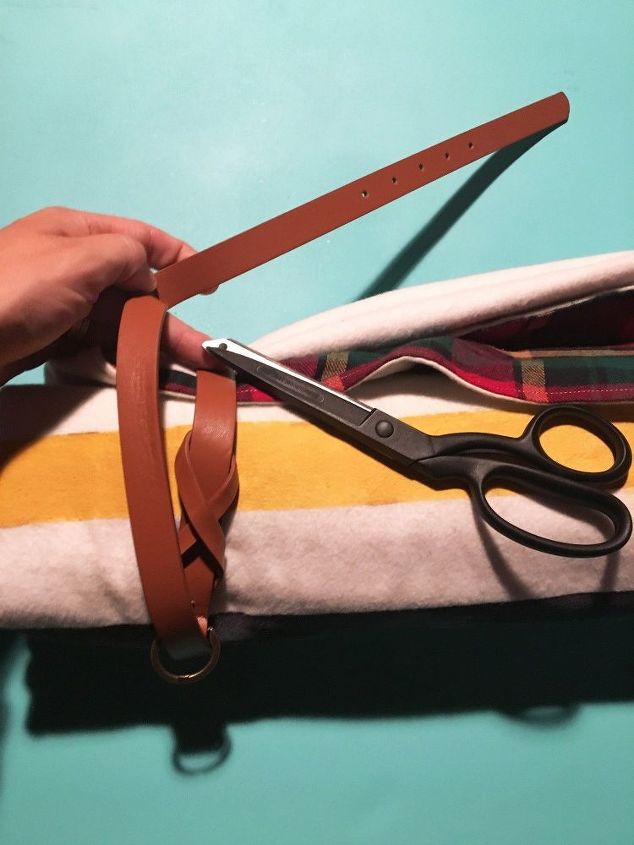
STEP 4: Make the carrier strap


Now that the blanket portion of the project is complete it is time to move onto the carrier strap. First you will roll your blanket up as it will be when carrying it. Grab 2 of your belts and wrap each one around opposite ends of the blanket roll. Make sure to pull the belts as tight as they need to be and cut a good 2" past where the belt will slide through the loop. I hope this makes sense... basically you are making the belt a shorter version of itself.
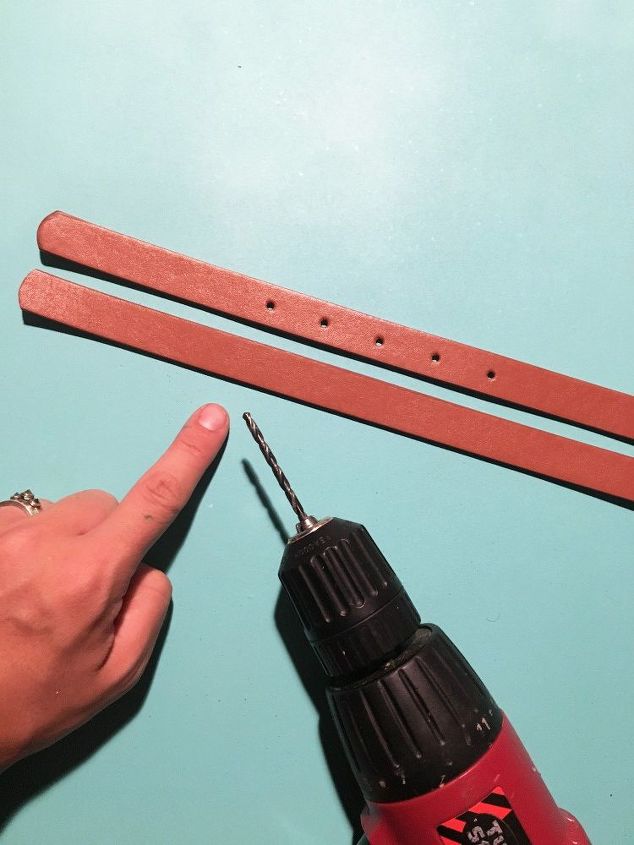
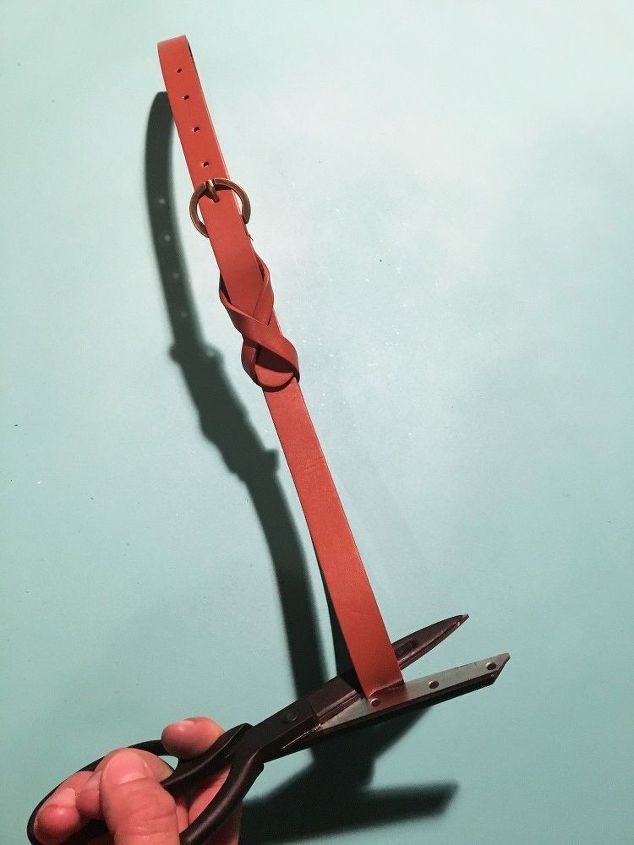
STEP 5: Cut holes into the belt


When you cut the belt be sure to round off the end for a nice finished look. Now you will need to cut holes into the new shorter version. Use the old belt holes as a guide as to where you will place them and drill them into the leather.
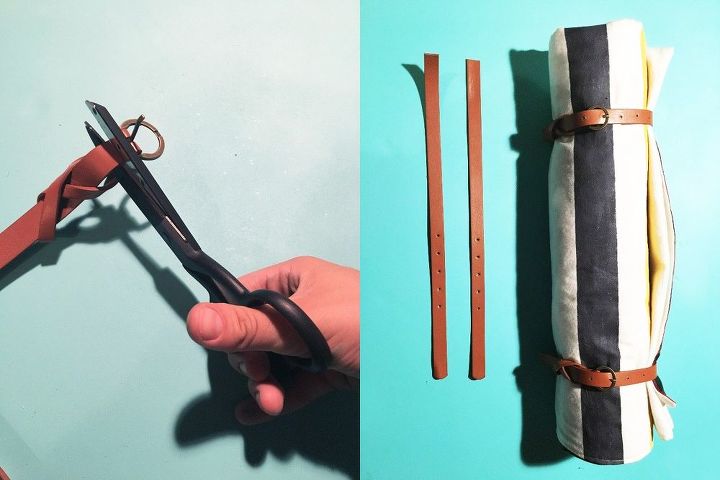
STEP 6: Grab your 3rd belt and cut the loop off.


Now Cut 2 strips from the belt about 12"-16" long, depending on the length of your blanket roll. My belts were shorter than I needed, so I used the leftover pieces from my first 2 cut belts so they would match. If you want, this also eliminates a needed belt which cuts down on cost!
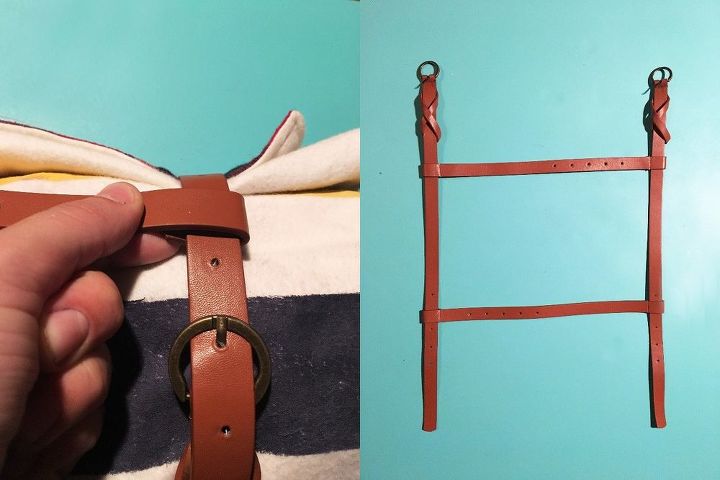
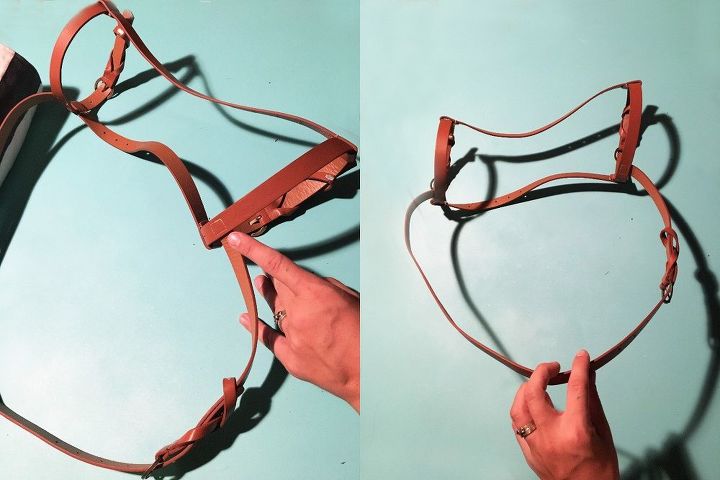
STEP 7: Create the cross straps


Using the 2 strips you just cut, you will be creating 2 cross straps around the looped straps on the end of your blanket. One will be for the top of the blanket roll and one for the bottom. Simply fold the end of the belt around the looped straps on either end and sew it into place.


At this point your blanket carrier should look like the picture on the right.
STEP 8: Create the shoulder strap


It's time to create the shoulder strap. Grab your last uncut belt and fold it in half, making sure the loop is not centered (see pic). Cut your belt in half.
STEP 9: Sew the strap onto the carrer


Now you will sew your strap onto the carrier. Stitch a square in place to ensure it stays put. Sew the strap in just above the top cross strap and above the looped belt ends.


It should look like the picture on the right once completed.
STEP 10: Place your strap back around the blanket and you are set to go!
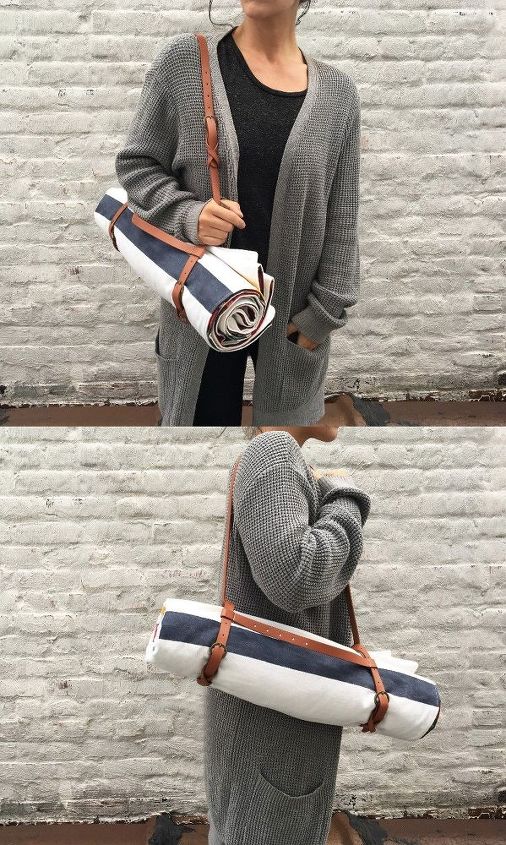
You can use this carrier for any blanket! Because there are so many belt holes you can use it for larger or smaller blankets if need be!
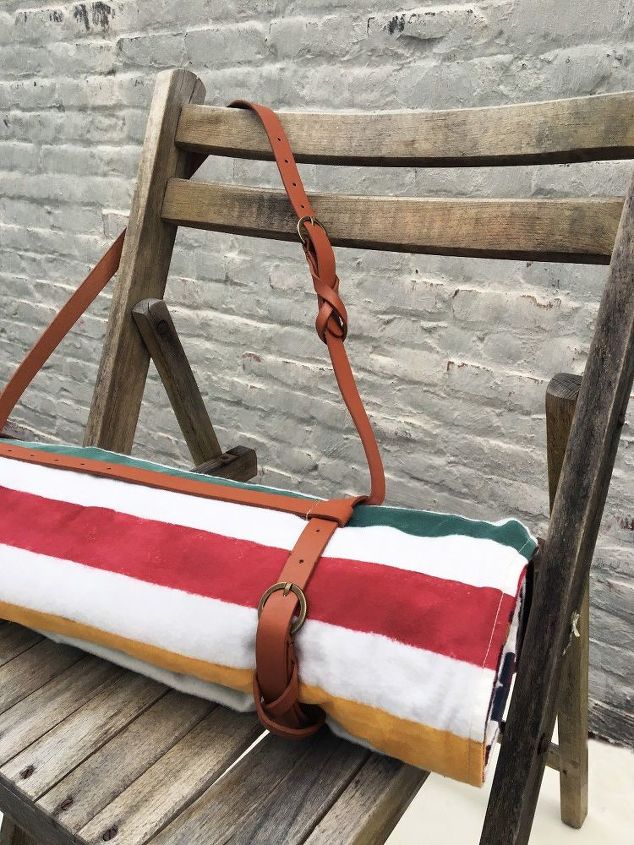
I feel like I need to be on the lookout for cheap belts all the time now, so I can make loads of these. They are such a great gift!
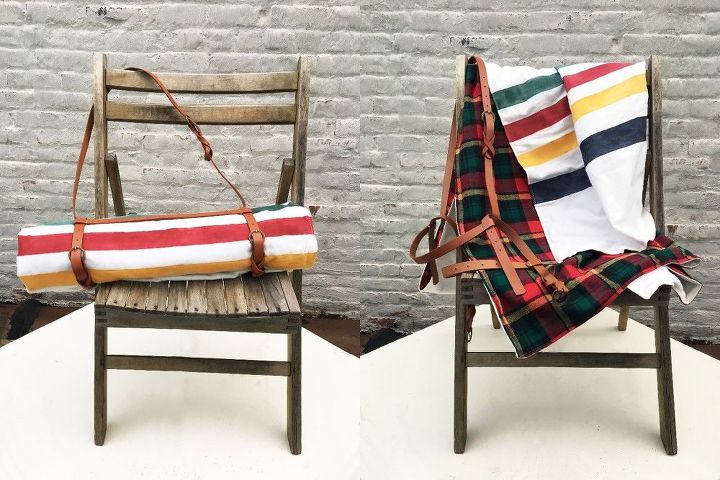
I mean how great is this guy! You can make so many options too! I know it isn't the same quality as a real Pendleton, but it's cute and cozy all the same and far less pricey. A great alternative while you save your pennies for the real deal.
Suggested materials:
  • 3-4 Belts   (Amazon)
  • 2 - 2.5 yds of Flannel Fabric   (Fabric.com)
  • Acrylic Paint   (Michael's)
See all materials
Frequently asked questions
Have a question about this project?
  1 question
Comments
Join the conversation
2 of 24 comments
Next