


Simple Painted Lamp Base - a Pottery Barn Dupe
This post is sponsored by Black Dog Salvage Furniture Paint, all opinions are my own.
I’m so excited to share my simple painted lamp base!
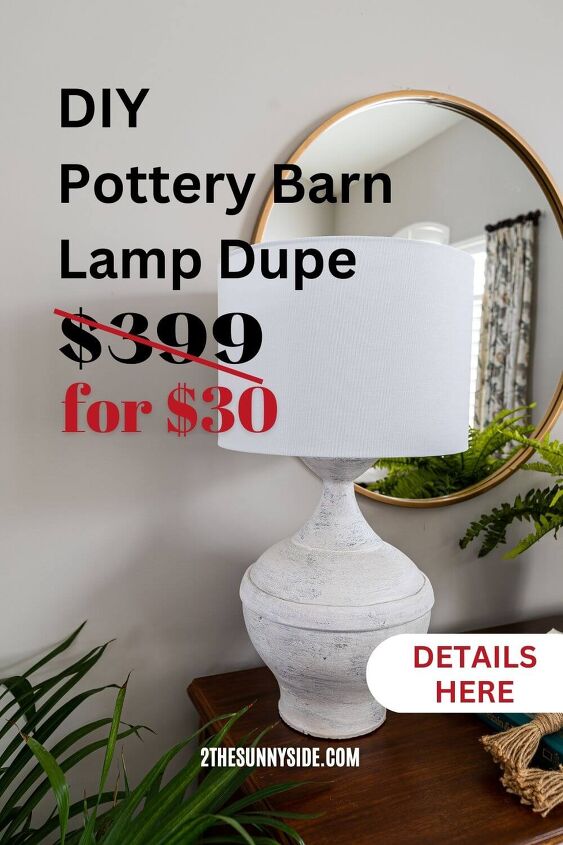
Several months ago while browsing at Pottery Barn I fell in love with the Faris ceramic table lamp, but not the price.
There is no way I can justify spending nearly $400 for a table lamp when I can recreate it myself.
So, I decided to transform a thrift store lamp into an incredible Pottery Barn-like painted lamp base.
But first, I would need a lamp with the shape similar to my inspiration lamp.
With that in mind, I began my search for the perfect lamp base.
And as luck would have it, on a girls trip with my sisters and daughter, I found the perfect lamp.
The lamp base had a similar profile to the Faris ceramic lamp, and it was only $8! Score!
Do you also love the look of Pottery Barn’s Faris ceramic table lamp?
Believe it or not, with just a few simple steps and supplies you can recreate that same look for yourself!
We’ll show you exactly how to transform a thrift store lamp into an incredible painted lamp base.
Follow our easy tips and you’ll have a show-stopping lamp in no time!
Can You Paint a Lamp Base?
Yes, you can paint a lamp base!
With the right supplies and a few steps, it’s easy to redo an ordinary lamp into something special.
In our painted lamp base project, we’ll show you how to layer paint to achieve the look of the Faris ceramic lamp from Pottery Barn.
You’ll want to select a paint that will bond well to the ceramic surface of your lamp base.
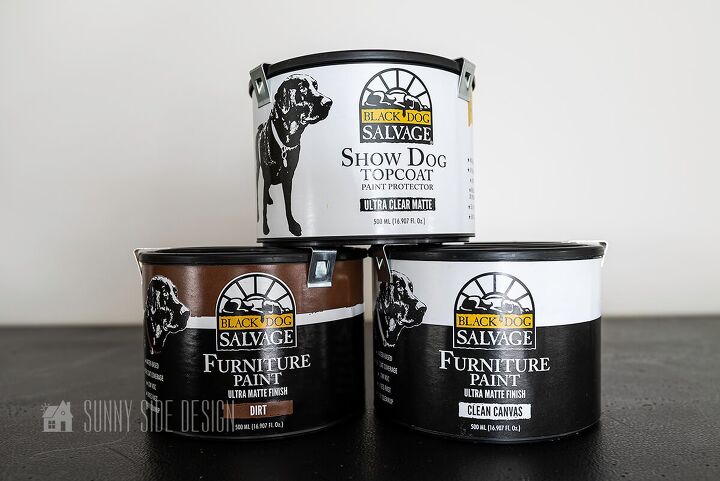
And the perfect paint for this project is Black Dog Salvage Furniture paint.
Let me tell you a little bit about this amazing paint.
We first used Black Dog Salvage Furniture paint on Steph’s kitchen island and we were so impressed with the self-leveling properties.
Black Dog Salvage Furniture Paint is not “chalk” paint.
Their formula is 50/50 latex & acrylic based with calcium carbonate
and other clay bodies for superior self-leveling with an amazing finish.
The only prep before painting the lamp base with this paint is a good cleaning with TSP.
With Black Dog Salvage Furniture paint you can paint over wood, metal, glass, laminate or ceramic.
Also this paint can easily be mixed, creating your own custom colors.
And they’ve created over 100 color recipes.
This is not a fussy paint.
Lay it down and let it dry!
The self-leveling component will
smooth out the brush marks.
Or you can create texture if you over-work the paint.
The paint and topcoats are very environmentally friendly.
Low in VOC’s, no odor!
In addition it’s easy clean up with soap and water.
And you can save 20% on your order using our promo code 2THESUNNYSIDE20
So don’t miss out on this fun project – follow our simple tips and transform an ordinary lamp into something special!
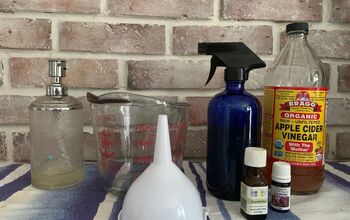
Painted Lamp Base Supplies
You’ll need just a few supplies to recreate this Pottery Barn look on your lamp.
- Black Dog Salvage Paint in Dirt and Clean Canvas
- Show Dog topcoat ultra clear matte
- paint brush
- chip brush
- TSP
- air dry clay (optional)
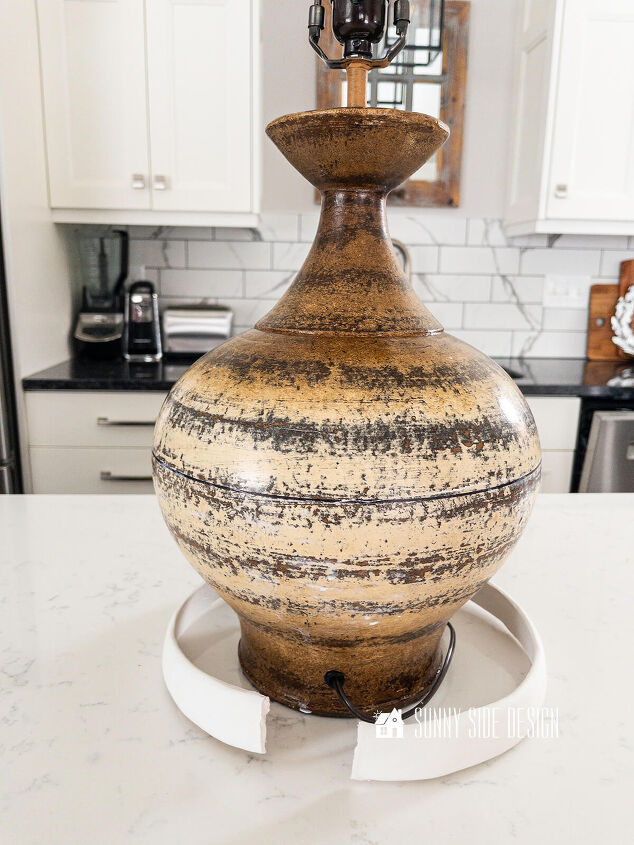
Prep Lamp Base for Paint
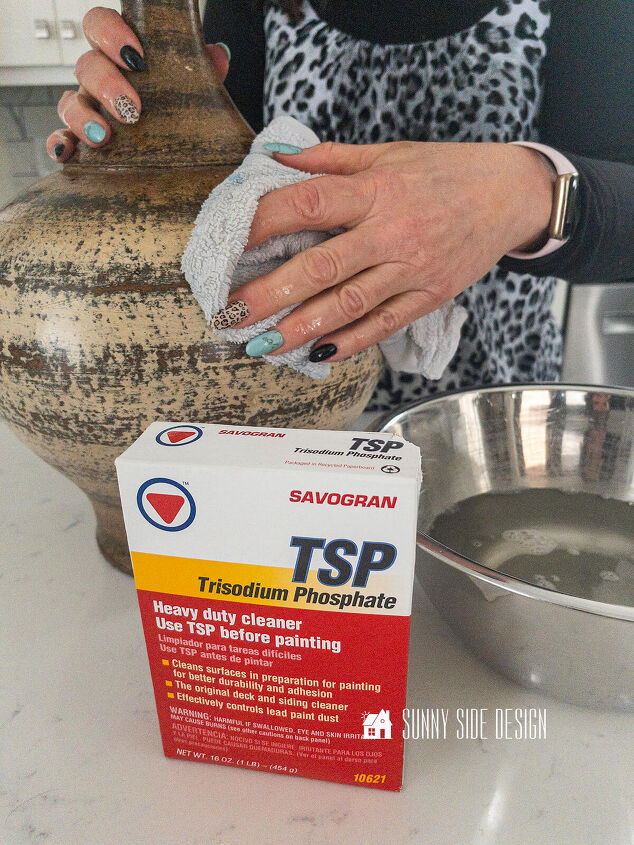
The only prep you’ll need to do is give your lamp base a good cleaning.
We recommend using TSP before painting.
Mix the TSP with hot water according to the package directions and rinse with clear water.
I also wanted to create the raised band that is on the inspiration lamp. (this is totally optional)
To do this, I rolled out air dry clay with my rolling pin on a piece of parchment paper, into a long strip that was about 1/8″ thick.
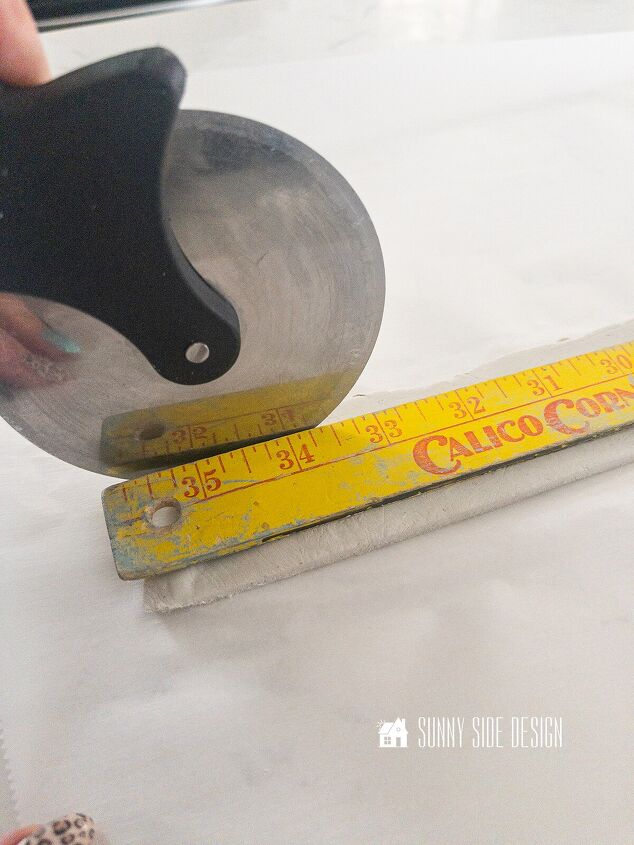
Once the clay was long enough to go around my lamp, I used a pizza cutter and a straight edge to trim it to about 1 1/4″ wide.
Next, I made a placement mark on my lamp for the clay strip with a sharpie marker.
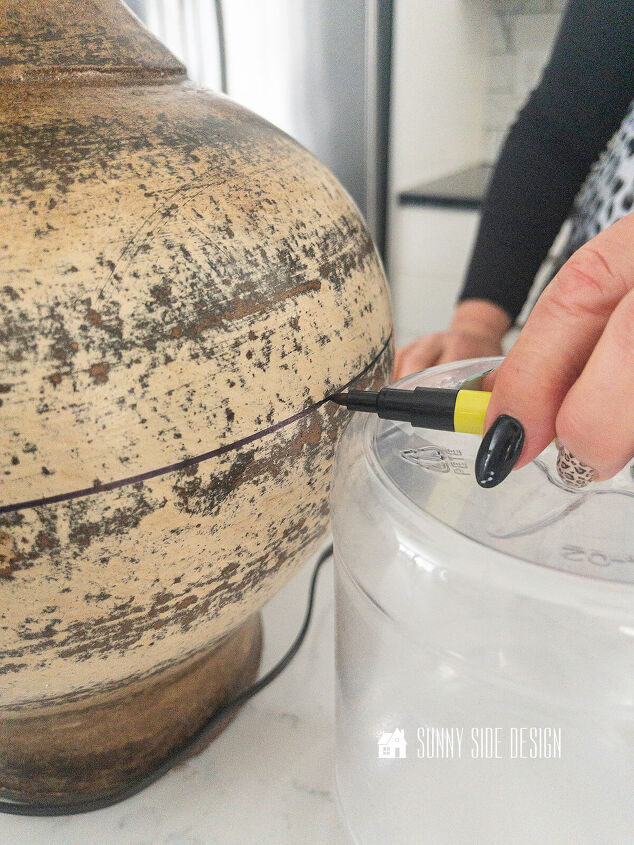
Then I placed the clay onto the lamp base along my placement line with the seam at the back of my lamp.
And finally with damp fingers I smoothed out the seam, along with any imperfections in the clay and let it dry overnight.
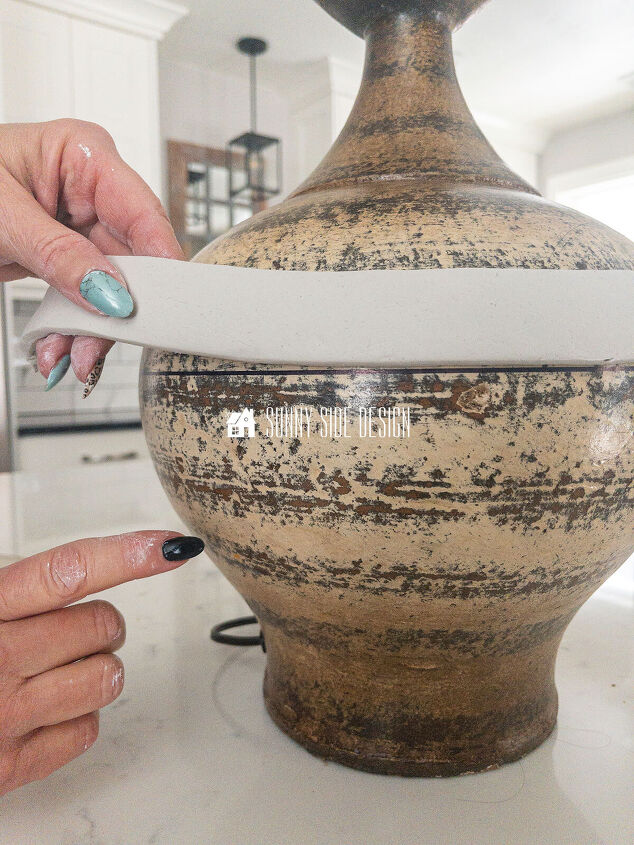
To my surprise the next morning when I went to check on my lamp, I found that it had separated at the seam as it dried and it shrunk about an inch.
But it was an easy fix, I simply adhered the clay band with E6000 glue and added a piece of clay to fill the gap.
Once it was dry, I sanded the seam before painting the lamp base.
Are you enjoying this painted lamp base project?! Please pin it, save it for later and share it with a friend.
Sharing is caring!
Painting Lamp Base
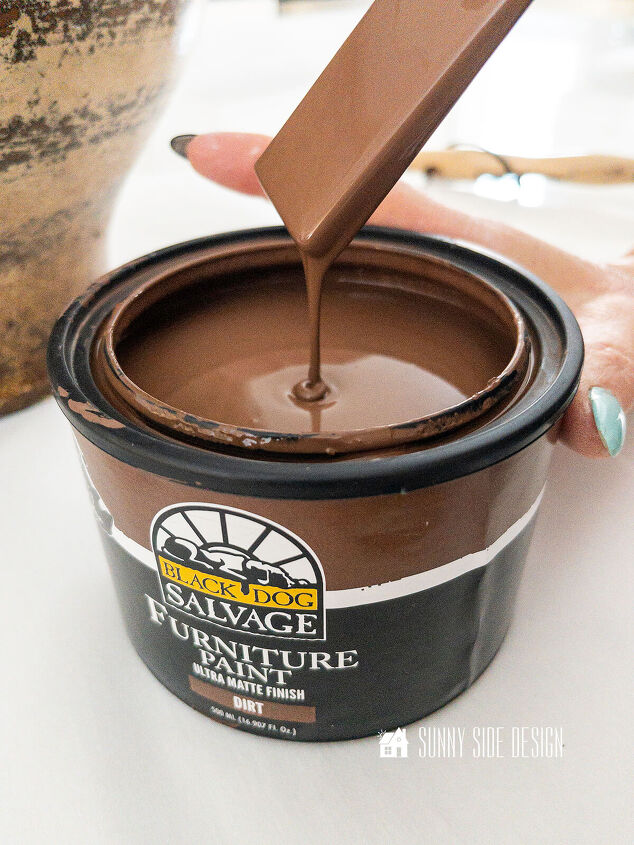
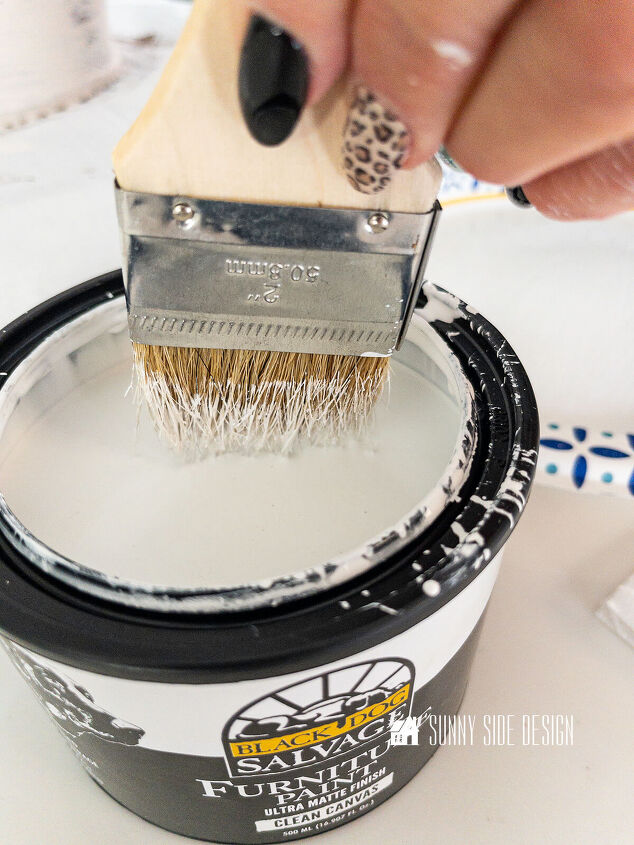
Before we begin painting the lamp base you want to thoroughly stir the paint.
I’ve noticed especially with the darker colors there is quite a bit of settling in the bottom of the paint can.
Never shake this paint! Always STIR!
If it is shaken the components will separate and the paint will need to sit for several days so it can settle down and then be stirred to reunite all of the ingredients.

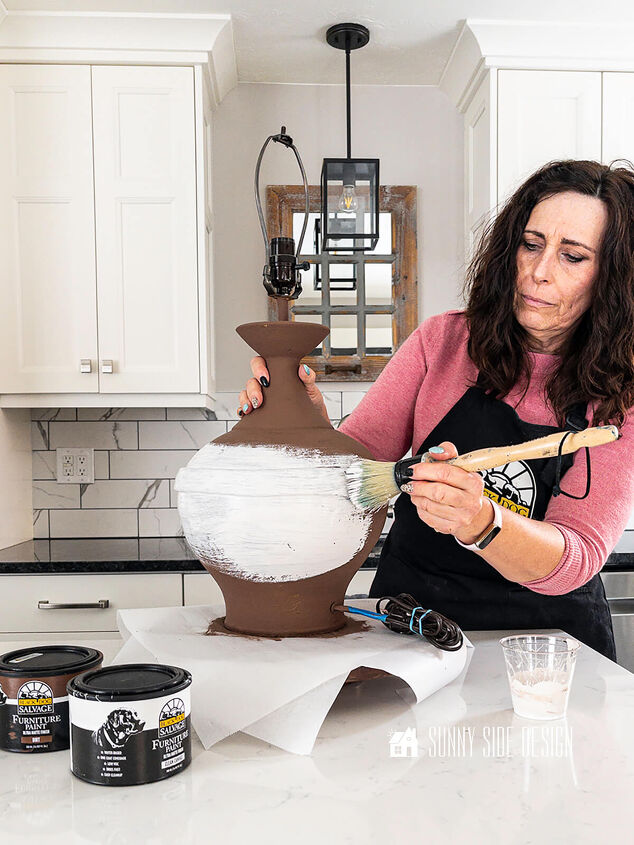
The first coat will be this rich dark brown color called dirt.
Apply one base coat.
You’ll see that it covers beautifully.
However, we aren’t worried if a little of the lamp base shows through the paint.
We’ll be applying two more coats.
Let this coat fully dry.
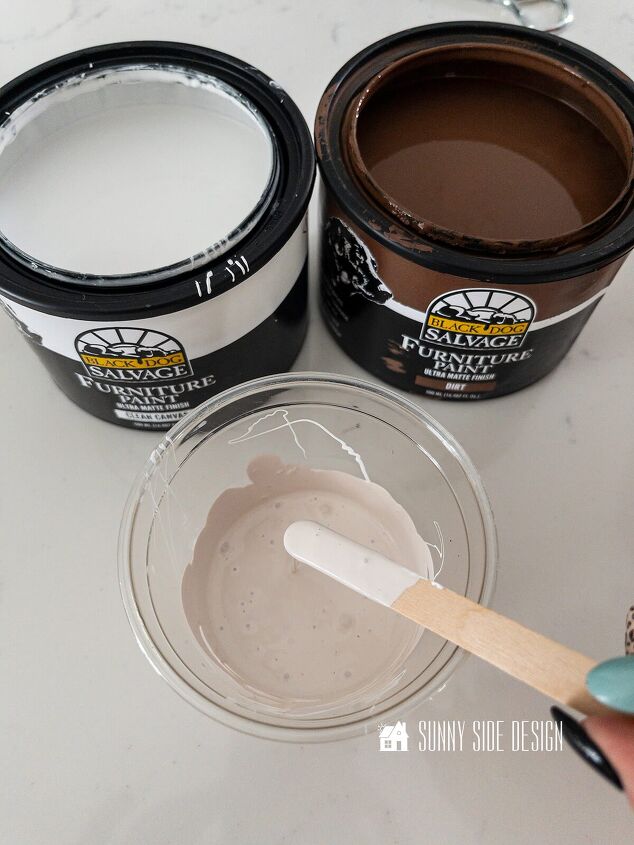
For the next coat of paint I mixed my own custom color.
It’s a soft creamy off white.
To achieve this color I used a ratio of 1 part dirt to 30 parts clean canvas.
It doesn’t take much paint.
In fact, I mixed 1/2 tsp. dirt color with 5 tbsp. clean canvas and it was plenty of paint for my lamp base.
That is the beauty of this paint, you can easily combine paints to make your own custom color.
Plus on their website you’ll find recipes for 70+ custom paint colors you can mix.
As you apply this creamy off white paint onto the lamp you’ll brush it a bit more to create a little texture in the finish.
This coat will not cover all of the brown paint and that’s just the way you’ll want it.
This layer creates depth and a layered effect with the paint.
And as luck would have it, my ceramic lamp base had a few divots in it which will add to the character of the finish.
I’m so excited with the way this is coming together!
The paint is creating a sense of age along with depth and dimension.
Let’s stay connected! Follow us on social media!
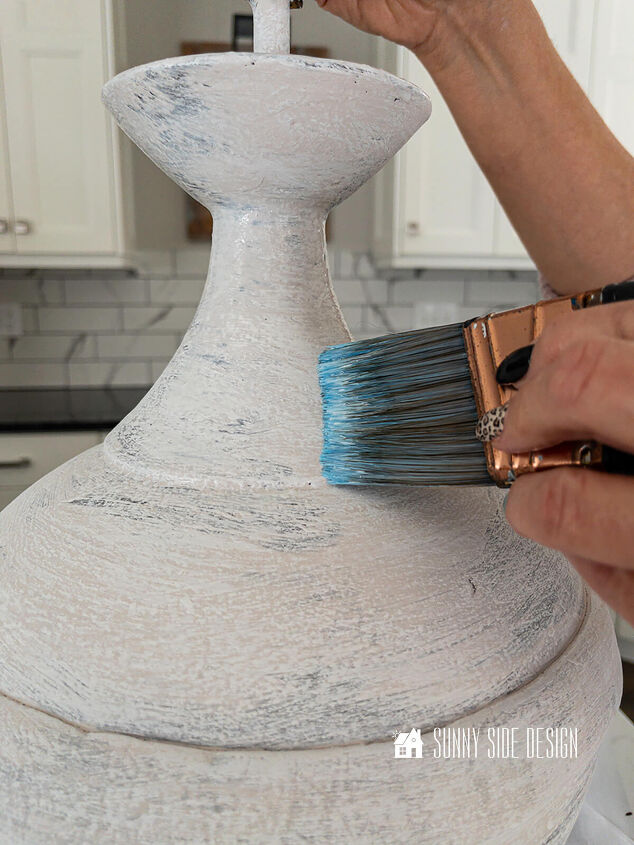
Dry Brush Lamp Base
The final layer of paint will be Clean Canvas.
And with this layer, you will use a dry brush technique.
First dip the tip of a chip brush into the paint.
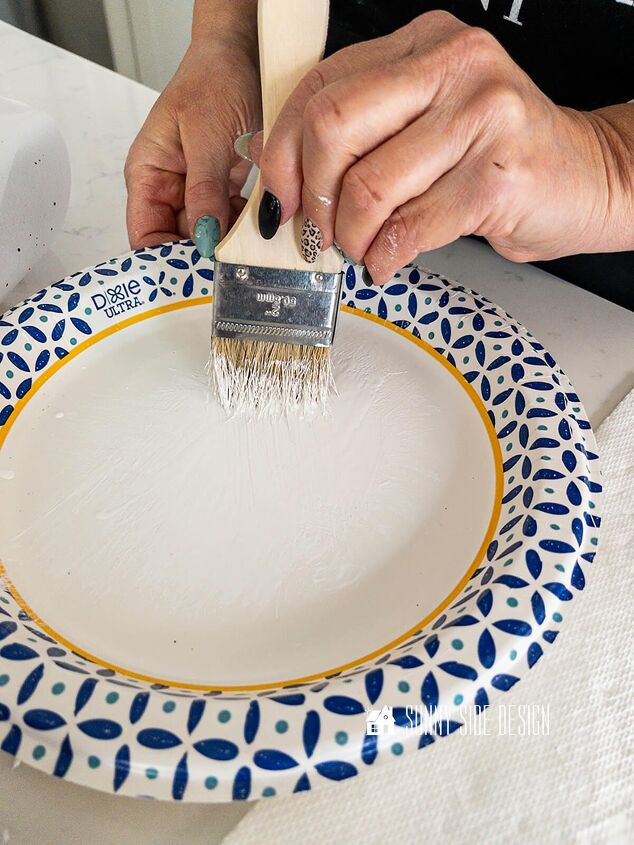
Work the paint into the bristles by brushing it back and forth on a palette or paper plate.
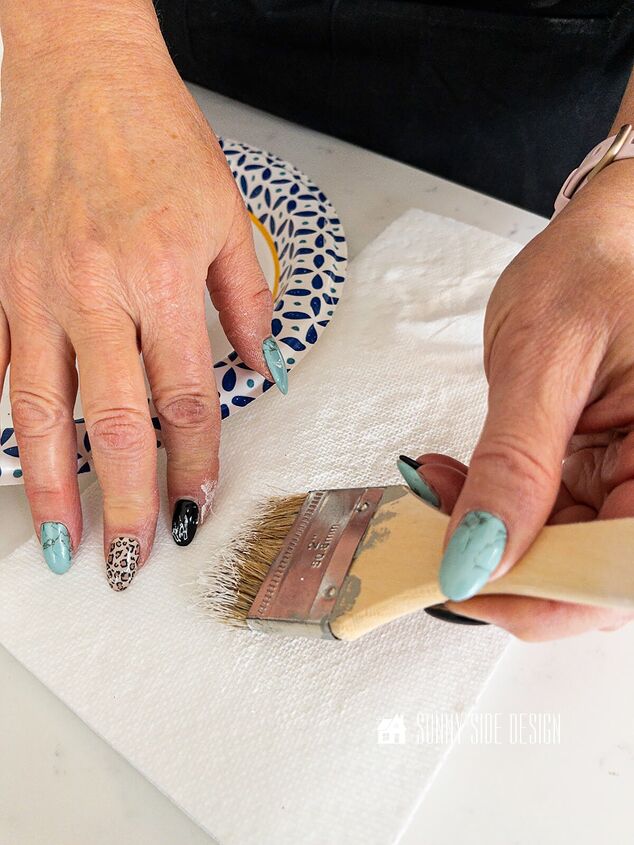
Next, blot the brush on a paper towel.
You do not want too much paint in the chip brush.
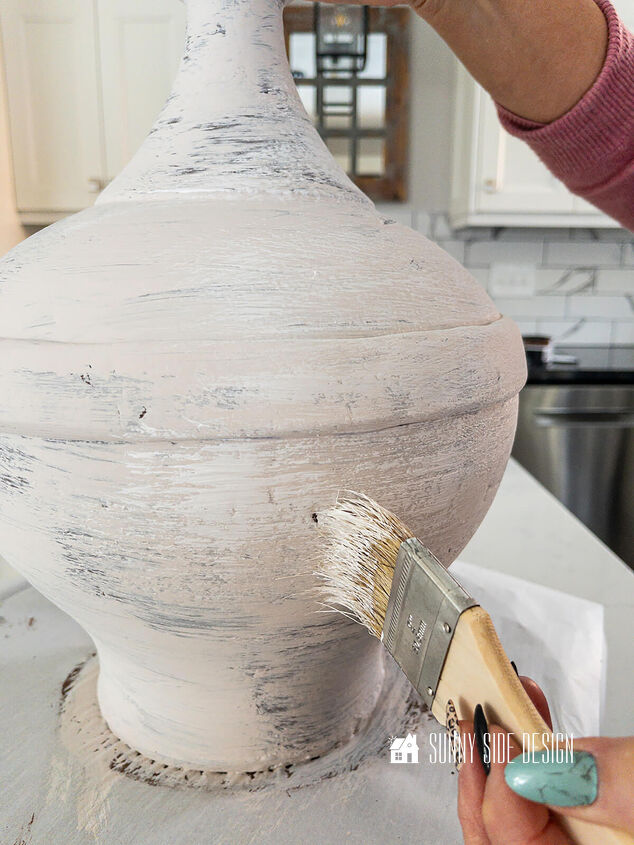
Lightly brush across the lamp base in a horizontal motion.
This will create a lovely aged and layered effect very similar to our Pottery Barn lamp.
Let me share a tip with you when painting a piece like this.
I placed the lamp base onto a lazy susan that I covered with parchment paper.
It made it so easy to spin the lamp around as I painted each layer.
Continue this dry brushing technique around the entire lamp base until you are satisfied with the results.
Allow the paint to fully cure for 24 hours before applying the topcoat.
Apply Topcoat
The very last step in our painted lamp base is to apply the topcoat.
Be sure to allow the paint to dry for 24 hours before applying the topcoat.
I chose the Show Dog Topcoat in ultra clear matte.
First and foremost, I wanted to maintain that beautiful velvety matte finish of this paint, so I chose the matte finish.
When painting a project that is a white or a pale color, you’ll want to choose the Show Dog topcoat because it will not yellow over time.
The Guard Dog topcoat will amber over white.
Before applying the topcoat, stir it well.
Never shake the topcoat!
This goes for any topcoat.
Shaking will aerate the topcoat and create bubbles you won’t see until it dries.
Painting Tips
Tips for using Black Dog Salvage Furniture Paint and Topcoat
- clean with a good all purpose cleaner like TSP
- no need to sand, strip or prime
- paint will adhere to any clean surface whether it has lacquer, poly, varnish, shellac, oil or water base paint or stain
- you can paint over metal, glass, laminate or ceramic
- don’t overwork the paint, brush it on and let it be
- environmentally friendly, low in VOC’s, no odor
- easy clean up with soap and water
- stir paint and topcoat before use, never shake
- allow paint to dry at least 24 hours before applying topcoat
- if thinning to spray the paint, use distilled water
- store paint above 60°, preferably 65 and above
- for pale colors or white use Show Dog topcoat, Guard Dog topcoat will amber over white.
Don’t forget to get your 20% discount on your Black Dog Salvage Furniture Paint purchase, enter the code 2THESUNNYSIDE20 on their website.
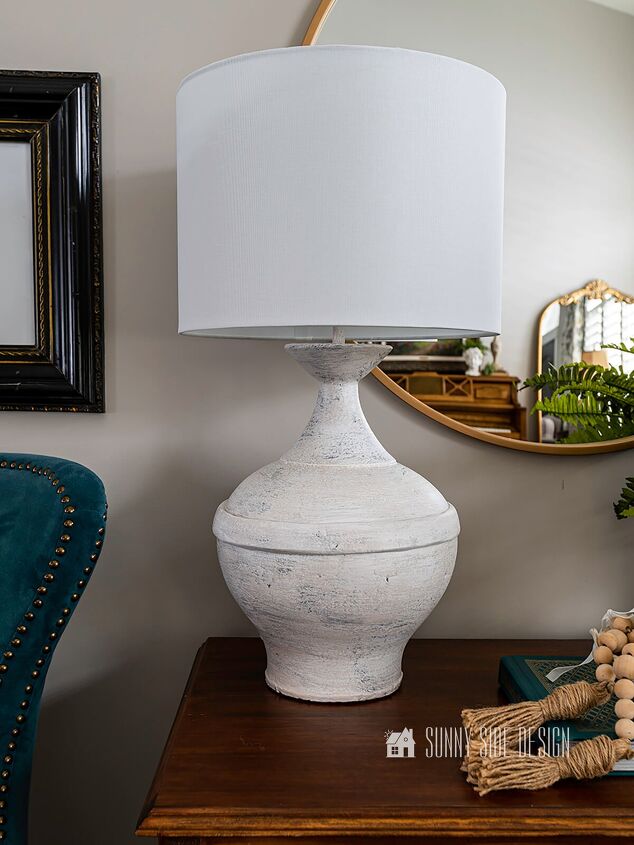
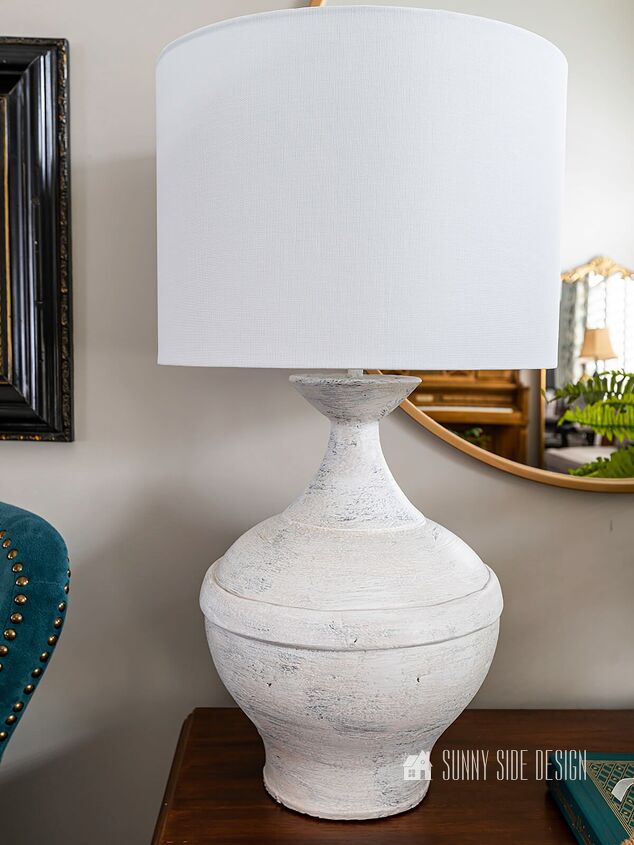
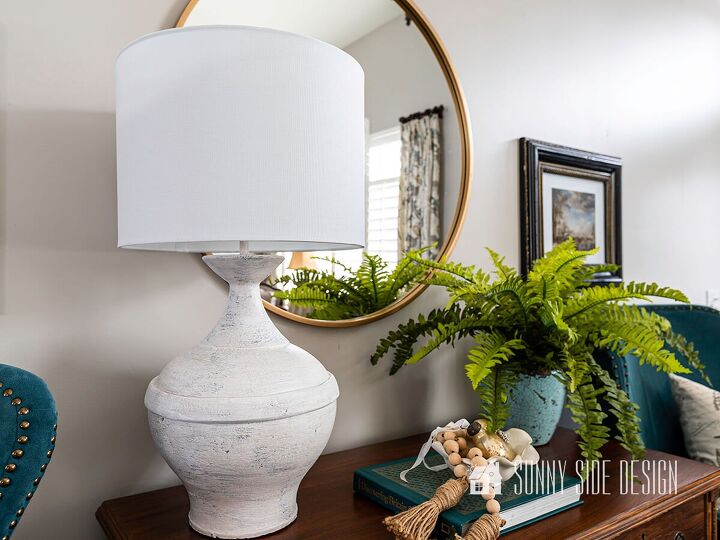
Painted Lamp Base Reveal
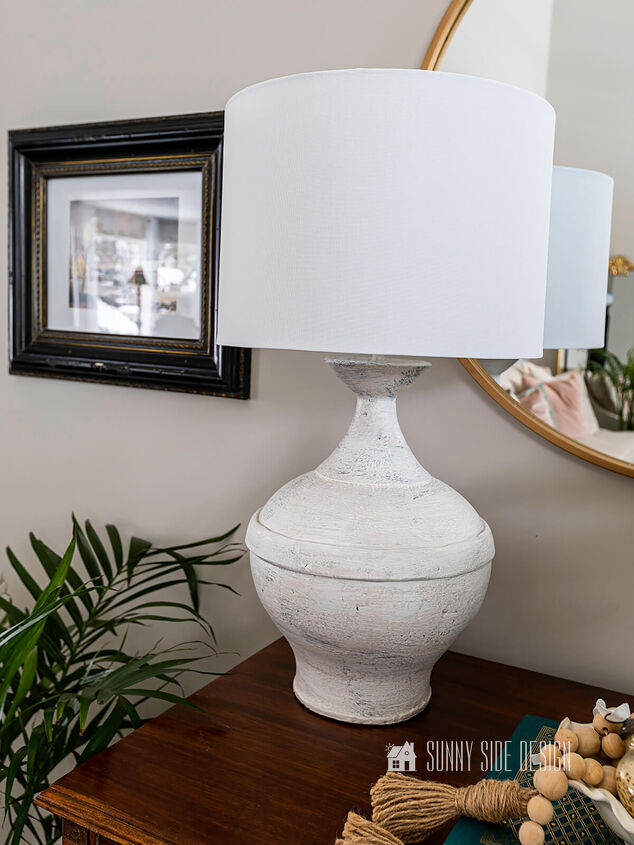
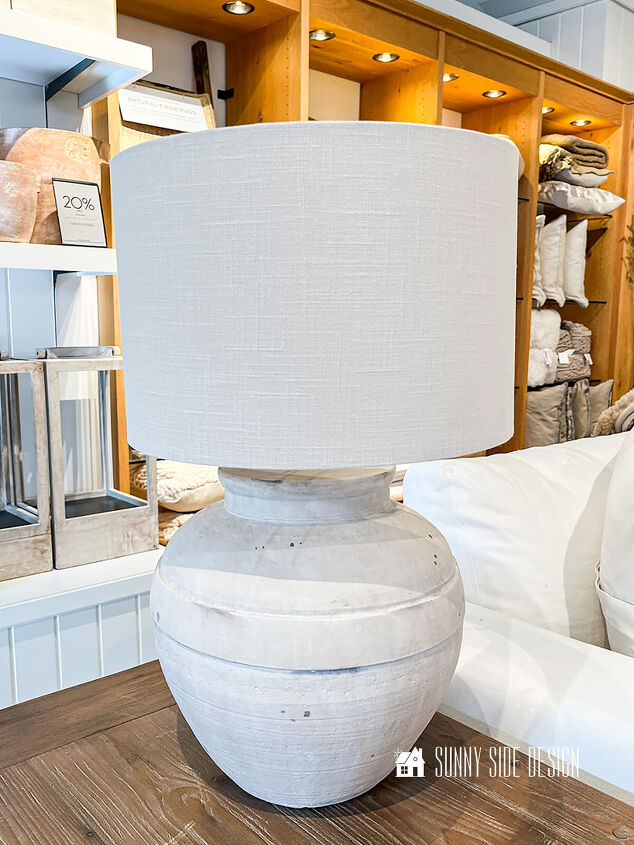
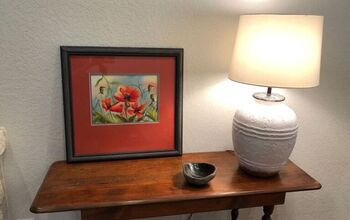
I am thrilled with the way this lamp makeover turned out!
It has all the character that I love in the Faris ceramic lamp.
Just take a look at the two lamps side by side, I think this dupe turned out amazing!
This painted lamp base is full of depth and character.
In fact, I believe that my lamp base turned out better than the inspiration lamp.
Painting lamp bases doesn’t have to be intimidating or expensive.
With the right supplies, like Black Dog Salvage Furniture Paint and layering the paint, you can transform an ordinary lamp into a beautiful painted lamp base.
Don’t miss out on this amazing transformation – follow our step-by-step instructions and you’ll have a show-stopping painted lamp base in no time!
With the way this lamp turned out, I’m already thinking of project I can try this technique on.
This technique would be amazing on an old vase or maybe even a table top.
What piece would you like to try this painting technique on?
Did you enjoy this project?! Please pin it, save it for later and share it with a friend.
Sharing is caring!
Are you ready to transform an old lamp?
In no time at all, you can transform a thrift store lamp into an amazing lamp for your home.
Let us know if this is a project you’d love to try.
Please share your thoughts and questions with us.
We’d love to hear from you!
If you’re new here, WELCOME! We love having new readers and friends!
Let’s stay connected!
Subscribe to our free newsletter so you don’t miss any inspiration for your home.
Please PIN and save for later, and share with your friends!
Sharing helps grow our following!
Thanks for stopping by and as always here at Sunny Side Design…
WE HOPE TO BRING YOUR HOME TO THE SUNNY SIDE OF THE STREET.
Be sure to follow us on Pinterest for even more home decor and DIY ideas.
To see what we are working on before it’s on our blog, follow us on Instagram.
You will also find our video tutorials on our YouTube channel.
Resources for this project:


Comments
Join the conversation
-
You did an amazing job, your lamp is absolutely beautiful! I'm always searching for quality paint for my many, many, many diy projects (😊) and I'll give this one a go!
-
WOW! I think I love your lamp even more that the Pottery Barn lamp! It looks amazing and has a better shape! Amazing job and you can't go wrong with Black Dog Salvage paint. By the way, loving your nails!


Frequently asked questions
Have a question about this project?
In this great video you mentioned painting your kitchen island. Where can I get more info on that process?
Where do you find the “Show Dog Topcoat”?
You did a great job!