


You Can Create an Elegant Wall Sconce With a Bathroom Plunger

As someone who believes strongly that elegance and luxury can always be found on the cheap, I am always on the lookout for beautiful items that I can recreate in my own home.
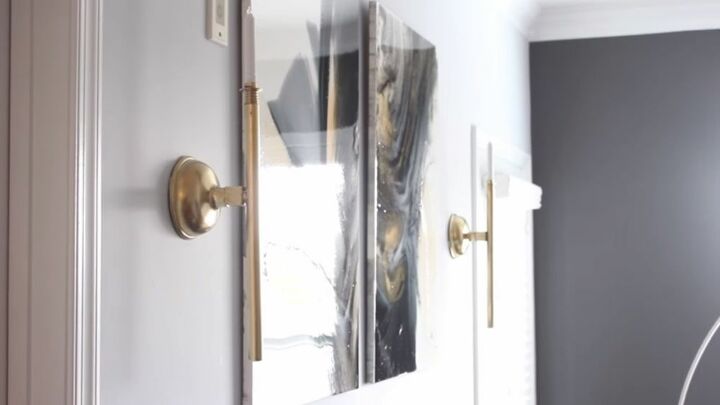
I was recently browsing Z Gallerie when I stumbled across some truly gorgeous bronze wall sconces, the kind one might see in luxury European hotels or Park Avenue apartments. Of course, those candle wall sconces were not particularly cheap, especially given that you will likely want to buy multiple sconces in order to complete the look.
However, I really wanted that look, as I thought they would complement my newest artwork perfectly. My brain cogs starting turning, and I came up with an unconventional idea for creating these at home for almost zero cost. I realized that a typical bathroom plunger would be able to replicate all of the parts needed to create the wall sconce, while a couple of coats of metallic paint and a dash of hot glue would take care of the rest. Here's how I created my own luxurious candle wall sconces in just a few minutes, spending almost no money at all.
Tools & Materials
While I was able to put this project together using materials I already had lying around my house, you might have to make a trip to the store to get what you'll need. Everything I used can be found at Home Depot or bought online at Amazon or Best Buy. If you need to buy everything on this list to create your wall sconce lighting, you will still pay a fraction of what it costs to buy these wall sconces in the store. Here's what I used.
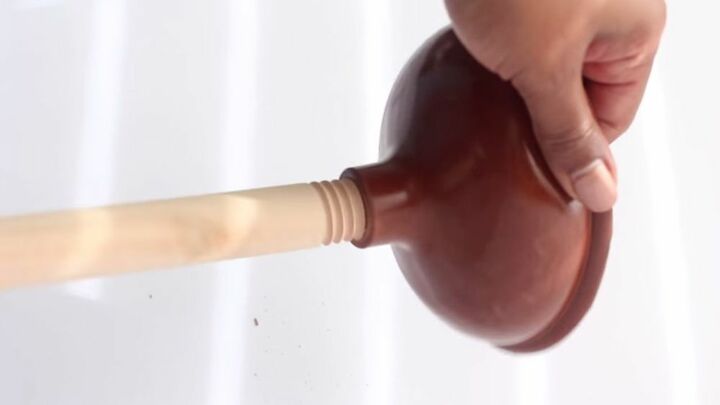
- A standard bathroom plunger per wall sconce.
- I opted for a larger plunger since I wanted my sconce to occupy a prime position on my living room wall.
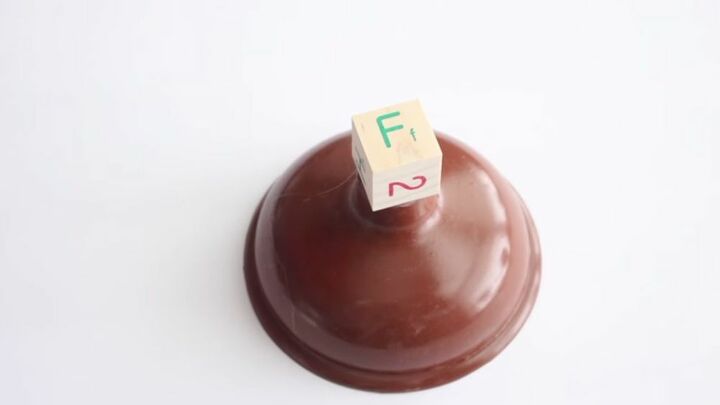
- A pack of alphabet building blocks.
- Make sure the blocks you choose are only slightly larger than the diameter of the plunger handle.
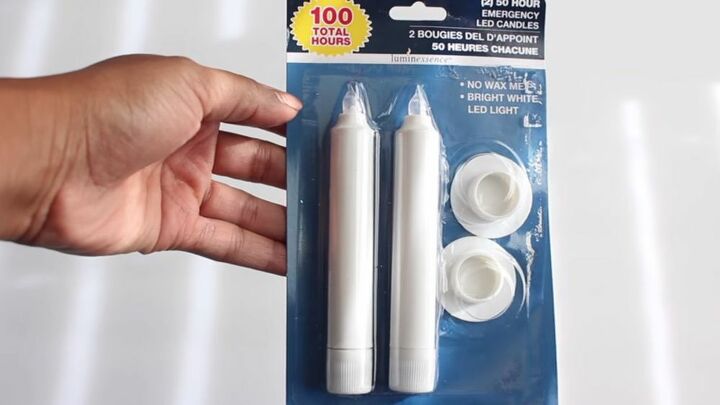
- A pack of emergency LED candles.
- Pick candles that will fit nicely on top of the plunger handle.
- E6000.
- Hot glue gun & glue sticks.
- Matte black craft paint.
- Gold spray paint. You can, of course, pick any color that strikes your fancy.
Standard command strips.
Gather Your Materials
The first thing I did was to make sure that all of my materials were in one place. When done right, this whole project can take less than an hour to complete, so it helps to have everything ready before you start. I made sure to lay down a big sheet of paper over the flat surface I chose to work on, as the spray paint and hot glue can get a little messy, and the last thing anyone wants is a stain on the furniture! I also made sure to open a window to ventilate the room because the fumes from the spray paint can make some people lightheaded, even if the paint is non-toxic. With my materials in place, I was ready to get started!
Take the Plunger Apart
Each of the candle wall sconces I created was made up of the different parts of a bathroom plunger that I reassembled. That meant that the first step was to take apart the plunger that I had bought at the store. To remove the rubber plunger part from the wooden handle, all I had to do was hold the base and unscrew the pole handle. Once it is off, the next step is to remove the barcode label that is always wrapped around the handles of new plungers. This can be a little tricky, as they tend to be glued on pretty tight. However, if you take your time and peel it off carefully, you should be able to remove it without leaving any unsightly residue. Once I had taken it apart, I grabbed a pencil and marked the handle at about 6 inches from the bottom, as this is where I was going to glue my base later on.

Glue Candle to Handle
Next up, it was time to attach my candles to the plunger handle. I grabbed some E6000 and applied to the flat part of the handle base where I had removed the rubber plunger. I then use my glue gun to add some glue to the nub. I had taken the time to make sure I had picked out candles that matched the diameter of the plunger handle as closely as possible, as it is easier to attach everything when all of the sizes match up. I placed the base for the LED candle on top of the side where I had applied the glue. Once this had dried, all I had to do was place the candle into its base!
Glue Cube to Plunger and Handle
Remember how I mentioned that I marked the plunger handle at the 6-inch line? This is because I needed to glue to rubber plunger to this part to form the wall base for my wall sconces. I couldn't just glue the rubber plunger straight to the handle, because this would not be enough to support the overall structure. Instead, I used a small alphabet building block to connect the two. It's a good idea to use these because they are all identical, so you'll get the exact same effect if you create more than one wall sconce. The first thing I did was apply some glue to the rubber plunger where the handle used to be. I then suck the alphabet block on top. Once it had dried, I put some glue on the exposed top of the block and attached it to the handle at the line that I had marked earlier.
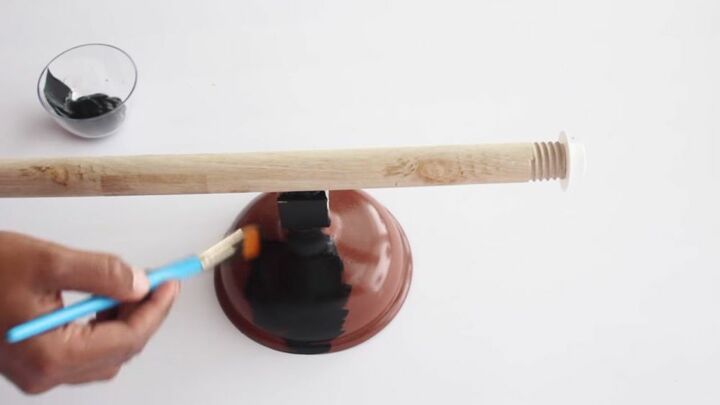
Paint
Next up was the painting stage. I wanted to make sure that my plunger sconce looked exactly like those heavy, expensive-looking bronze wall sconces I'd seen in the store. To do this, I decided to add a base coating of matte black craft paint to the entire piece before adding the gold spray paint. This will allow the gold paint to truly pop and make the wall sconces look as authentic as possible.
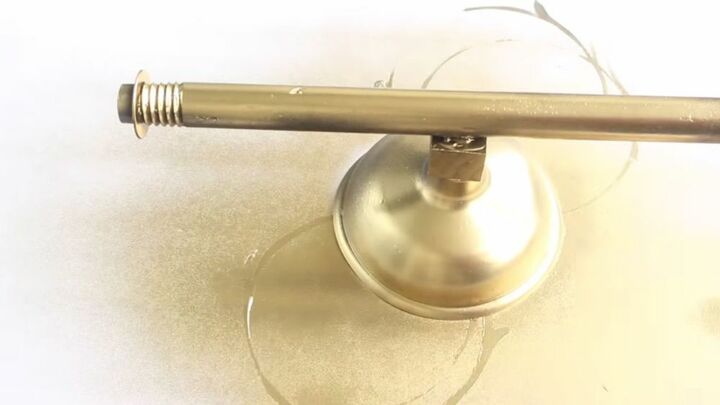
Spray Paint
Once the matte black craft paint had dried, the piece was ready for a heavy coating of gold spray paint. I did not skimp on the paint here, as I realized that a very thick coat was necessary if I wanted my plunger to really look like a piece of metal. I made sure to cover every inch of the piece with gold spray paint before leaving it to dry for a little while.
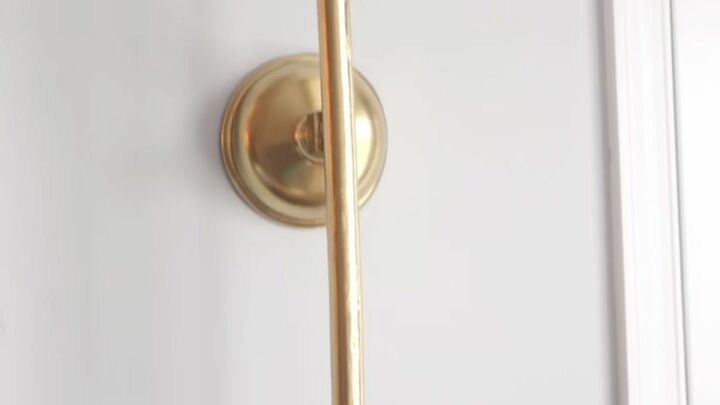
Hang
Once all of the paint and glue had dried, it was finally time to hang the sconces on my walls! Since this is made from a plunger, it hardly weighs anything at all. That means that a couple of standard command strips are more than enough to keep the piece stuck to the wall. I simply pasted the command strips on the rubber plumber and placed it on the wall. I chose to hang two wall sconces on either side of a piece of wall art I had made, as they frame art very nicely. However, you can hang yours wherever you like. Candle wall sconces enhance any room.

This simple, fun, and unusual project takes less than an hour to complete and will only leave you a few bucks out of pocket. If you liked this project and want to see more, make sure to share it with your friends!
Has this project inspired you to transform your home with a designer touch?
Resources for this project:
See all materials


Comments
Join the conversation
-
Absolutely brilliant!
-
Will definitely steal this idea☺.


Frequently asked questions
Have a question about this project?
Did you do the paintings?
Maybe I missed something, but what did you do to the end where the rubber bulb was screwed on? In one photo it looks like it's on the top, but in another, it appears to be on the bottom of the sconce.
A picture of the finished project would help me to understand exactly what you did and how you did it. I still don’t know how the LED candles fit in.