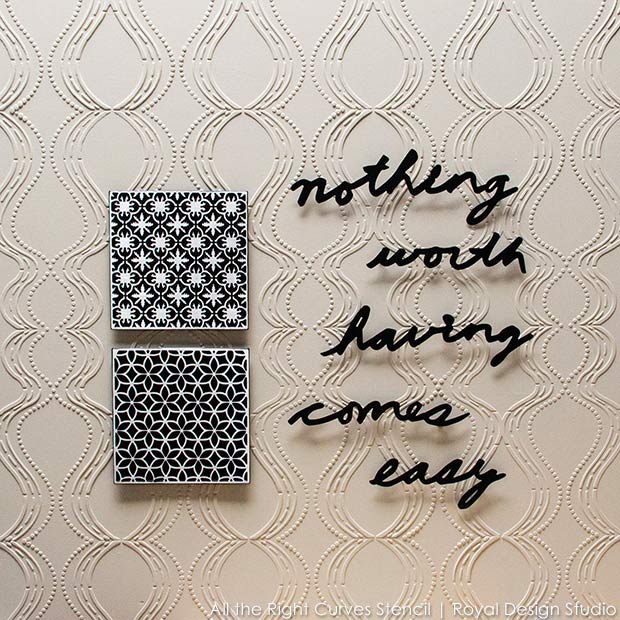
Stencil How-to: Stencil Embossing an Allover Pattern

Royal Design Studio
by Royal Design Studio
Are you ready to take stencils to new heights?? Stencil embossing, also known as dimensional stenciling, can be a bit more challenging, time consuming, and shall we say DARING than stenciling with paint. But, the end result is so eye-catching and unique that it is OH SO worth it. Stencil embossing is a fabulous finish for using an allover stencil pattern to highlight a special feature wall or niche. Read on to discover the basic steps for stencil embossing an allover pattern.
There are many different specialty plaster materials that you can use to create different types of raised effects with stencils, but we are starting you off here with a plaster material that is super easy to use, readily available, and dirt cheap: Premixed Joint Compound.


Because Joint Compound is a very porous, brittle material on it's own we are going to finish off the stencil embossing technique here with a couple of solid coats of paint. This makes this technique even more user friendly, as it creates a solid color look, and it will be easy to fix and cover any inconsistencies in the finish.


Stencil supplies you will need:


All the Right Curves Stencil or your favorite allover stencil pattern from Royal Design Studio


1" Stencil Brush


Gray paint


Premixed Joint Compound (find in Drywall section)


Plastic Taping Knife (find in Drywall section)


Japanese Trowel


Medium Sanding block


Paint roller/tray


Off White Paint + Primer such as Behr's Premium Plus Ultra
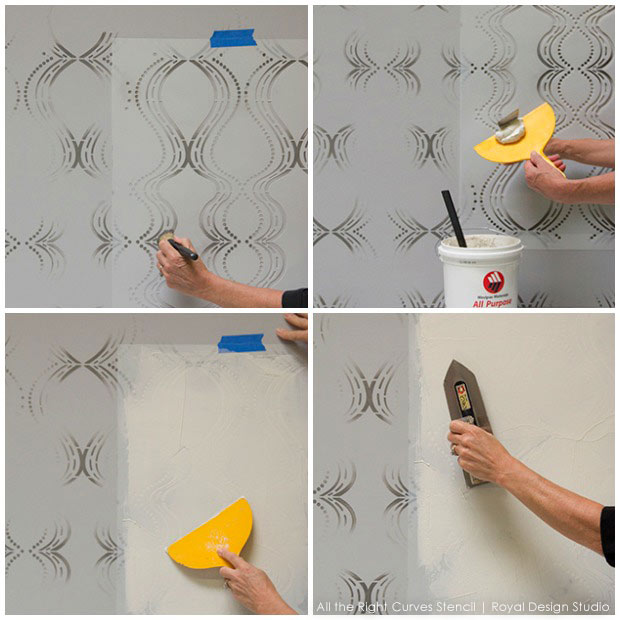
If you are stenciling embossing an allover pattern as shown here, you will need to create a visual guide first for the repeat registration. This is because you will need to hopscotch around with the stencil pattern to avoid placing it over areas that you've stenciled that are still wet with the raised joint compound or plaster.


Step 1: You do not need to stencil every part of the pattern. Stencil just enough so that you can map out the repeat of the pattern and have a good guide to follow when you start stencil embossing.


Step 2: Place your stencil over the first repeat previously marked with paint and tape in place securely. Load some Premixed Joint Compound on to of your a your Plastic Taping Knife with a putty knife or similar.


Step 3: Hold the Taping Knife at a low angle as you gently but firmly pull it across the stencil, trying to cover each area evenly. Don't build up the Joint Compound too high. Just apply it to cover a little more than the depth of the stencil.


Step 4: Once you have the stencil covered as uniformly as possibly, use a Japanese trowel (or other clean trowel) to further smooth over the surface. Your goal again is to get the Joint Compound as even as possible and remove as many lines as you can that were left by the Plastic Taping Knife. Don't worry about removing ALL the lines and ridges. You can easily sand them out later if you wish.
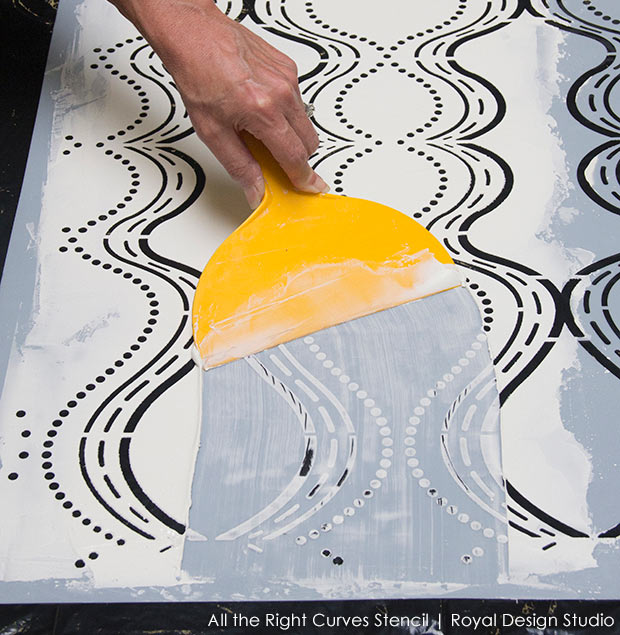
It is not necessary to clean the stencil between each repeat-unless you pushed some Joint Compound onto the back of the stencil. You WILL need to clean the stencil often though. The best way to clean a large stencil like this is to lay it flat on a table or surface covered with heavy plastic. Use the Plastic Taping Knife to remove excess Joint Compound. If it is still wet, you can put it back in the bucket to reuse it. If it has started to dry and crumble, simply scrape it into a trash can. DO NOT put the Joint Compound down your drain.


After removing the excess, you can easily rinse the stencil off in a large sink, bucket, bathtub, or even outside with a garden hose. One of the beauties of using Premixed Joint Compound for this technique is that it is very water-soluable and will rinse off with very little effort. Dry your stencil with a large towel, and continue on.
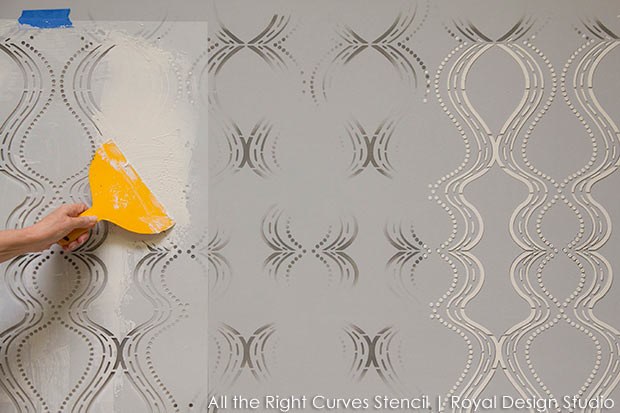
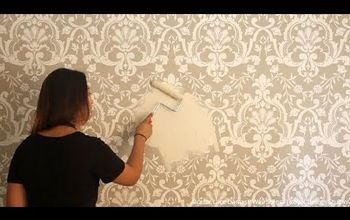
Step 5: Skip one repeat and place your stencil over the previously stenciled pattern. Follow Steps 1-4 again. Allow the Joint Compound to dry at least to the touch before stenciling the repeats "in between".
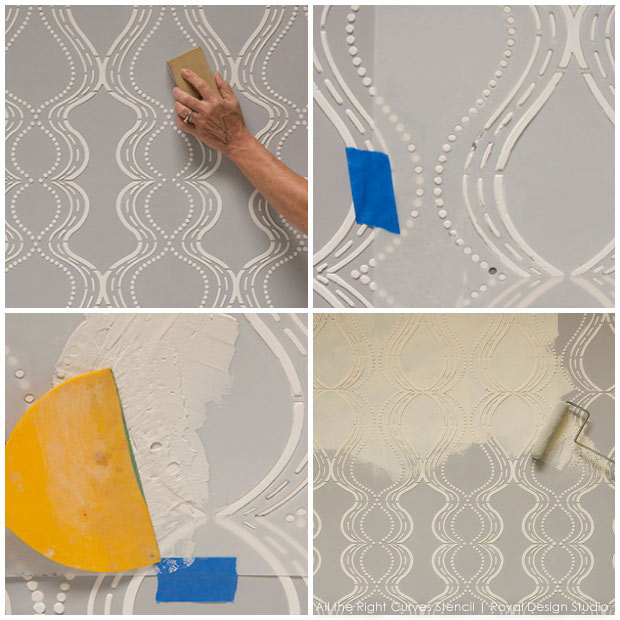
Step 6: When all the joint compound is dry use a medium-grit sanding block to lightly sand down all the raised, uneven areas, trowel lines, and bumps. The good news: Joint Compound is SUPER easy to sand. The bad news: It's dusty and it's easy to sand TOO much. Go easy. A little sanding will go a long way. It's best wear a dust mask and use a vacuum attachment to remove the dust which will collect around the pattern and below. Clean


Steps 7-8: Once you've sanded and cleaned, it will be easier to see if you need or want to go back and fill in some areas more. If you skipped over or applied the Joint Compound too thinly in some areas you can re-apply the stencil and repeat steps 2 and 3 just to that area. Sand and clean again, if necessary, after your last coat of Joint Compound dries.


Step 9: Joint Compound needs to be well sealed to provide a durable finish. We recommend applying a good quality paint that also contains primer, such as Behr's Ultra Premium Plus. Roll on a minimum of 2 coats of paint with a 3/8 roller.


For more stencil projects, ideas, and how to's visit our blog Paint + Pattern!
Frequently asked questions
Have a question about this project?
Comments
Join the conversation
Next