


How to Fix a Broken Door Frame in a Few Simple Steps

By Judy Schumer
Time, heavy use, forceful entry, and exposure to the elements can cause damage to your door frame in the form of cracks and splits in the wood. The method you use to fix your door frame depends on how extensive the damage is. In some cases, you may just need some wood filler, in others, you may need to replace the entire frame.
Read on to find out how to fix a broken door frame, how to replace the frame in cases where the damage is too extreme, and tips to make the job easier to complete.
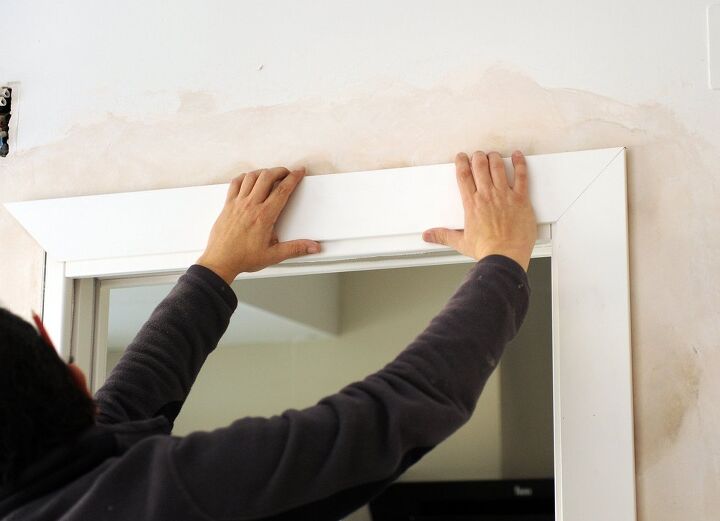
Photo via Shutterstock
Reasons for a Broken Door Frame
Doors get used and abused every day in the average home. After all, they are the entry points to your house and the rooms inside your house, so they're opened and closed often. Exterior doors are exposed to extreme heat and cold, while interior doors get slammed, bumped into with heavy furniture, and are subject to the heat and moisture from kitchens and bathrooms. Below are the most common reasons for a cracked door frame:
Cold Weather – Cold weather is a common culprit when it comes to cracked door frames. Cold, dry air causes your door frame to lose moisture and shrink, which can result in cracks.
Damaged Jamb – When the wood that supports the door jamb (the vertical parts of the door frame) gets damaged or stressed from impact (often when furniture is moved through doorways), the wood becomes weakened. Cracks can form near the stress points. A sagging door frame can also split from stress caused by the uneven weight.
Damaged Trim – Trim damage, like splits and cracks, is often caused by slamming doors. Without repair, the damage can spread and require entire trim replacement.
Wood Rot – Rot on the door frame, or softening of the wood, can be caused by repeated exposure to moisture and condensation in bathrooms or exterior-facing jambs. Moisture is also a culprit for squeaky doors (check out our fix for a squeaky door if you’ve got that problem, too).
Forced Entry – Whether by a criminal act or a homeowner who locked their keys in the house, forced entry causes significant damage to a door frame. Not to mention, cracked and splintered wood around the frame can also compromise the security of the door.
Pets – Sometimes, our furry friends decide to use the door frame as a chew toy, removing parts of the frame in the process.

Photo via Shutterstock
How to Fix a Broken Door Frame
As long as your door frame isn't completely cracked from top to bottom, chances are you can fix it. Wood glue and wood filler, along with carefully replacing destroyed wood, can save you from having to buy a new door and/or needing to replace the frame.
While you may be tempted to just fill any cracks with glue and wood filler, taking the time to cut out and replace the split wood will affirm the structural integrity of your door frame. This, in turn, will save you from having to do more costly repairs down the road. Keep reading to learn how to fix a door frame, which should take you an hour or two.
Tools and Materials Needed:
- Hammer
- Putty knife
- Pencil
- Ruler
- Wood screws
- Hand saw, sharp
- Wood to replace broken pieces (usually 2 x 4 inches)
- Sandpaper
- Wood glue
- Paper towel
- Nails (regular and finishing)
- Wood filler
- Paint with primer that matches the door frame
- Angled paint brush
Step 1: Remove the Door
If the split is on the hinge side of the frame, you’ll need to remove the door. Skip this step if the crack or break is in another area of the frame.
Step 2: Remove the Door Stop
Remove the door stop (the innermost casing along the door frame) to give yourself full access to the door frame for cutting out the split area. To do so, use a putty knife to get in between the door stop and the frame. Lightly tap the end of the putty knife with the hammer to pry the door stop off the frame. If you find that doing so still doesn’t give you full access to the frame, you'll also need to remove the molding, using the same technique. Remove any nails as you go along and stow them in a safe place.
Step 3: Measure the Damaged Area
Use a ruler and pencil to mark off a buffer zone, the five-inch area both above and below the split or crack. This area needs to be strengthened. So in the end, your total measurement for your new piece of wood will include the length of the crack plus an additional ten inches.
Step 4: Secure the Door Frame
Using the penciled lines as a guide, place a screw into the door frame, just above the top line and just below the bottom line, to secure the door frame.
Step 5: Cut Out the Split and Buffer Areas
Using a sharp hand saw, cut the damaged area and the additional buffer out of the door frame.
Step 6: Cut the Replacement Wood
Measure the freshly cut opening where you removed the damaged wood. Cut a replacement piece of wood from your new piece of wood at the measurements from Step 3.
Step 7: Glue the Replacement
Squeeze wood glue into both ends of the replacement wood piece. Push the new piece into place and wipe away any extra wood glue with a paper towel. Hammer a nail into the top and the bottom of the new price to secure it while drying to add extra reinforcement. Let the glue dry according to the manufacturer’s instructions. Once dry, lightly sand the new piece for a smooth finish.
Step 8: Apply Wood Filler
Using a putty knife, smooth wood filler over the repaired top and bottom to fill in any gaps between the new wood and the existing door frame. Once dry, lightly sand the wood filler so the repair blends into the frame.
Step 9: Paint the Repaired Section
Paint the new repair with a paint that has primer blended into it. Let the paint dry thoroughly before attaching the door stop and molding.
Step 10: Reattach the Door Stop and Molding
Carefully reattach the door stop (and the molding if you removed it) with finishing nails. Paint any areas that need to be touched up.
Make Your Own Wood Filler
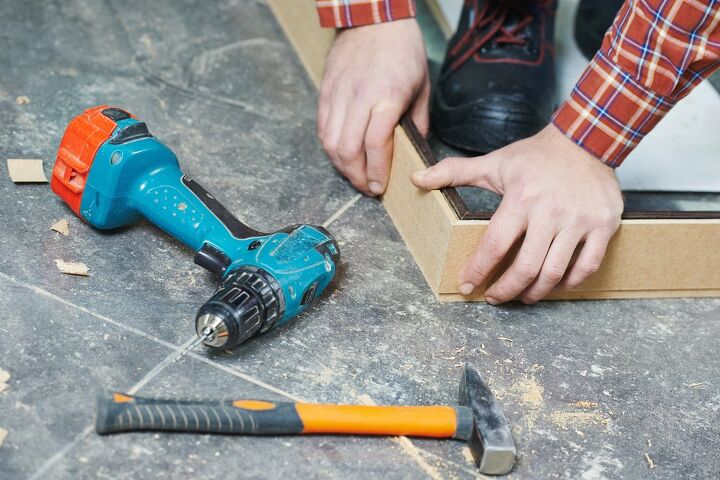
Photo via Shutterstock
How to Replace a Broken Door Frame
If your door frame is extensively damaged, it’s a good idea to replace the entire frame instead of repairing multiple or wide cracks. The best (and easiest) way to replace a broken door frame is to use a door frame kit. Building your own door frame may save you a little bit financially, but the structural integrity can be compromised.
Tools and Materials Needed:
- Construction gloves
- Safety goggles
- Screwdriver
- Putty knife
- Claw hammer
- Pry bar
- Door frame kit (sized for your door opening)
- Nails (regular and finishing)
- Metal carpenter’s square
- Spray foam insulation
- Caulk and gun
- Paint with primer
- Angled paint brush
Step 1: Remove the Door
Remove the door from the frame. Leave the hinges attached to the door. Set the door (along with hardware) somewhere out of the way.
Step 2: Remove the Door Stop
Use a putty knife to get in between the door stop and the frame. Lightly tap the end of the putty knife with the hammer to pry the door stop off the frame. Once the door stop is loosened with the chisel, you can carefully use the pry bar to remove it the rest of the way. Remove any nails as you go along and store them in a safe place.
Step 3: Remove the Molding
Use a putty knife to get in between the door stop and the frame. Lightly tap the end of the putty knife with the hammer to pry the molding off the frame. Remove any nails as you go along.
Step 4: Remove the Shims
Door frames are installed using small, flat pieces of wood called shims that ensure the door frame fits snugly into the wall. You can remove them with your hammer and putty knife, making a note of their current placement and taking care to preserve them for re-use when installing the new door frame. You’ll be reinstalling them in the same spots.
Step 5: Remove Hardware
You’ll need to remove the strike plate and any other hardware attached to the door frame. Put all hardware in a safe place.
Step 6: Remove the Door Frame
Pry the door frame away from the walls using the pry bar. Remove any nails left behind.
Step 7: Assemble the New Door Frame
Assemble the door frame kit according to the manufacturer’s instructions. Use your carpenter’s square to make sure the door frame header (the top horizontal piece) and the sides meet at a 90-degree angle. Before attaching the new frame to the door, pre-drill holes for the nails you’ll use for installation.
Step 8: Attach the New Door Frame
Place the new frame in the opening, nailing the header in place once you’re sure the sides are flush with the wall. Reinsert your shims to keep the door frame level. Tap them into place with your hammer—they’ll go back into the areas you've noted that they were removed from in Step 4.
Step 9: Hang the Door
Place your door into the new frame. Screw the door hinges back into place.
Step 10: Attach the Hardware
Reattach the strike plate and any other hardware to the door frame.
Step 11: Insulate
Use spray foam insulation around the edge of the entire frame. Let it dry completely before reattaching the molding.
Step 12: Reattach the Trim Moulding
Reattach the trim molding using finishing nails. Caulk all the edges where the trim is against the wall. Paint the new frame with an all-in-one paint with primer.
Tips and Hacks for Difficult Cases
Sometimes, you’ll run into obstacles when trying to fix a broken door frame. Not to worry: We’ve got the solutions for you. The most common problems (and what to do about them) when fixing or removing a damaged door frame are:
Stuck Nail
If a nail refuses to come out, put a piece of wood between the nail and the claw end of your hammer for extra leverage to pry it out. You can also use a crowbar to pull the nail out with the extra piece of wood in place to prevent even more damage to the door.
Buried Nail
If you run into the issue of a nail being buried in the wood, use a cat’s paw tool, also called a nail puller, to remove it. Hammer the end of the tool into the wood directly under the nail, then grab the newly exposed nail head to remove it. Cat’s paw tools can leave marks. Use a thin coat of wood filler to cover any dents or rough spots on wood that is being reused.
Stripped Screws
Any home DIY-er has run into the issue of stripped screws at some point. If you're trying to remove a stripped screw and the head of the screw isn’t flush with the wood, use locking pliers. Grab the screw head with the pliers and slowly turn the screw counterclockwise to remove it.
If the head of the screw is flush with the wood, you’ll need a special tool called a screw extractor. To use a screw extractor, first drill a ⅛-inch deep hole in the center of the screw head (which seems counterintuitive, but trust us!). Place the extractor in your drill and insert the extractor into the screw’s new hole. Slowly turn the extractor counterclockwise until you feel the screw coming out of the wood. Remove the screw the rest of the way with locking pliers.
Stuck Door Stop
Most door stops get painted over when the molding gets painted, making it difficult to pry off when needed. To easily remove the door stop, use a utility knife to cut through the paint along all edges of the door stop. You’ll be able to use your putty knife to get under the door stop once the paint is removed.
Have you fixed a broken door frame? Do you have any tips to share?


Frequently asked questions
Have a question about this project?