1.5K Views
Dress-Up Trunk

by
Tammie
(IC: homeowner)
$20
7 Days
Easy
All little girls love to dress up! Here is a Dress-Up Trunk that I created for my great-granddaughter's birthday. I repurposed a box that I got at Sam's Club. Fortunately, it had a lid. When I saw a sturdy box, and a lid, I knew I could make something that could be used, and would last long enough to be handed down to her little sister. This box was about 24"x18"x12" - I didn't measure it before, but this is my best guesstimate.
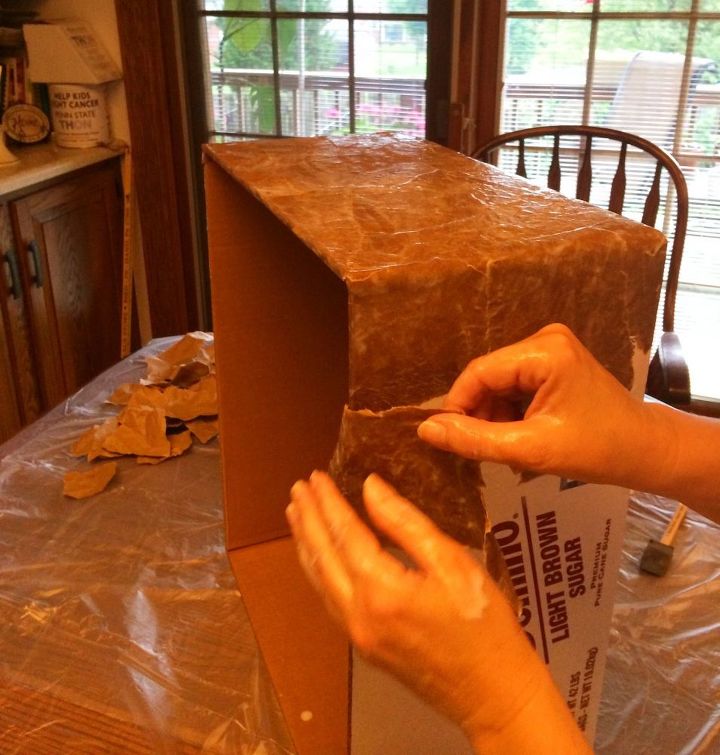
I used a paper bag technique. I had most everything I needed. All I had to buy was Mod Podge and the fabric.
Here is a closer look at the side of the box. You can see how the paper is overlapped, and the glue is still white. It will dry clear, of course. You can also see on the inside of the box, where I ran the paper over. I went back in, and added more to have a depth of about 3". You don't need to worry about neatness, as it will be covered with the fabric.
This is after the box was covered. I let it dry overnight after the sides were done, so that when I did the bottom, I knew the sides wouldn't stick to my work surface. You want to let everything dry for at least 24 hours, which will ensure the box won't stick to the lid. I did the lid while I worked on the box, and ran the paper on the inside of the lid, covering the sides and running the paper onto the top (inside) of the lid. This was ultimately covered with fabric. Once both pieces were completely dry, I Mod Podged over it to seal all of the paper. I used a 2" sponge brush to apply the Mod Podge. This dried for 24 hours after. Humidity will also be a factor for the drying time.
Box and lid. Notice on the top of the box, there are some "shiny" spots. This was where I had applied the paper with the "wrong" side up. I loved this look, though, as I felt it added character to the box. Doesn't it look like leather?
I didn't get photos of the application of the fabric, but it was pretty easy, once I had a plan. I bought a yard of fabric, but still have plenty left for another project. I measured each side - and because it was a cardboard box, none of the sides were exactly square, nor were opposing sides the same. Measure EACH side. I added an inch to the top and sides of the fabric, and using a fairly hot iron - specific to your fabric - I pressed down about 1/2" on all sides. I used a poly/cotton blend fabric. I then covered each side by coating with a fairly thick layer of straight Mod Podge, and pressed the fabric onto the box. Smooth out the fabric, and remove air bubbles. Once the sides were done, I did the bottom. The bottom of the box was not flat, and I couldn't really do anything to it without interfering with its integrity. I measured the fabric, but added 2" to all sides. No pressing for the bottom. I had batting left from another project, so I cut it to fit the box. I left it kind of big, so that the bottom would have a nice padding to cover up the misfit bottom. I put a large sheet of plastic on the floor of my garage - lots of fresh air - and used spray adhesive on the wrong side of the fabric, and pressed the batting onto it by hand. I then folded the sides of the fabric over onto the bottom of the batting. Back in the house, I let this sit for a couple of minutes, while I applied Mod Podge to the bottom of the inside of the box with a 2" sponge brush. I then pressed my "pillow" into the box, and let it dry. The inside of the lid was done like the sides.
As you can see, there are still things that you could do. If I had more time, I would have liked to add some old fashioned travel stickers to the outside, to give it a vintage trunk look.
Enjoyed the project?
Published July 6th, 2015 6:47 PM
Comments
Join the conversation
2 comments
-
Oh wow! I can't think of any little girl who wouldn't love this!
 Hannah V
on Jul 06, 2015
-









Frequently asked questions
Have a question about this project?