My DIY Recycled Secret Garden

by
Judy
(IC: homeowner)
$35.00
6 Days
Easy
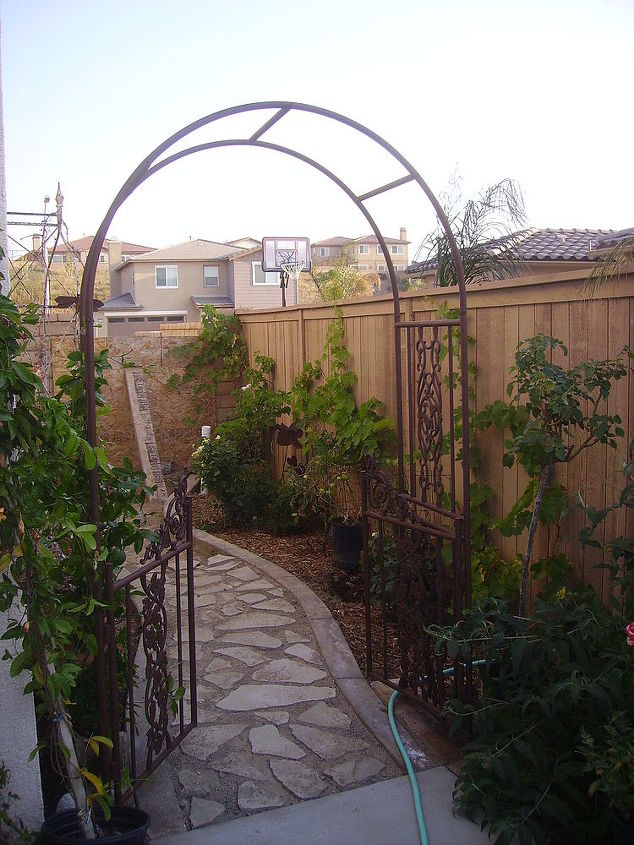
After moving into our new house I scoped out a side area on the house for something I'd wanted for years, a secret garden. My hubby broke the small concrete step outside the backdoor into pieces so as to pour a large patio slab. He thought I was crazy when I told him I wanted to use the broken pieces of concrete to make a walkway in my garden. He thought it would look horrible. I told him to wait and see and if it looked awful I'd take it out. He loved the look and helped me to add a concrete border with leftover materials from the patio slab. It gave it a more finished look.
I used rope to lay out the design I wanted for my walkway, then used leftover bender board from another garden project to make the forms for the little concrete border. Some concrete pieces were the perfect size and shape after being broken, others I took the sledgehammer to and made smaller pieces. I laid them out, using trial and error until I liked the way the design looked. I filled in around the concrete pieces with leftover sand from another garden project but then added some leftover brown grout on top to avoid having to deal with weeds popping up later. My husband liked the look so much he eagerly agreed when I told him I wanted to bust out part of the wall to install a gate.
I wanted the arbor to be secure so when we poured the concrete for the border I placed the feet of the arbor into the wet concrete and now it's very stable. I added another arbor with a built in seat against the side of the house to have a secluded seating area then started deciding my plant choices and placement. Most of the plants I used were ones I'd bought from the clearance rack at my local Lowes. A lot of home/garden stores have them but sometimes they're hidden in a back corner of the garden department . Check it out though because some of the deals are amazing and most of the plants thrive after a bit of trimming and a good watering.
Finished placement of the concrete pieces, planted everything, and finally got my gate installed. In the back left corner I placed some old, used bricks that I got for free from an old house that was being torn down. I just had to load them, bring them home and wait for the perfect project. I also added some statues, a fountain, a birdbath, and an old window frame, all things I already had. The project was very easy and very cost effective due in part to using items on hand and leftovers from other projects. Even the gates were a super deal because my husband's co-worker had a relative that made them. We did some bartering, he gave us a deal being a friend and because we bought two gates. It took a few weekends to complete this project as we did it in sections, having to wait for concrete and grout to dry and for the friend to build the gates.
I just love my secret garden and I really enjoyed recycling leftover materials, putting it all together, saving money and creating such a tranquil space. Anyone can create their own little hideaway......just start with a vision and go for it.
Hope you enjoyed my DIY project. Let your creative juices flow, enjoy what you're creating, and the results will bring you much joy.
Enjoyed the project?
Published March 23rd, 2015 10:45 AM
Comments
Join the conversation
2 of 504 comments
-
-
 Kimberly Espey
on Feb 24, 2024
Your creativity is amazing! Thank you so much for taking the time to share your progress every step of the way. I know this post is old but hope you still get comments
-













Frequently asked questions
Have a question about this project?
Where did you purchase the arbors?
Question, after you poured the sand, you just poured the grout, or did you mix the grout with water?
Love it! It’s beautiful!
How did you make the edging?
could you please give the directions for that!!!!
Do the sand and grout mix harden and set so the sand does not come off and carry in the house on the bottom of your shoes?
please reply
i just love your project!