


Gel Staining Builder Grade Oak Cabinets
Easy
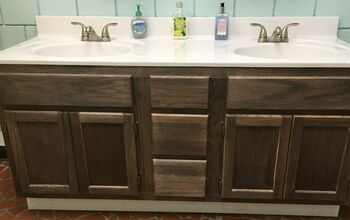
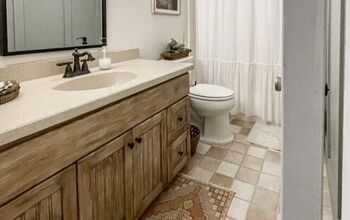
We always consider painting first because 1. it is usually the cheapest option, 2. we can do it ourselves, and 3. typically it's pretty simple. When I came across gel stain, I knew it was a no brainer. The hardest part for us was choosing the color. Here is how we turned our builder grade oak cabinets into gorgeous updated cabinets, that we receive so many compliments on. Detailed below, or visit www.raisingrustic.com/gelstainingcabinets for more pictures.
Supplies:
Let's start with the stain. Because really this DIY is all about General Finishes Antique Walnut gel stain. It is the star in this show so I must take a second to reflect on it. If you want this particular look, then you can not substitute this. The steps in this tutorial are specific to General Finishes, so if you choose to follow please get this product! The only exception is the color. We went back and forth between Antique Walnut and Java. Ultimately, we decided on Antique Walnut, but I don't think you can go wrong. If you are choosing a different color of General Finishes Gel Stain, this tutorial will still work (the amount of coats needed to achieve your desired look may vary). Our house is all whites, grays, and natural woods. I was really nervous with going so dark. But it works in the bathroom and laundry room and really does blend in well with the rest of our home. Okay now back to the supply list!
-General Finishes Antique Walnut Gel Stain 1 quart - A little of this goes a very long way. For reference, we did our laundry room and guest bathroom and have about 1/4 of the quart left.
-General Finishes Gel Topcoat 1/2 pint, Satin - I remember getting the can in the mail, and thinking this is so tiny! But again a little goes a long way.
-Foam brushes or a sock - I solely used these in different sizes depending on where I was painting on the cabinet. I can only attest for this method. We have heard the sock works fabulous as well. Pick your method, stick with it and don't look back.
-Painter's Tripods - As you can see in the pictures, I did use these. They allow you to stain both sides at once. I had used them once before, and was not a huge fan. If they move just a budge your fresh paint is scratched and you have to retouch it. But, I decided to give them one last try for these cabinets, because of the drying time needed between coats. I liked them a bit more this time, but I still needed to touch up a few areas from where they set.
-Gloves - Get a big box. I wear two pair at a time.
-2 Drop cloths
-Tape - I use painters tape on surfaces that will touch my cabinets/countertops.
-Sponge with soap and water, dry rag
-Sanding Block
-Screwdriver - To remove cabinets from vanity
-Drill - If you are putting hardware on your cabinets when there are no preexisting holes (like we did)
-Hardware Installation Template - This is the best! We have used it for installing new hardware in our kitchen, bathrooms, and laundry room. Such a time saver, and gets it right every time.
-New hardware - Ours is from Hobby Lobby for .99 cents a piece!
Time to Prep:
I have learned over the many years of painting that the prep is just as important as actually painting. Gel staining was no different. What attracted me to gel stain is that there isn't a ton of prep required besides the basics.
-Prep Your Area - I always like to first set up the area where I am going to paint. Because of the drying time between coats, I set up my workspace in the garage where the kids would not be tempted to stick their fingers in wet paint. Typically, I refuse to buy a drop cloth, but I gave in for this project. I wanted a very clean service to do this on, while also ensuring the floor was protected from walnut stain. This is oil based so it stains easily and very quickly. Because you also need to stain the vanity itself, prep this area as well. I used blue painters tape to protect the counters, wall, and secure the drop cloth to the floor.
-Remove hardware and doors/drawers - We did not have any hardware on the cabinets in our guest bath or laundry room. Another reason I wanted to give these cabinets a major update. But if you do, remove them now, put in a plastic bag or Tupperware and keep them somewhere safe. Also remove your cabinets and drawer faces. If your drawer faces are not removable, simply slip the drawer out of the pocket and set it up in your paint area. I labeled plastic baggies with the hinges and screws for the cabinets and drawers because I was doing the laundry room and guest room at the same time. It saved me time after, to not be rummaging through a bag for the right hardware for the right spot.
-Clean, Sand, Clean - First, I used soap and water and gave everything a good wipe down. I started in the actual bathroom and cleaned the vanity itself, the walls, and anything that would come in any contact with the stain. You want to make sure all dirt and grime is removed. Next, I went to the garage and scrubbed the cabinets and drawers nice and clean. I like doing this once they are off the vanity, but it is totally personal preference. Then, go over everything with a dry cloth.
-Sand and clean again - Okay, so from my experience and from reading a lot of reviews on the gel stain you should not spend a lot of time here. For the cabinets in the laundry room, I failed to believe this was true. I sanded them with my electric sander. In the bathroom, I lightly sanded them with my sanding block. I honestly think the paint looked smoother and more natural with the sanding block. I would not use the electric sander again. You are not wanting to strip them. Using my sanding block with a fine grit I gently went over all surfaces making sure to get into the crevices as well. After sanding, throughly wipe off all dust with a dry rag. This is your last chance to make sure the cabinets are clean and ready for stain!
Grab your brush, it's time to stain:
I like to start in my work space with the cabinets and drawers (my garage). Then I head over to my actual vanity (bathroom and laundry room). Again, personal preference. Pick a system that works for you and stay with it for the entire process.
-Time to glove up! I wear two pair. When I was done staining in the garage, I would simply pull off the pair covered in paint and be left with a nice clean pair. This way I could easily grab my brush and paint and go inside to paint the vanity without covering a door knob in stain or worry about getting on a new pair of gloves (I am nurse and love gloves!). I used the foam brush, because I am simply more comfortable with an actual brush. Again, pick between a sock or foam brush and never look back. I used the larger foam brush for the faces and vanity, and smaller foam brush to get into the crevices.
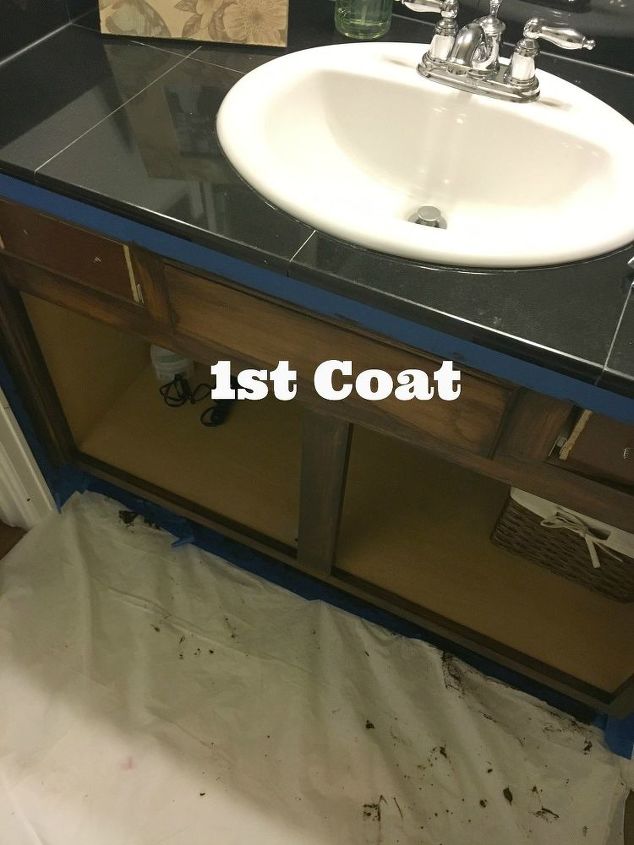
You want to put on a nice thin coat of stain. Do not wipe it off. Do smooth strokes with the grain, and be sure there are no globs in the corners. The main goal with the first coat is to apply a nice even coat to build upon.
-After applying the first coat to all surfaces, call it a day. Clean your supplies, and make sure your doors/drawers are in a safe place to rest for 12 hours.
After 12 hours, apply the 2nd coat. With the exact same technique. Let it dry for 24 hours.
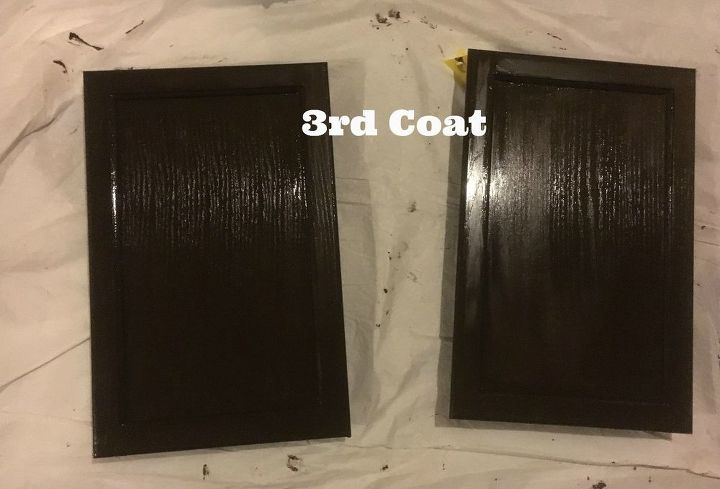
-After 24 hours, apply your 3rd and final coat. By this time you have this down to a science, apply your 3rd coat and feel like a gel stain expert!
-After 5 full days. Yes, 5 full days. Make sure you are happy with your almost finished product. Any streaks or imperfections, this is the time to fix them, but remember...you will have to wait 5 full days again if you choose to touch something about. Then, seal it with your gel topcoat. I waited 12 hours between coats (follow the instructions on your can), and then applied a second coat. Don't forget the vanity! Yup, the first time I was patting myself on the back, then realized I forgot to apply the gel topcoat to the actual vanity, whoops!
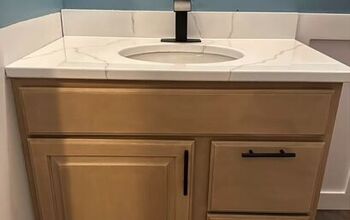
-After 24 hours, we put the doors and cabinet fronts back on the vanity. Then using our template we added hardware. I can't emphasize how easy the template makes adding new hardware.
-Your done, eye the next surface you are going to go gel stain!
Extra Tips:
Drying Times - So, let's take a minute to talk about the drying times. After doing it quite a few times to many cabinets in my home, I have witnessed first hand how much the stain continues to penetrate the wood hour by hour. So be patient, there is a reason for the long dry times. I have found that you truly can't wait long enough between coats.
Time between Coat 1 - Coat 2: 12 hours
Time between Coat 2 - Coat 3: 24 hours
Time between Coat 3 - Gel Topcoat: 5 days
As you can see from the pictures below, after you put the first coat on you will be horrified. I was literally online shopping for a new vanity. Don't panic, think of this step almost as the primer step.
I did our guest bathroom and laundry room over a year ago and it still looks like the day we did it. I have two boys under three, the laundry room is clearly a very high traffic area, and it has held up wonderfully.
Supplies:
Let's start with the stain. Because really this DIY is all about General Finishes Antique Walnut gel stain. It is the star in this show so I must take a second to reflect on it. If you want this particular look, then you can not substitute this. The steps in this tutorial are specific to General Finishes, so if you choose to follow please get this product! The only exception is the color. We went back and forth between Antique Walnut and Java. Ultimately, we decided on Antique Walnut, but I don't think you can go wrong. If you are choosing a different color of General Finishes Gel Stain, this tutorial will still work (the amount of coats needed to achieve your desired look may vary). Our house is all whites, grays, and natural woods. I was really nervous with going so dark. But it works in the bathroom and laundry room and really does blend in well with the rest of our home. Okay now back to the supply list!
-General Finishes Antique Walnut Gel Stain 1 quart - A little of this goes a very long way. For reference, we did our laundry room and guest bathroom and have about 1/4 of the quart left.
-General Finishes Gel Topcoat 1/2 pint, Satin - I remember getting the can in the mail, and thinking this is so tiny! But again a little goes a long way.
-Foam brushes or a sock - I solely used these in different sizes depending on where I was painting on the cabinet. I can only attest for this method. We have heard the sock works fabulous as well. Pick your method, stick with it and don't look back.
-Painter's Tripods - As you can see in the pictures, I did use these. They allow you to stain both sides at once. I had used them once before, and was not a huge fan. If they move just a budge your fresh paint is scratched and you have to retouch it. But, I decided to give them one last try for these cabinets, because of the drying time needed between coats. I liked them a bit more this time, but I still needed to touch up a few areas from where they set.
-Gloves - Get a big box. I wear two pair at a time.
-2 Drop cloths
-Tape - I use painters tape on surfaces that will touch my cabinets/countertops.
-Sponge with soap and water, dry rag
-Sanding Block
-Screwdriver - To remove cabinets from vanity
-Drill - If you are putting hardware on your cabinets when there are no preexisting holes (like we did)
-Hardware Installation Template - This is the best! We have used it for installing new hardware in our kitchen, bathrooms, and laundry room. Such a time saver, and gets it right every time.
-New hardware - Ours is from Hobby Lobby for .99 cents a piece!
Time to Prep:
I have learned over the many years of painting that the prep is just as important as actually painting. Gel staining was no different. What attracted me to gel stain is that there isn't a ton of prep required besides the basics.
-Prep Your Area - I always like to first set up the area where I am going to paint. Because of the drying time between coats, I set up my workspace in the garage where the kids would not be tempted to stick their fingers in wet paint. Typically, I refuse to buy a drop cloth, but I gave in for this project. I wanted a very clean service to do this on, while also ensuring the floor was protected from walnut stain. This is oil based so it stains easily and very quickly. Because you also need to stain the vanity itself, prep this area as well. I used blue painters tape to protect the counters, wall, and secure the drop cloth to the floor.
-Remove hardware and doors/drawers - We did not have any hardware on the cabinets in our guest bath or laundry room. Another reason I wanted to give these cabinets a major update. But if you do, remove them now, put in a plastic bag or Tupperware and keep them somewhere safe. Also remove your cabinets and drawer faces. If your drawer faces are not removable, simply slip the drawer out of the pocket and set it up in your paint area. I labeled plastic baggies with the hinges and screws for the cabinets and drawers because I was doing the laundry room and guest room at the same time. It saved me time after, to not be rummaging through a bag for the right hardware for the right spot.
-Clean, Sand, Clean - First, I used soap and water and gave everything a good wipe down. I started in the actual bathroom and cleaned the vanity itself, the walls, and anything that would come in any contact with the stain. You want to make sure all dirt and grime is removed. Next, I went to the garage and scrubbed the cabinets and drawers nice and clean. I like doing this once they are off the vanity, but it is totally personal preference. Then, go over everything with a dry cloth.
-Sand and clean again - Okay, so from my experience and from reading a lot of reviews on the gel stain you should not spend a lot of time here. For the cabinets in the laundry room, I failed to believe this was true. I sanded them with my electric sander. In the bathroom, I lightly sanded them with my sanding block. I honestly think the paint looked smoother and more natural with the sanding block. I would not use the electric sander again. You are not wanting to strip them. Using my sanding block with a fine grit I gently went over all surfaces making sure to get into the crevices as well. After sanding, throughly wipe off all dust with a dry rag. This is your last chance to make sure the cabinets are clean and ready for stain!
Grab your brush, it's time to stain:
I like to start in my work space with the cabinets and drawers (my garage). Then I head over to my actual vanity (bathroom and laundry room). Again, personal preference. Pick a system that works for you and stay with it for the entire process.
-Time to glove up! I wear two pair. When I was done staining in the garage, I would simply pull off the pair covered in paint and be left with a nice clean pair. This way I could easily grab my brush and paint and go inside to paint the vanity without covering a door knob in stain or worry about getting on a new pair of gloves (I am nurse and love gloves!). I used the foam brush, because I am simply more comfortable with an actual brush. Again, pick between a sock or foam brush and never look back. I used the larger foam brush for the faces and vanity, and smaller foam brush to get into the crevices.
You want to put on a nice thin coat of stain. Do not wipe it off. Do smooth strokes with the grain, and be sure there are no globs in the corners. The main goal with the first coat is to apply a nice even coat to build upon.
-After applying the first coat to all surfaces, call it a day. Clean your supplies, and make sure your doors/drawers are in a safe place to rest for 12 hours.
After 12 hours, apply the 2nd coat. With the exact same technique. Let it dry for 24 hours.
-After 24 hours, apply your 3rd and final coat. By this time you have this down to a science, apply your 3rd coat and feel like a gel stain expert!
-After 5 full days. Yes, 5 full days. Make sure you are happy with your almost finished product. Any streaks or imperfections, this is the time to fix them, but remember...you will have to wait 5 full days again if you choose to touch something about. Then, seal it with your gel topcoat. I waited 12 hours between coats (follow the instructions on your can), and then applied a second coat. Don't forget the vanity! Yup, the first time I was patting myself on the back, then realized I forgot to apply the gel topcoat to the actual vanity, whoops!
-After 24 hours, we put the doors and cabinet fronts back on the vanity. Then using our template we added hardware. I can't emphasize how easy the template makes adding new hardware.
-Your done, eye the next surface you are going to go gel stain!
Extra Tips:
Drying Times - So, let's take a minute to talk about the drying times. After doing it quite a few times to many cabinets in my home, I have witnessed first hand how much the stain continues to penetrate the wood hour by hour. So be patient, there is a reason for the long dry times. I have found that you truly can't wait long enough between coats.
Time between Coat 1 - Coat 2: 12 hours
Time between Coat 2 - Coat 3: 24 hours
Time between Coat 3 - Gel Topcoat: 5 days
As you can see from the pictures below, after you put the first coat on you will be horrified. I was literally online shopping for a new vanity. Don't panic, think of this step almost as the primer step.
I did our guest bathroom and laundry room over a year ago and it still looks like the day we did it. I have two boys under three, the laundry room is clearly a very high traffic area, and it has held up wonderfully.
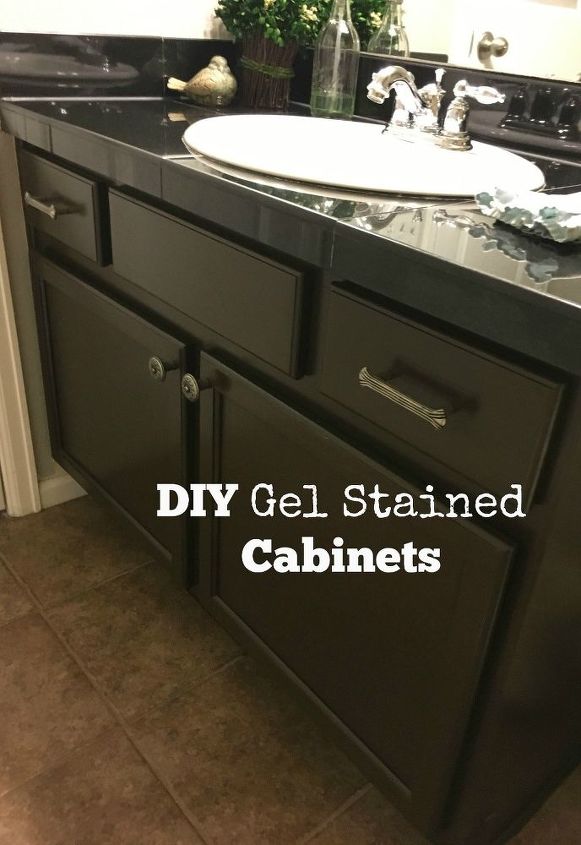
Finished Product
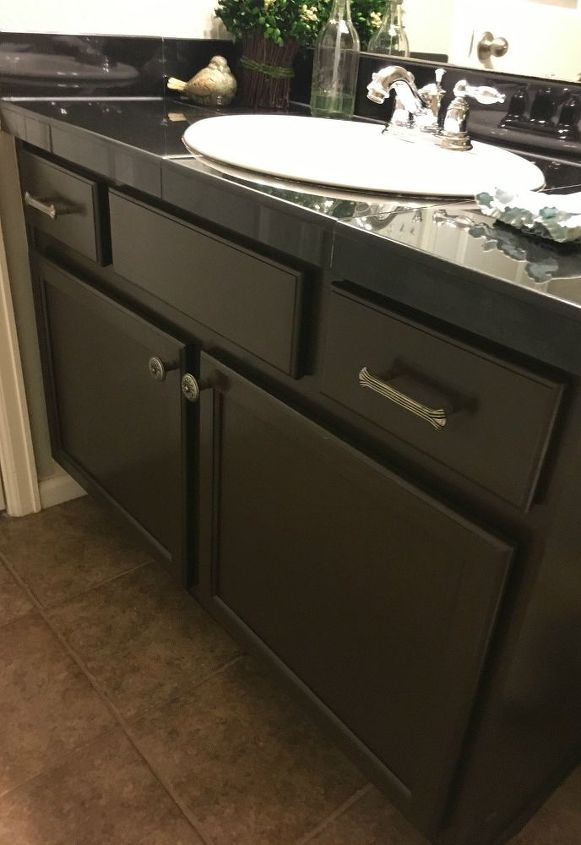
Finished Product


Want more details about this and other DIY projects? Check out my blog post!
Comments
Join the conversation
1 comment
-
I am using this stain (in a different color) and after almost a week, it still feels tacky. I tried to start a second coat after 3 days but it was pulling the first coat off.
(thin coat, used foam brush)
help!


Frequently asked questions
Have a question about this project?