


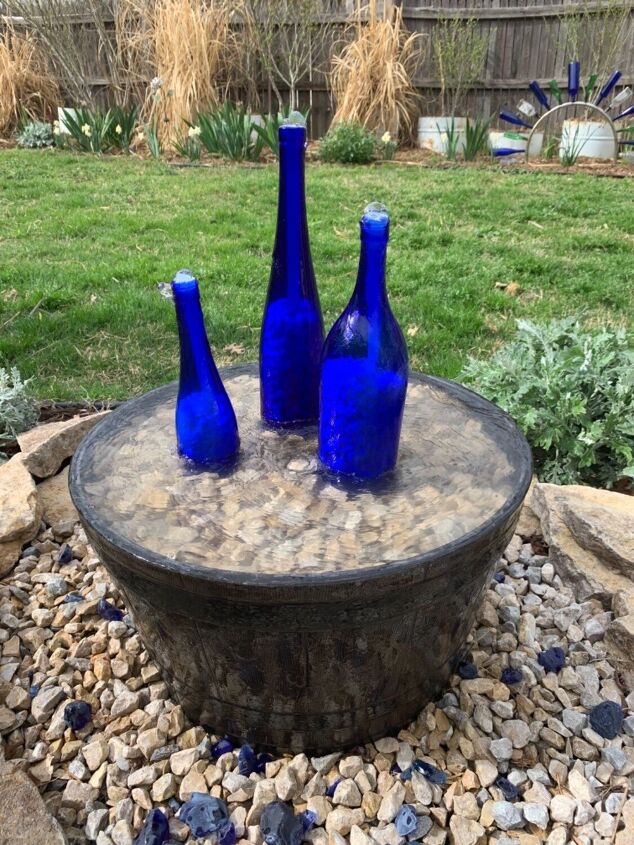
Water Fountain From Wine Bottles

Water fountains are fun and relaxing, and can add a lot of visual appeal to your yard.
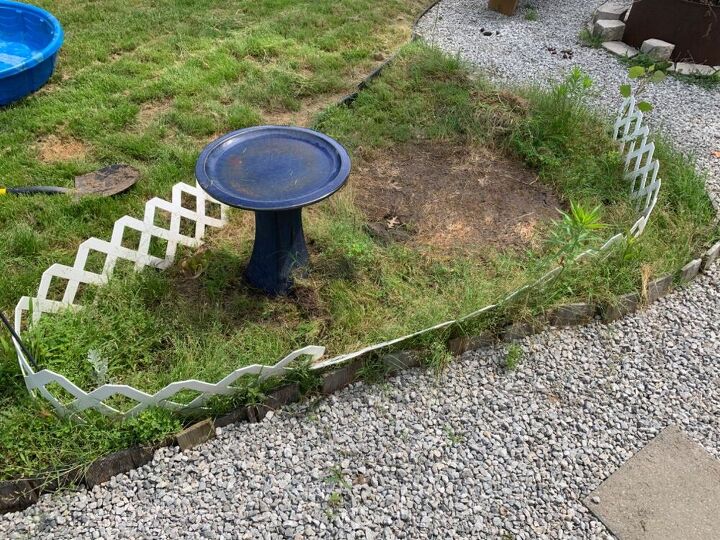
This area used to be an herb garden, but after massive amounts of rain last spring, all the herbs died and it quickly filled with grass and weeds. Rather than replanting herbs this year, I deemed it the perfect spot for a small water fountain.
Best fountain pump!
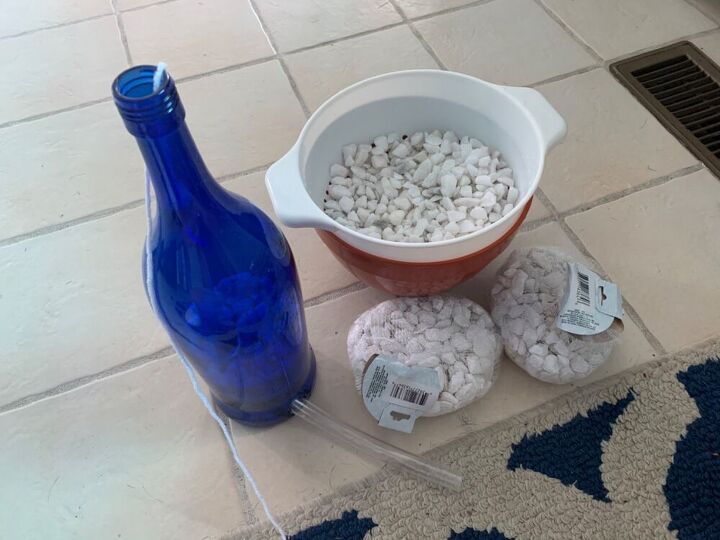
Materials
To make a fountain like this one, you will need:
-submersible fountain pump (I used a medium (max 338 GPH) pump from Home Depot, $32)
-10’ clear vinyl tubing, 1/2” inner diameter ($5)
-(2) 1/2” barbed tees for the tubing ($1.50/ea)
-hardware cloth or other durable screen-type material (ex: small hole chicken wire; I used expanded metal sheets, on hand)
-clear silicone caulk
-fountain base structure/ water reservoir (ie- small pool or pond liner, I used a clearance kiddie pool and )
-large planter or nice bucket
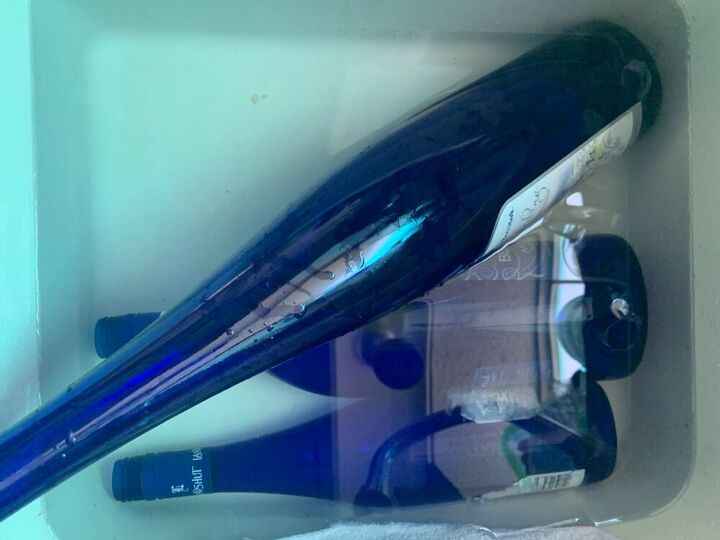
-wine bottles (I used 3 blue of different sizes)
-rocks and gravel (small pebbles/gravel for inside the bottles, medium gravel for on top of the hardware cloth/screening, and large rocks to go around the base to cover the edges. (I spent $15, but already had large rocks)
-sand to level the base ($4)
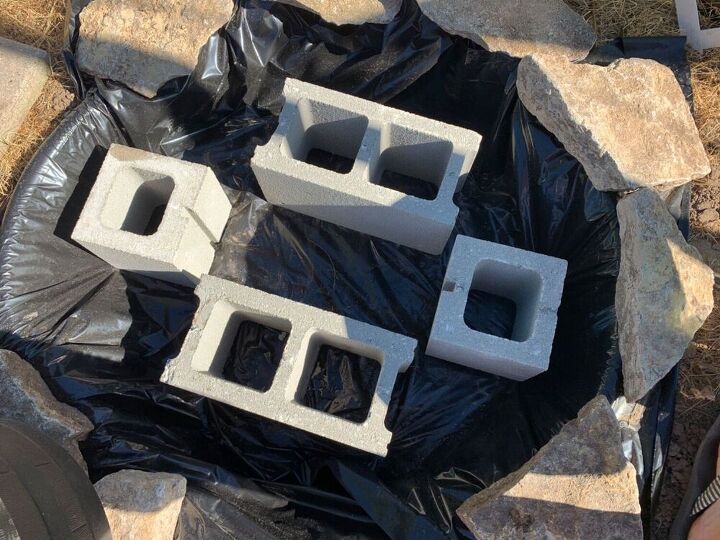
-stones or heavy duty buckets to go inside the fountain base and planter to bring things to the correct height (I used cinder blocks, 3 whole and 2 half size) ($9 total)
Special tools needed:
-tin snips to cut metal screening
-drill bit for glass (we used a 5/8” bit)
Base prep
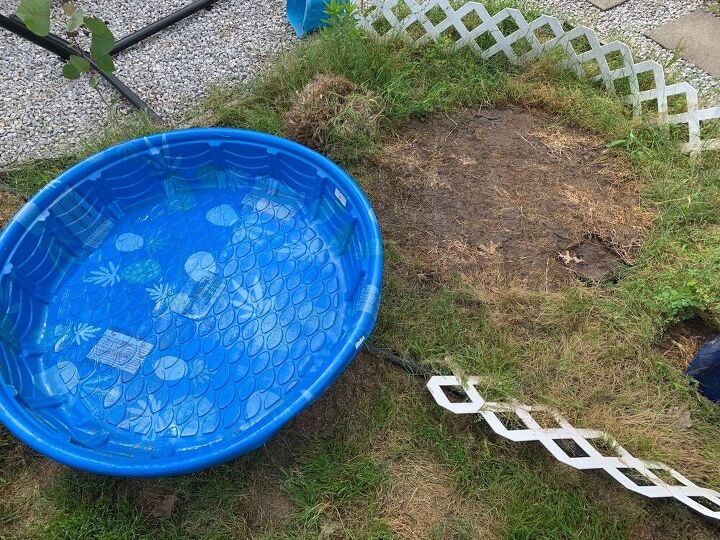
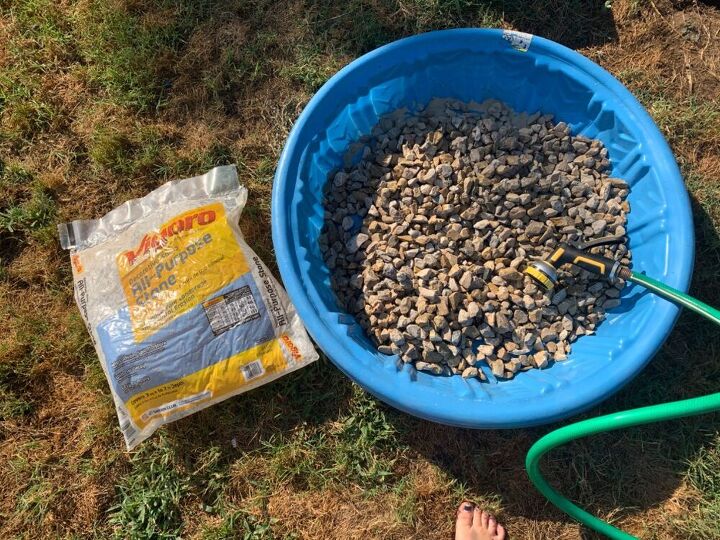
As a base for the fountain, I used a small kiddie pool I bought for $2 on clearance last year. You can use a pond liner or preformed pond base instead, but they can get pricey.
I decided on the fountain location several weeks before beginning the project, so I put the pool in place and weighted it down to help take care of the grass in the area. It also helped mark where to dig.
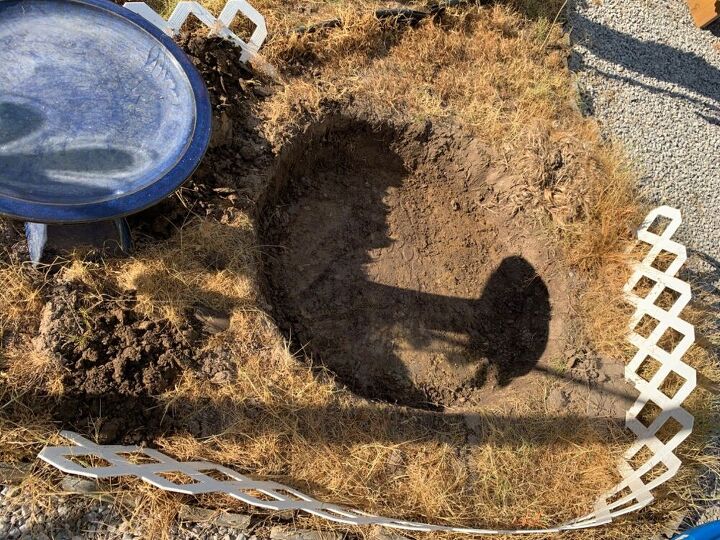
Dig out the area for your base, adding a few inches of depth for leveling with sand. Get the soil as level as possible so you won’t have to use a ton of sand.
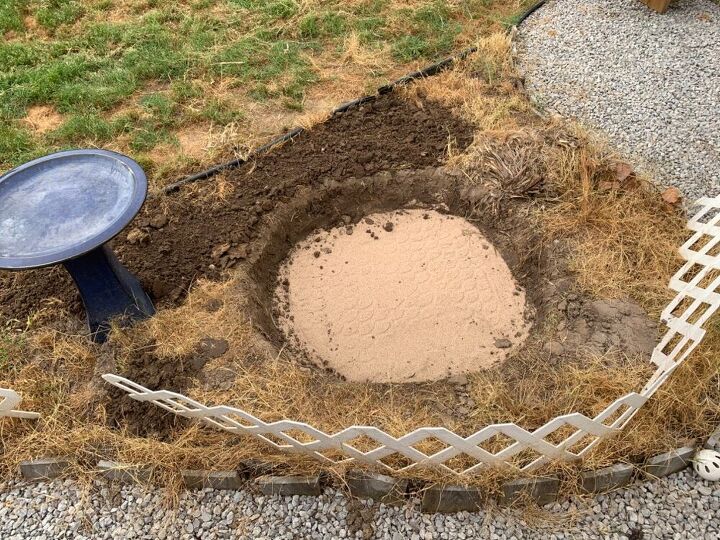
Pour in your sand base (I used one 50 pound bag), and level it in all directions. Place your fountain base in the hole and make sure the bottom and sides remain level with weight applied throughout.
To help disguise the blue pool, I chose to put two cut-open contractor trash bags in the base. Completely optional.
Decide on how high up you want the planter to sit and add something sturdy for it to sit on. You want it to be level with or below the edges of the pond base. Cinderblocks were perfect for us at 8” tall, and provide a lot of stability throughout the base. Helpful if you have kids or large dogs like we do, who may decide to step in the fountain.

Cut your hardware cloth or other screen material to sit on top of the base and hold your base gravel. We used expanded metal because we already had enough on hand leftover from a different project. BE CAREFUL! The edges are very sharp and I cut myself several times while trying to bend the sharp edges down.
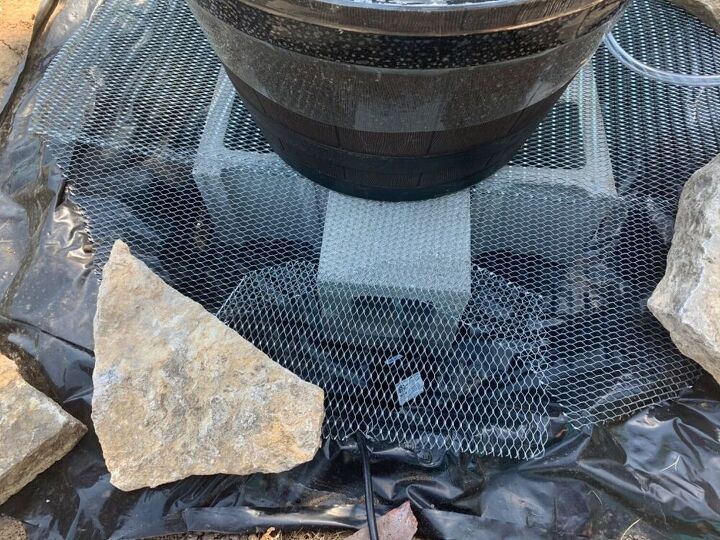
You want to leave a trap door somewhere to access your pump for cleaning and to remove it in the winter if necessary. If you want the water to shoot out the top of the bottles, your pump needs to be directly underneath your planter and bottles. If you want more of a soft bubbling (like I did), the pump can be to the side with more tubing in between the pump and the bottle tops.
If you are not putting the pump and trap door centered under the planter, you will need to cut a hole near the center for the tubing.
place your large rocks around the base to cover the edges and hold the screen in place.

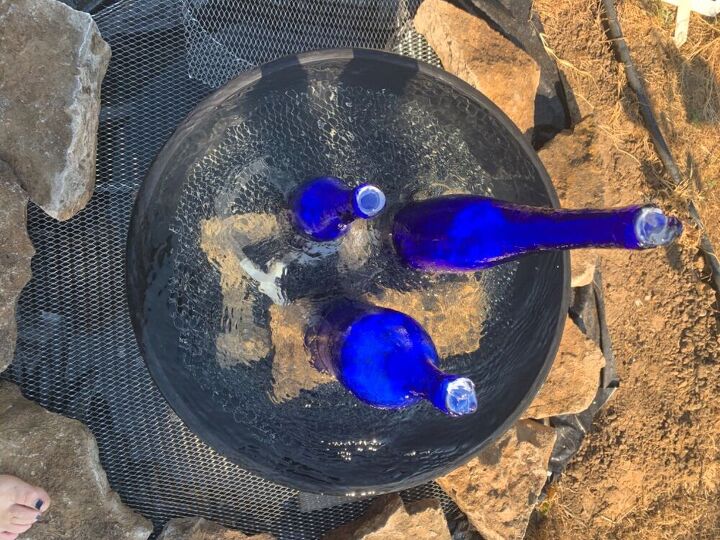
Planter prep
To use fewer rocks in your planter and give a large flat surface for your bottles to sit on, cut a screen to sit inside the planter. (You may need additional support if your screen is not rigid) I put a large full sized cinder block in the base of the planter (the planter you use will affect what you can use in the base), and measured the inside diameter of the planter at the top of the cinder block. The top of our bird bath was the right size, so we used it as a guide to cut the screen.
You will also need to drill a hole in the bottom of the planter to feed the tubing through. If it already has drainage holes in the bottom, plug all but one using silicone caulk, and make one around 5/8” for the tube to come through.
Bottle prep
Using a 5/8” glass bit, drill a hole in the side of each bottle, as close to the bottom as possible. This is where the tubing will enter the bottle. After holes are drilled, remove the labels and clean up the bottles. I prefer to do this after drilling in case a bottle breaks.
Tubing setup
To set up your tubing, place your pump, attach one end of the tubing to the pump and feed the other end through the bottom of the planter. Cut a hole in the top screening near center and pull the tubing through. Leaving about 6 inches of slack for adjustment and to be able to move the pump, cut the tubing just above the screening.
Insert one of the tees so the flat side is along the top of the screen and the bottom sits through the hole in the screen. (The sides of the T sitting against the top of the screen will help hold the bottle tubing in place. The picture above will help show placement.)
Cut a small piece of tubing (3-4”) to connect the two tees (side of the first T, to bottom of the second T). Feed the remaining tubing through the drilled hole in each bottle and out the top. Leave several inches of tubing on each side before cutting for adjustments.
Fill the base with just enough water to cover the pump and turn on to test. You will be able to adjust bottle flow later, but you want flow to be fairly even between the bottles. Turn it off and let the planter drain, then caulk around the edges of the tubing where it comes through the planter.
To give the bottles a little more weight and to help disguise the tubing, put some small rocks inside. To do this, tape over the top end of the tubing, and to help guide the tubing back up, you can also tape a piece of knotted yarn around the tubing top. This isn’t enough to pull the tubing back through by itself, but will guide it through the top while pushing the tubing from the bottom.
Pull the tubing out the bottom just enough that the top end is just past the narrow portion of the bottle neck inside. Now you can add the rocks. I used (5) 32 oz bags of white rock from Dollar Tree (one in the smallest bottle, and two in each of the others.) You may want to rinse the rocks in a colander first, because they do tend to have a lot of dust on them.

Push the tubing back out of the bottle tops, protruding an inch or so. Use your clear silicone caulk between the bottle and tubing, making sure to seal everything well. You can also caulk around the drilled hole and tubing at the base. To keep the tubing straight at the top, I inserted handles of cooking spoons while the caulk dried. When the caulk dries, carefully trim the tubing to be flush with the bottle top.
Final set up
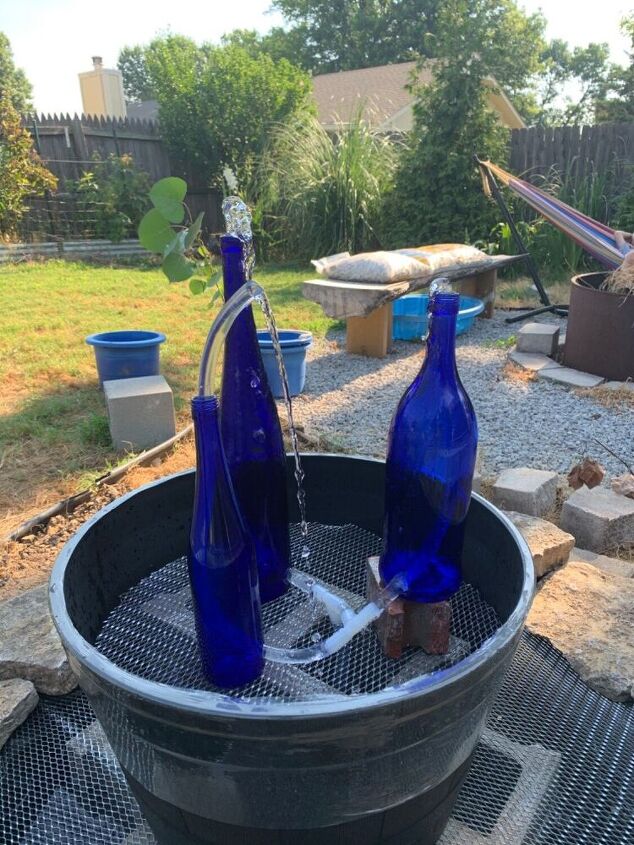
Attach the bottle tubing back up to the tees. The tallest bottle should be attached to the first tee to have the most flow, while the other two attach to the second. I put the medium bottle up on a chuck of broken paver to give it a little more height, making the three heights evenly spaced.
Fill the base with water and test the fountain. You may need to adjust the tubing to make everything bubble evenly. I had to wedge a small chunk of tubing into the base tubing of the tallest bottle to divert some water pressure to the other two, and the tubing to the smallest bottle is longer than the other two and slightly kinked to decrease flow from the top.
You may also need to level the planter by wedging something between the base screen and planter bottom. I used small leftover pieces of the expanded metal sheet we used, as it only needed minor adjustment.
Rinse your medium gravel to remove dust. Fill the top of the planter and cover the screen over the base. I used about 1 bag for each part.
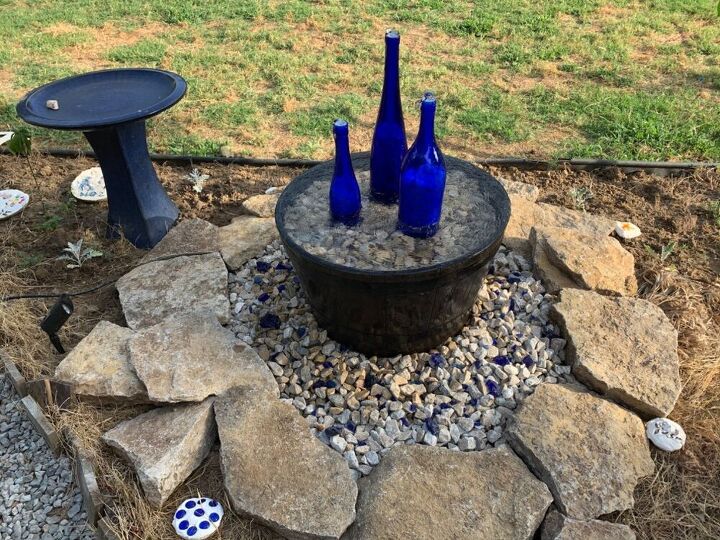
Finished!
Conceal the pump cord with rocks or mulch. Add some landscaping around the fountain, like small plants and solar lights, and enjoy!
I spent around $70, but I already had several of the materials. Cost will vary depending on size and type of base. Of course, you can always make a smaller fountain without an in-ground base, putting the pump in the planter. This was just my method, but you can be creative with this!
Some tips to keep your pump running smoothly:
-Check water level regularly to make sure the pump is always submerged.
-Clean the filter in the pump every month or so and use a filter bag around the pump to help keep it clean.
-Leave the pump plugged in and running, don’t keep turning it off and on.
-Remove the pump in the winter if you live in an area that freezes.
We live where it is REALLY windy, so I wanted more of a gentle trickle out of the bottles, instead of a tall spray. If you want a taller spray, get a larger pump.
DIY home decor using recycled glass bottles
Resources for this project:
See all materials


Comments
Join the conversation
-
it is quite the project. I am not sure I would want to tackle it. but you are very creative. Kudos to you
-
Amazing job! It looks so peaceful and serene! I wish I didn't rent so I could try this!


Frequently asked questions
Have a question about this project?
The area certainly benefitted from the effort, but the bottle fountain isn't at all eye-catching, water flowing or not. One of the bottles is plainly crooked, and the blue bottles don't pair well with the pot. Why use a plastic kiddie pool that will probably crack in the cold weather (if you're not living down south)? Was it needed?
Could you post a pic with the pump on /water flowing?
Do you have a link for the fountain that you built