


I Froze My Friend in Carbonite...Ultimate Star Wars Gift!!

As an early Christmas gift, I presented my friend (who is a huge Star Wars fan and doctor, thus the coat and stethoscope) as himself froze in carbonite, just like Han Solo from Empire Strikes Back.
Here is the video of the project. Go ahead and watch but be sure to come back and see the step-by-step process with some great pictures.
I have wanted to do a project like this for over eight years. Of course, I needed the perfect subject....my friend Dustin. I can't think of anyone who is a bigger Star Wars fan. So, one day when he was over at my house, I asked him if I could make a cast of his face. He said yes without asking any questions. Follow along, and I'll show you how I created my most significant project ever. I also included a link below to my video to show you the fun of making gifts for others.
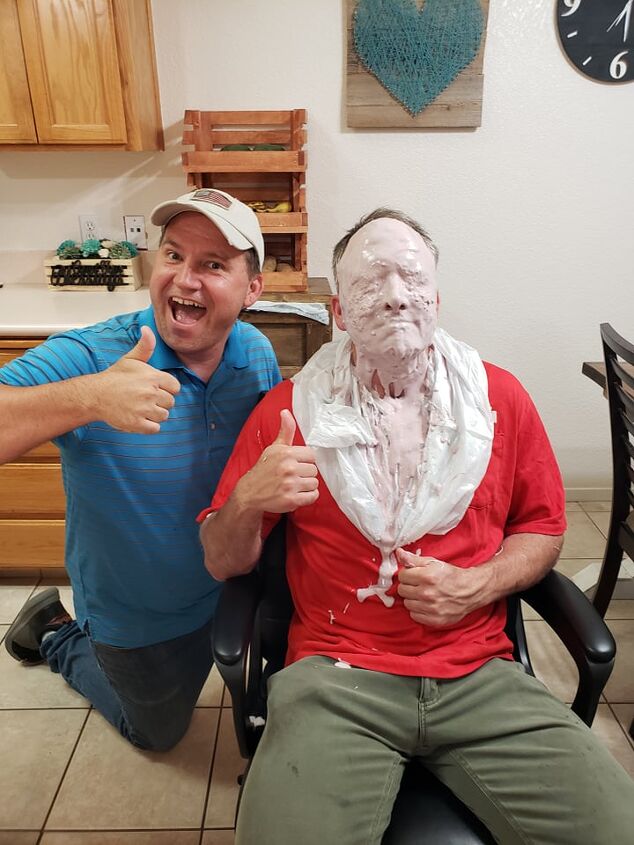
The first thing I did was make a cast of Dustin's face. I used alginate, a very safe molding agent, and wiped it all over his face. It gets a bit messy, so I cut a hole in a trash bag and draped it over him. Little did he know what I had in store for him.
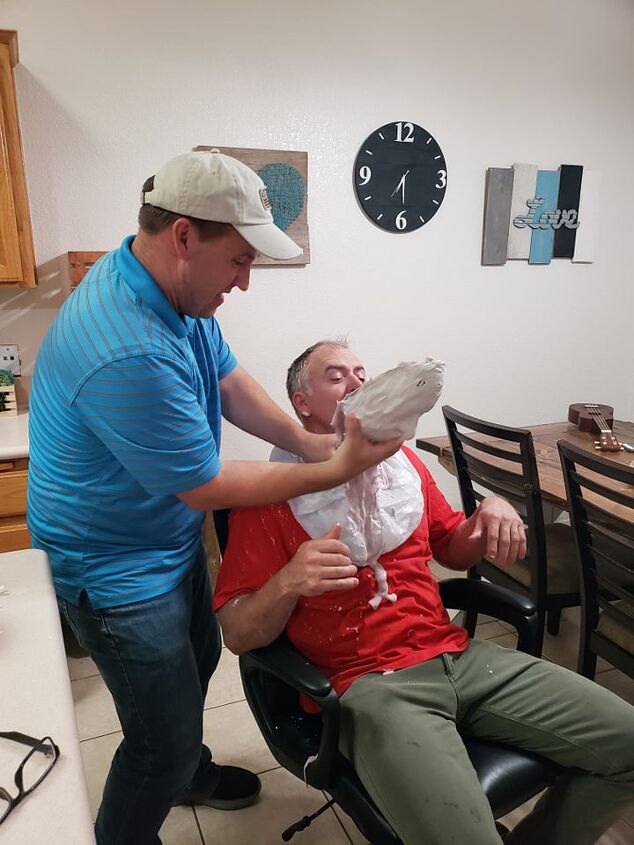
Once the alginate was on I layered on some cloth that once it gets wet hardens up. This will give support to the alginate. After 20 minutes, I was able to pull the mold off of Dustin's face. I think he had a huge sigh of relief.
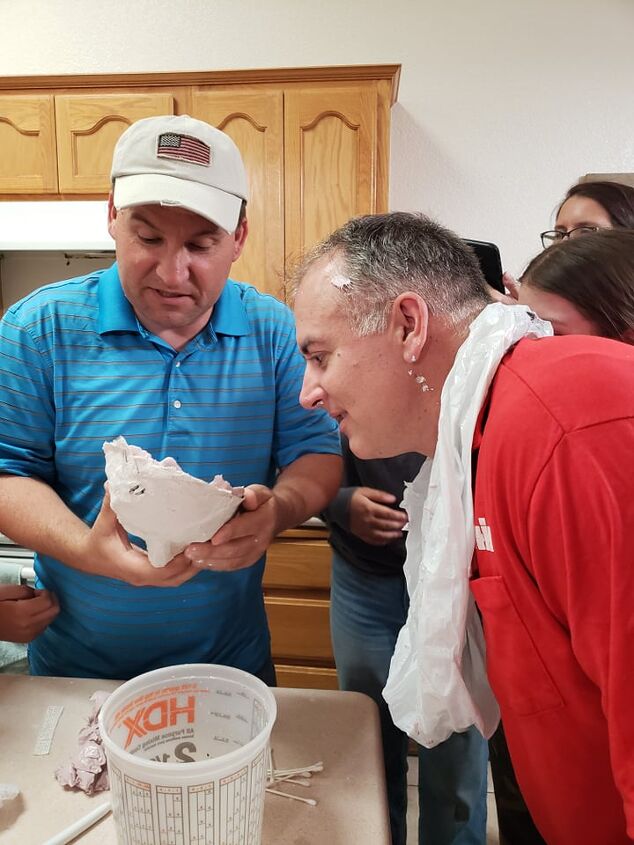
Once I pulled off the cast, we inspected the work. Alginate is such an amazing product. Every detail of his face shows up in the mold. Once we have this hollow mold, we need to pour in the casting material.
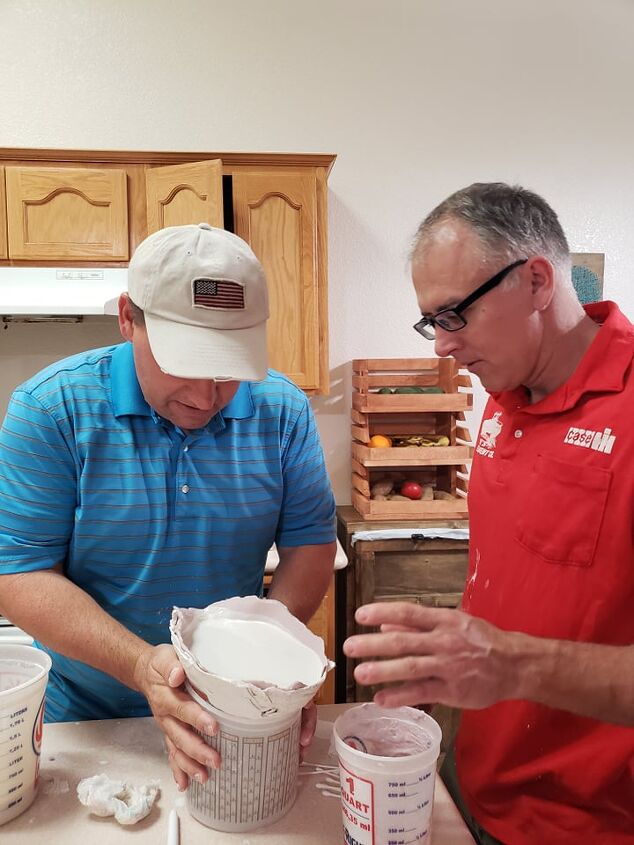
Dustin is looking over my work as I pour in the liquid casting agent. This product takes around 45 minutes to harden. You need to find a firm place to set the mold and pour in the product. All of the products I used in this project will be listed down below and in the video, I posted earlier.
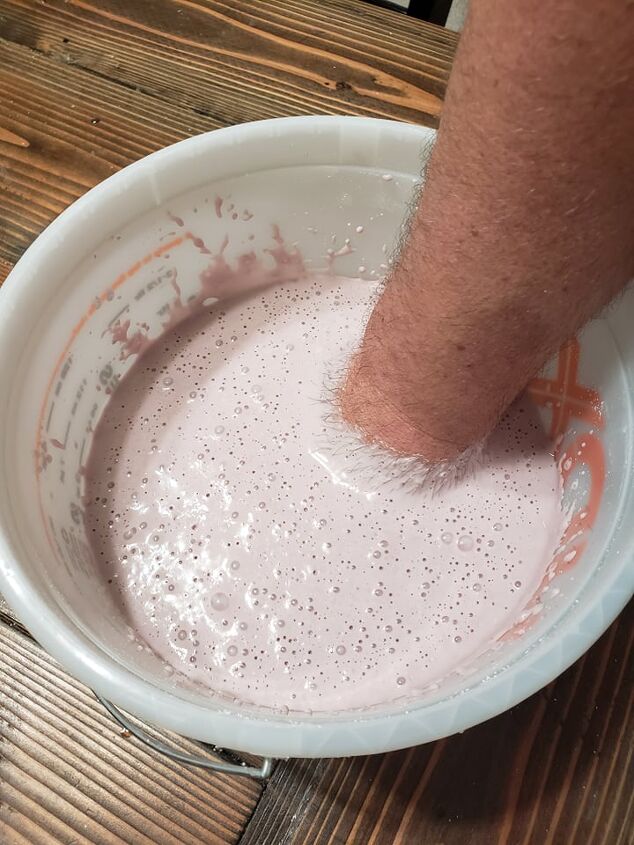
Next, it was time to make a cast of both hands. Again, we used the same products, alginate all mixed up, and then submerged the hands into the pink goo. After 10 minutes, you wiggle your hand out, and you have a perfect hand outline. Then, pour in the casting agent and sit for around 45 minutes. After the cast is cured, you pull apart the alginate and have a perfect replica of the hands.
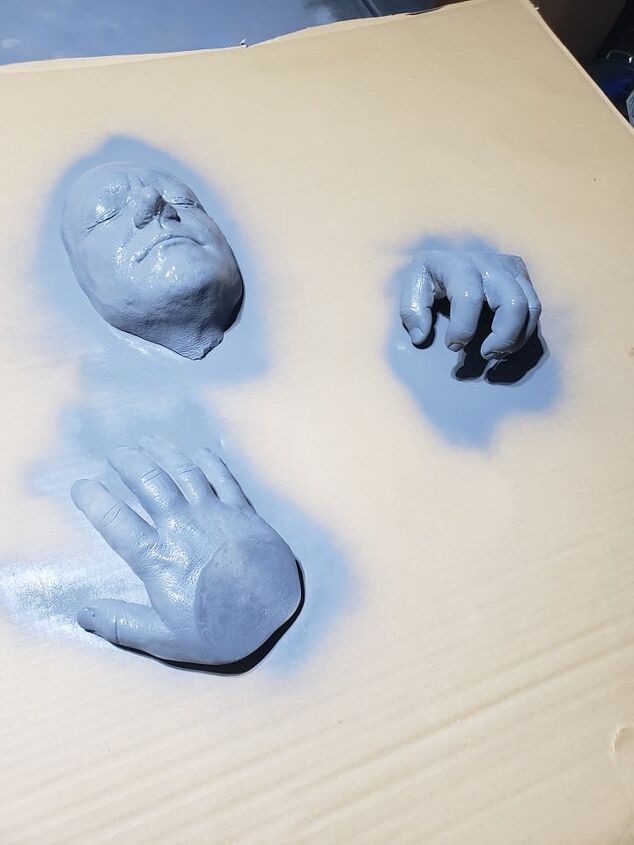
Here are the hands and face perfectly cast. Wow, they turned out great. Every little detail of the face came out, all the wrinkles!!! Once they dry for 24 hours I applied a primer to them to easily be painted when the time comes. How do you like the detail? I got the same hand poses as Harrison Ford in the movie.
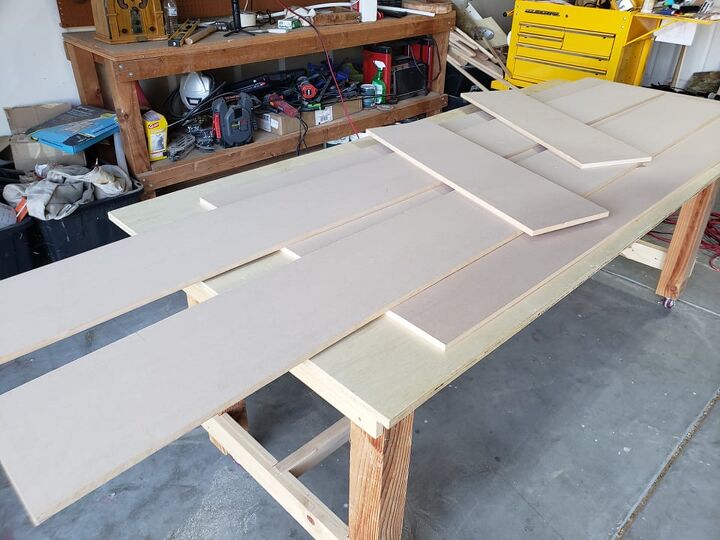
Now came the fun part. Yep, there is something more exciting than making a cast of your friend's face, and that is building the carbonite box to the exact specs as in the movie. I used 1/2 inch MDF plywood to make the cuts. It took two full sheets to cut out the front, sides, and trim.
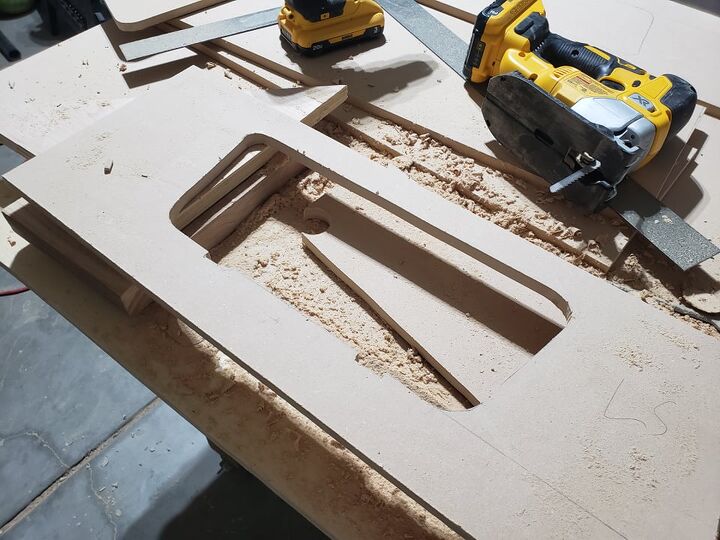
Here you can see me cutting out the areas on the sides where the control panels will go. These cuts and dimensions I found on the internet. There are four on each side for a total of eight panels. I used a drill to round off the corners and a jigsaw to cut the straight lines.
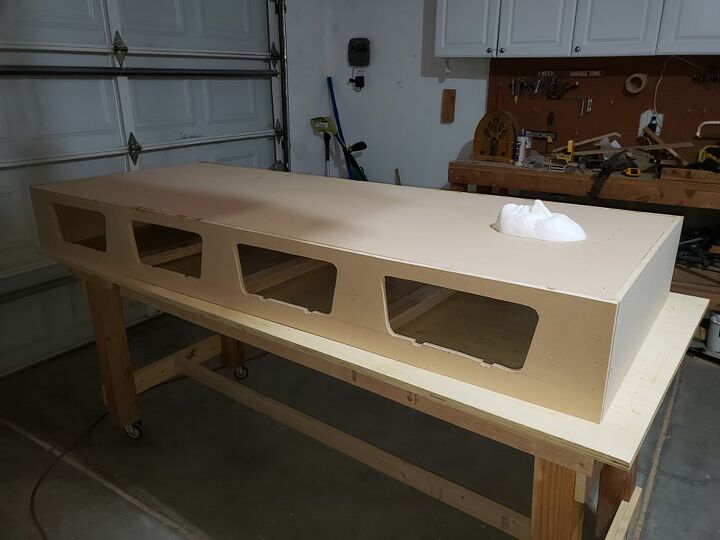
Here I got all of the sides nailed to the front. I used lots of wood glue to join the top, bottom, and sides and then brad nails to hold the box together. Once the glue dries, this thing will be indestructible. I placed Dustin's face on the box to see how it would look. So cool!!!
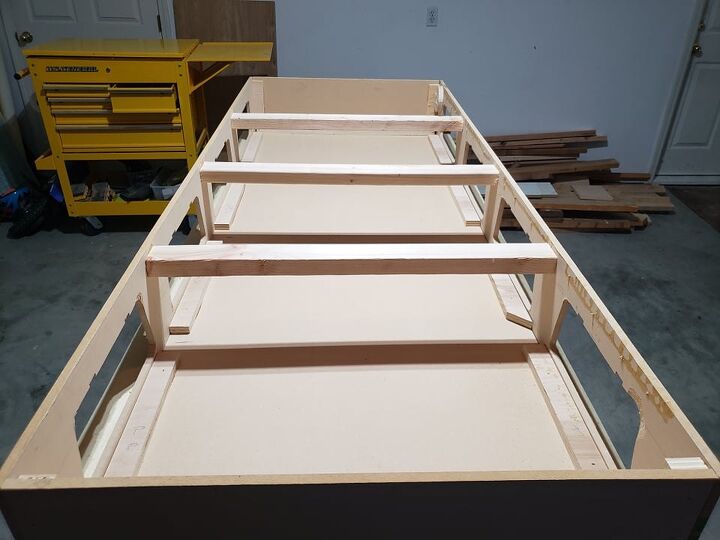
Just a quick note, I added some bracing to the back of the box to make it extra strong. These are just three cut-out 2x3 inch pine boards.
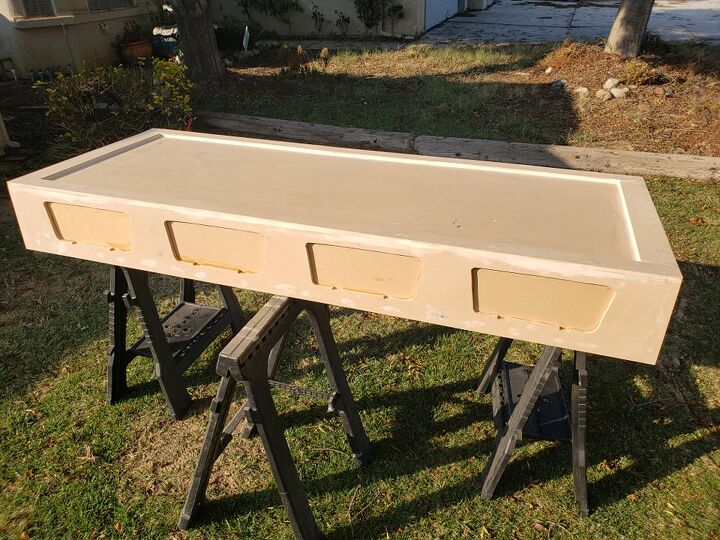
Early the following day, I took the box outside where the sun was shining. It was such a lovely day out, so I had to take advantage of the sun and work on the front lawn. Of course, I got some weird looks from the neighbors. If you think about it, it looks like a coffin  . I think this gives me an idea for my next project. As you can see, I added a backboard to the cut-out panels. This is to replicate the movie.
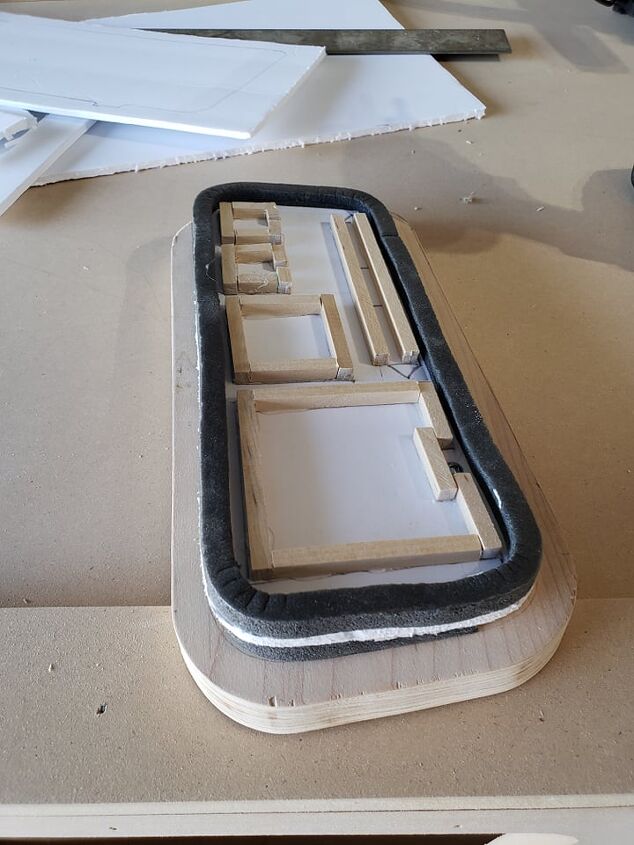
Now it was time to work on the control panels. I used some simple weather stripping and balsa wood to outline the panels. This is not similar to the movie prop since those were radio panels from a 1978 Volvo. Yep, a Volvo radio panel was used in the movie. They were so genius back in the day.
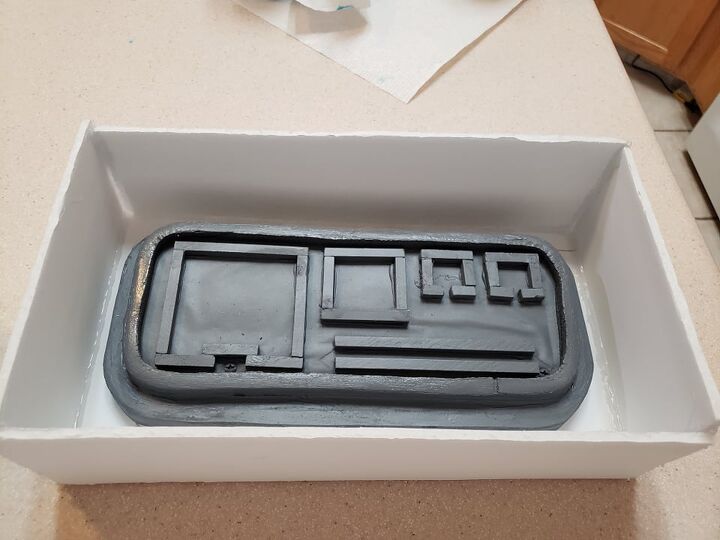
Once the panel was constructed, I made a foam box and sealed the sides with hot glue. It would be too time-consuming to make eight different panels from scratch, so this way, I can pour casting of the panel and make eight duplicates using plastic resin. Now it is ready for the pour.
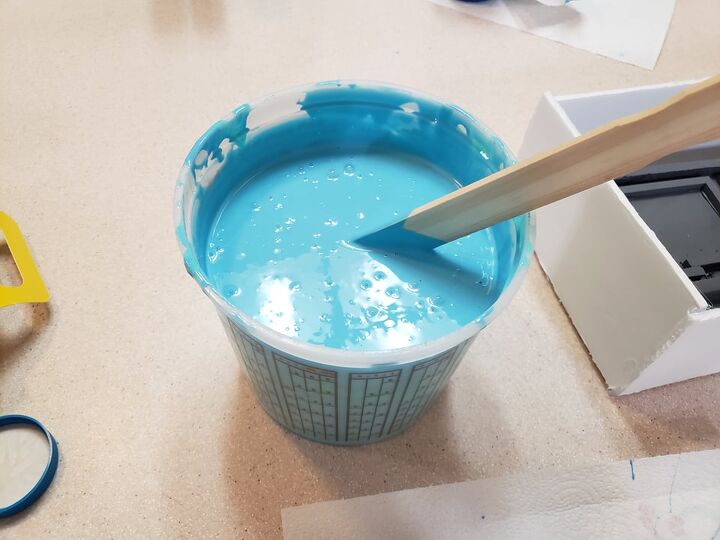
Here is a picture of the two-part silicone mold mixture. This casting agent is more rubbery and flexible, perfect for this type of project.

Here is the silicone after the pour. It will sit in the box for around one hour until it isn't sticky to the touch. Then you can tear off the sides and expose the mold.
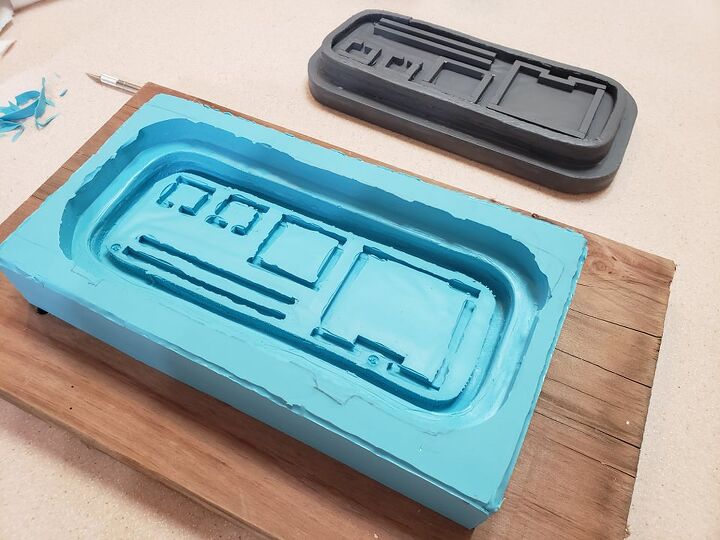
Here you can see the prototype removed from the mold. It is an exact replica. All that needs to be done is clean up the sides and it can be used to pour in the plastic resin.
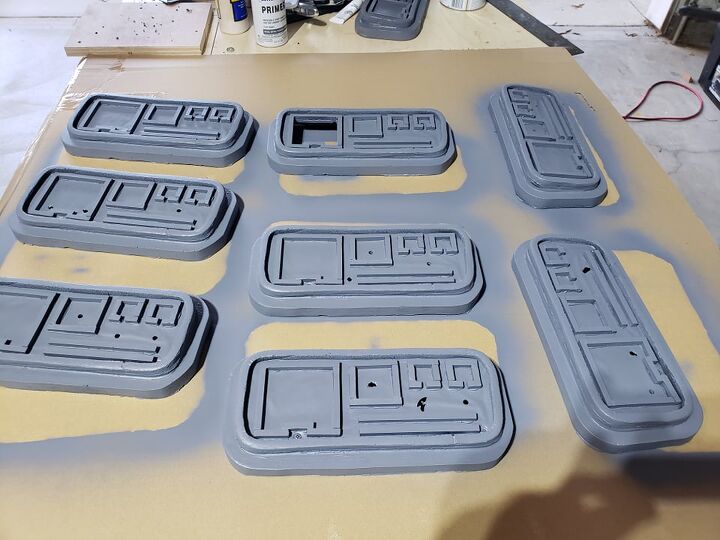
I apologize for not having a picture of the resin pour. In the video, I posted you can see how I applied the resin. Very easy to do. Just make sure you are working in a well-ventilated area. I was able to make eight panels from one silicone mold. In this picture, I drilled holes in some of the panels to add small LED lights. I also sprayed them with grey primer to be painted later.
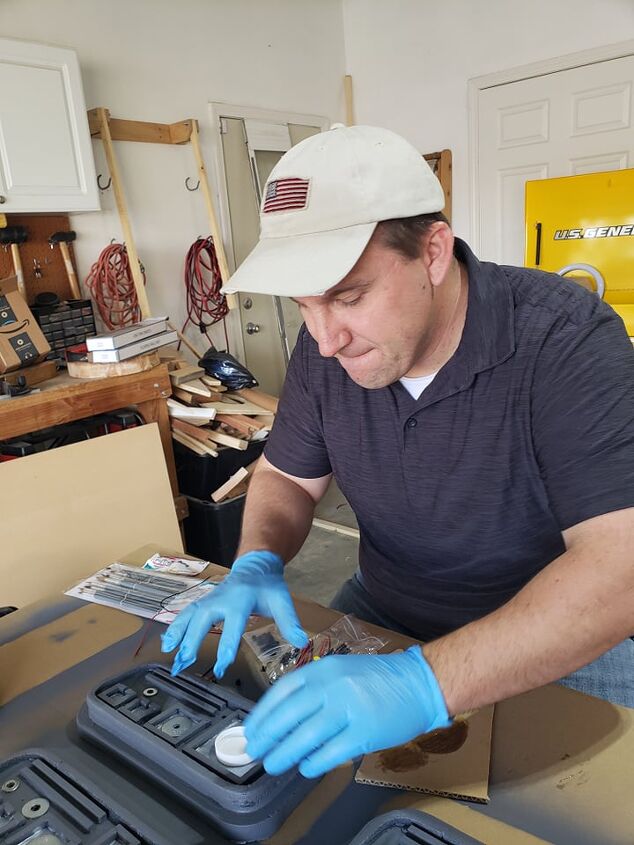
Here I am adding some metal washers and caps to the panels. This will help give them some flair. When working with epoxy, always wear gloves as that glue sticks to everything. After getting the washers and caps glued on, I primed the panels one last time.
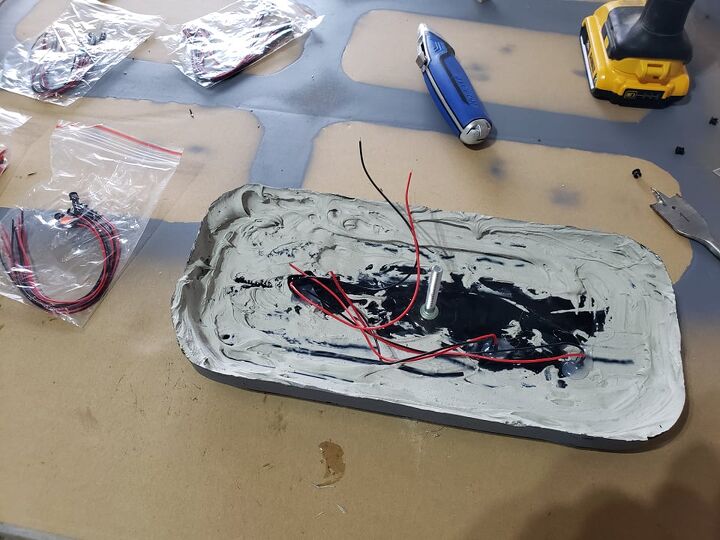
This is the back of one of the panels. I installed three tiny LED lights on the back of each panel through the drill holes. The grey stuff you see on the back of the panels is Bondo. You see, the sides of the panels aren't as thick as the fronts. So I added Bondo to the sides to strengthen them. Also, in this picture, you can see a bolt sticking out of the middle. I epoxied it on to attach it to the carbonite box. You'll see how I did the attachment in the following picture.
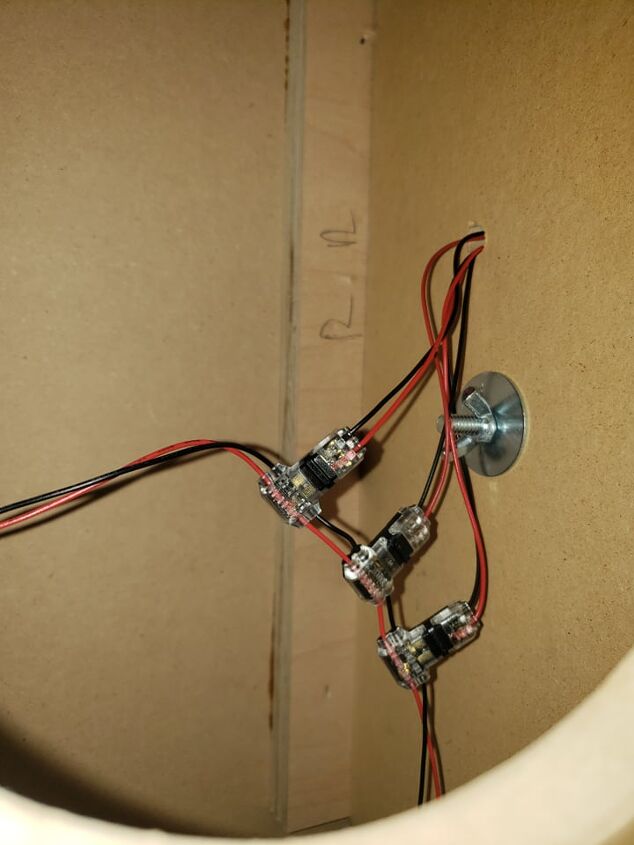
Once all of the lights were installed on the panels, I put them on the carbonite box. I purchased some wire clips to make the connections to the main wires easy.

I was so excited when I got all of the LEDs to light up. You can see how happy I am with my smile. I also painted the box with spray paint called Antique Pewter. It only took two light coats of paint.

Now came time for the body shaping. I epoxied the hands and face to the board and then sprayed expanding foam for the body. Now, you might think that the foam stops increasing after a few minutes. Not the case. I woke up the following day, and the foam kept growing in certain areas. Here you can see that Dustin grew some plumpy chests!!! All I had to do was trim the foam back with a knife into the shape of a body.
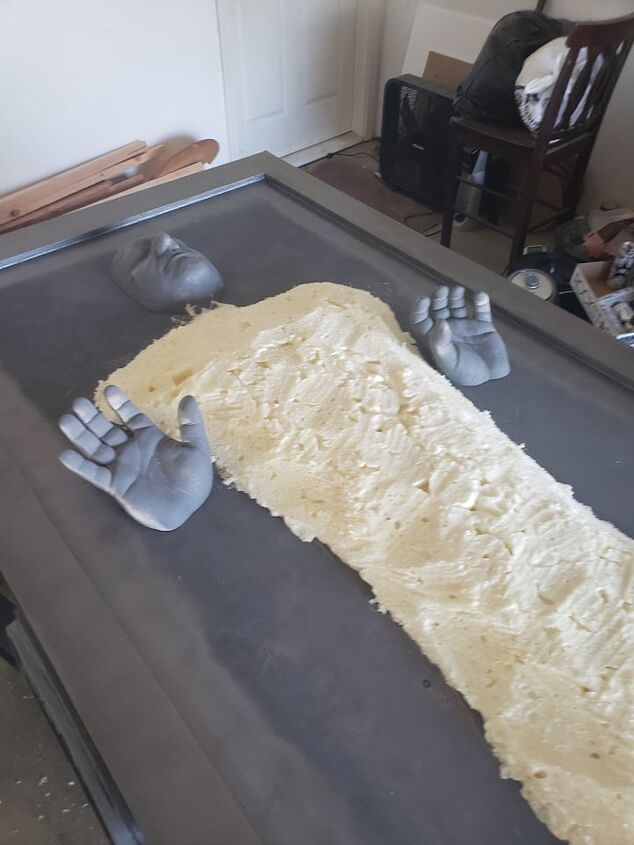
Here is the foam all cut back. It looks a lot better. Now, the foam will not ever be seen. I have to place the doctor's coat over the foam. To do this, I sprayed some adhesive onto the foam so that the coat would stick to it.
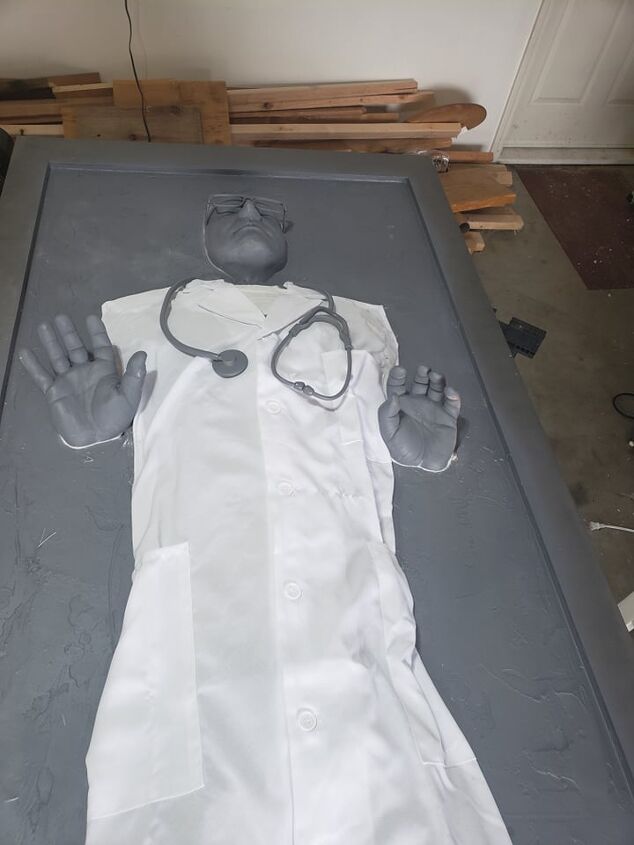
Here is the coat all laid out how I like it. I cut the back of the coat off and draped it across the foam body. Once it looked good, I sprayed some spray adhesive onto the foam and cloth and stuck it down. I also added a stereoscope to the neck area to give it that doctor look and feel. Now it is ready to be drenched in hard resin.
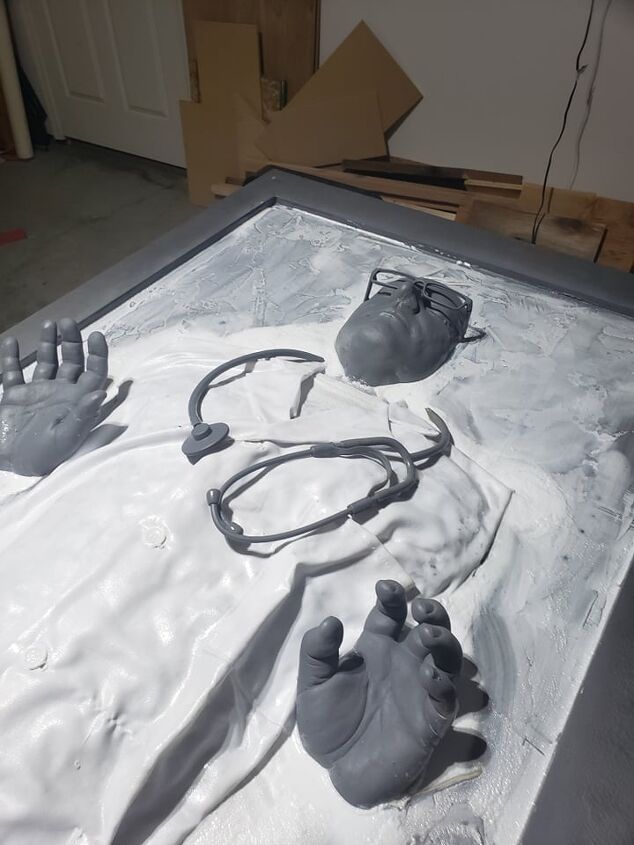
I wish I could show you how I poured the hard resin onto the body, but I'm limited in pictures that I can show. The resin mixes into a clear liquid, and then I pour it all over the body and cloth. In about 30 minutes, it hardened into a super hard plastic!!! After the resin cures, you can see that it becomes an off-white color. Now I can prime and paint the whole front.
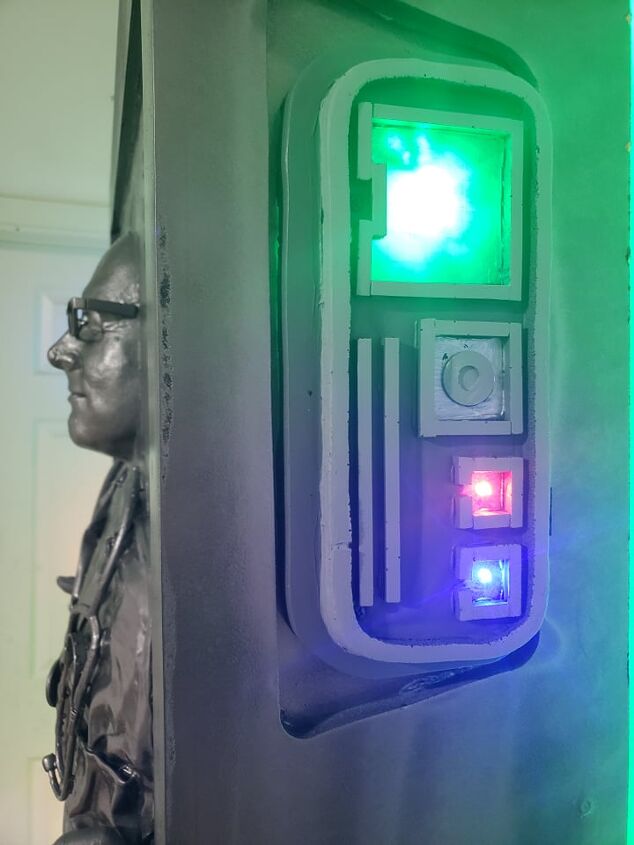
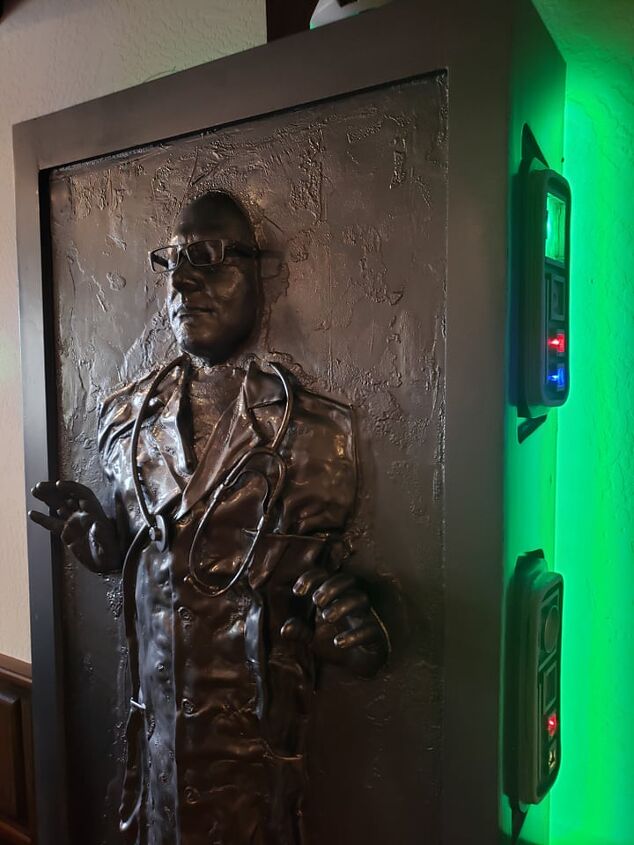
I finally finished the project. Here is a side profile of the carbonite box. I love how the top panel turned out with the grid display. All I did for that was cut a small plastic piece from a CD case and glue it onto the back of the panel.
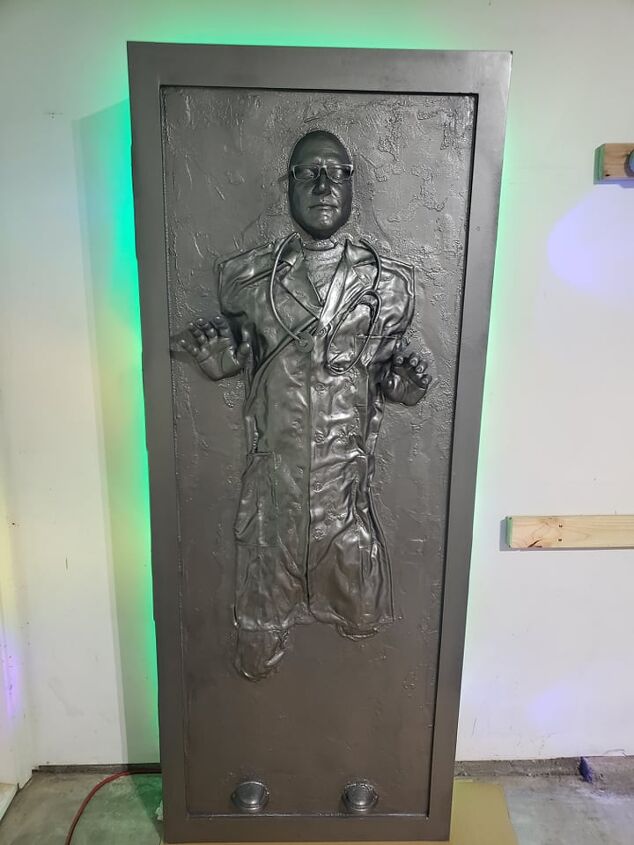
Here is the Dustin in Carbonite in full display. I think it turned out amazing!!! I installed some LED lights on the back all along the outside edge. These lights helped with the special effects. Dustin loves to sing karaoke, so the lights can be programmed to blink with the beat of the music!!! Now all I have to do is sneak out to his house and set it up in his home. With his wife's help, I got out there when he wasn't around and put it in his game room.
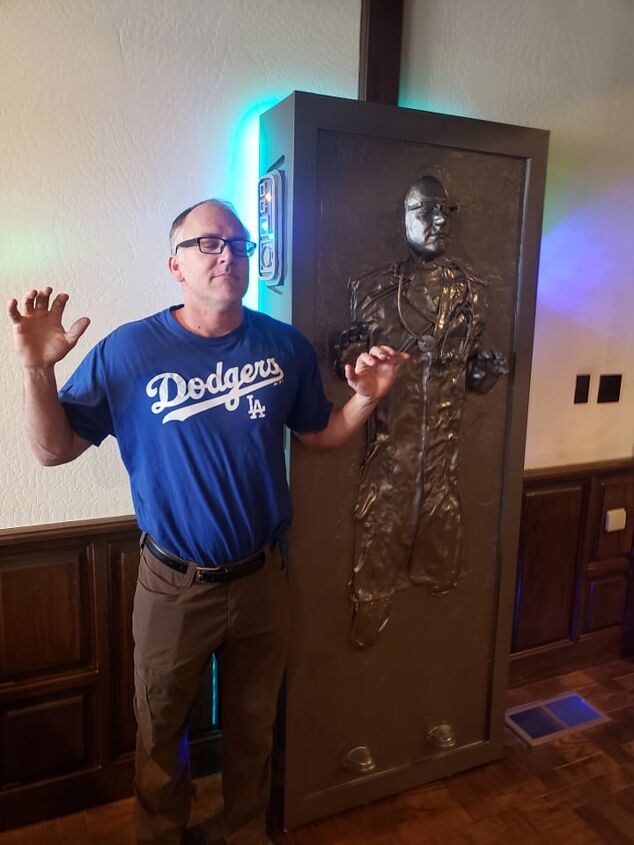
Here is Dustin mimicking the pose of the carbonite. I know it doesn't show on his face, but the guy loved his new display. He told me he's taking it to his office to see all of his patients. I hope you enjoyed viewing this as much as I did making and presenting it. You can watch the video to see more construction techniques, as I stated before. Have fun, everyone, and May The Force Be With You!!!
Resources for this project:
See all materials


Comments
Join the conversation
-
That is absolutely amazing 🙀🙀🙀
-
I love it!!! My son would go crazy with this, great job!!!!


Frequently asked questions
Have a question about this project?
You did such a great job! I know it's priceless, but what was your approximate total cost in materials and time?
WOW! you just had too much fun, what will be your next project?