


DIY Clay Gnome
Sculpting polymer clay gnomes is easy and enjoyable. Perfect for placement next to indoor plants, DIY clay gnomes will be a cheerful addition to your indoor garden or covered outdoor space. Making these curious good luck charms is a relaxing and joyful experience. I’m looking forward to making more to give as birthday presents to my green-thumb friends.
Polymer clay gnomes
This project is ideal for sculptors of any skill level and the finished product is charming. It’s a sweet arts and crafts idea for an adult, youth, or family activity. The steps are straightforward, the supply list is short, and the sculpting process will only take an hour or so.
After sculpting, your creation will need to be baked (cured) in the oven. Your polymer clay sculpture will have a natural finish after the baking process. For the Gnomies among us who prefer to “go big or go gnome”, the final step will add a shiny finish to your creation. But first, let me tell you more about our fabled friends.
Materials to make a DIY clay gnome:
- Parchment paper
- Baking sheet
- Polymer clay (this set has a variety of colors and the cutting tools)
- Clay cutting and piercing tools
- Modge podge
- Paint brush

Polymer Clay Tips
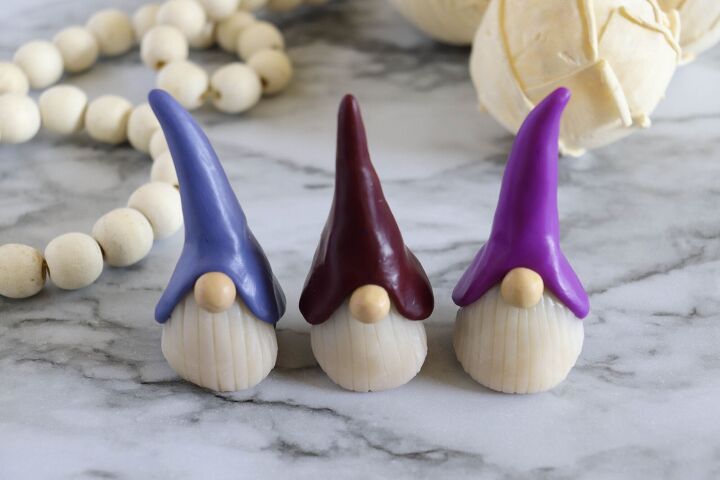
Polymer clay can be found at most art and craft stores, or online, and is available in many colors. The bright colors will most likely be sold in 2 oz blocks. Neutral colors like white, sand, black and terra cotta are available in 1 lb packages at a lesser per oz price. Gnomes are typically depicted with solid colored hats, so you will need a minimum of 4 colors. All of the bodies, beards, and noses can be the same colors. You may want a variety of hat colors.
- For the body: Charcoal Gray
- For the beard: White
- For the nose: Skin tone of choice
- For the hat: Bright color (or to be different you could try a multicolor hat for fun or economy)

Pro Scratch and Attach Tip
When attaching two different pieces, take your sharp tool and scratch lines on both attaching sides, this can help create a stronger fusion between the attaching pieces and will not be visible.
Conversion Ratio: 2cm = .79 inches

For each gnome roll a grey 3cm ball for the body, 2.5 cm colorful ball for the hat, 2 cm white ball for the beard and .5 cm skin color ball for the nose.2. Form the grey ball into a cylinder shape that slightly tapers at the top.3. Form the colored ball into a hat that is tapered at the top and open at the bottom to fitaround the grey body.4. Form the white clay into a triangle shape with rounded edges.
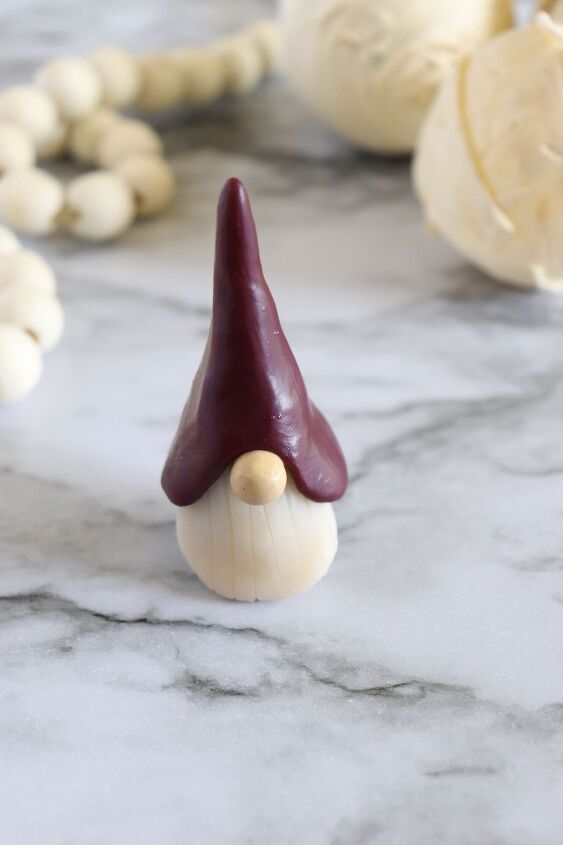
Press this to the bottomfront of the body.5. Layer the hat over the beard and body.6. Press the tan nose into the center of the body, over the beard and below the hat.7. Score lines into the beard using a clay tool.8. Bake as directed on the package.9. When the clay cools, if you’d like a shiny finish, seal with Modge Podge

Comments
Join the conversation
-
Creative and cute.
-
Trying to find people who are in snap sooooo if I have it Send me friend request pleassssss sungirl223_e Tysm


Frequently asked questions
Have a question about this project?