Macrame Wall-hanging for Beginners

by
Wendy at myfrenchtwist.com
(IC: blogger)
5 Materials
$40
3 Hours
Medium
A lovely macramé wall-hanging tutorial that is easy for beginners to follow!
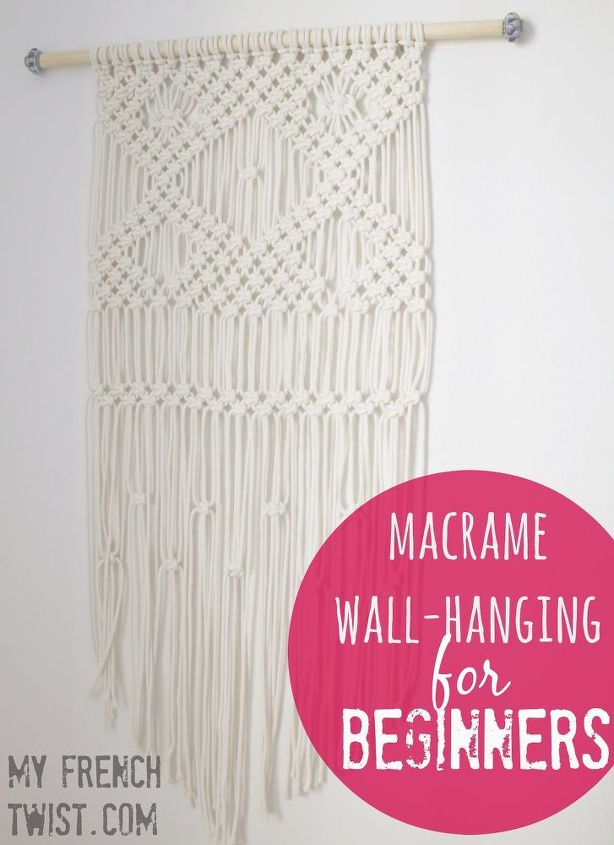
This pattern is an easy one for beginners, and it looks awesome, right? Only problem - the instructions were in French. So, with a few adjustments & lots of verb conjugations, I'm now able to share the instructions with you!
step 1
Cut rope into 28 pieces, each 16 feet long. Tie the cords onto the pole, as shown in the photo above. (I never knew until recently that this knot has an actual name – the Lark’s Head Knot.)
How to make a Lark's Head Knot:
step 2
The Square Knot is the most basic of all macramé knots, and it is the only one you’ll need to know in making this wall-hanging. Practice a few times until you get the hang of it.
How to make a Square Knot:
- Always work with 4 strands of rope.
- Place the right outside rope across the 2 center ropes. (Always start with the right side.)
- Run the left outside rope over the right outside rope then under the center cords and up through the opening.
- With the outside strands, gently tighten the knot.
- Make sure the knot is taunt, but be careful not to pull too strongly.
- (Now repeat the first four steps, starting with the left side this time.) Place the left outside rope across the 2 center ropes.
- Run the right outside rope over the left outside rope then under the center cords and up through the opening.
With the outside strands, gently tighten the knot.
How to make a Double Square Knot:
- Work with 8 strands of rope instead of 4.
- Place the 2 right outside ropes across the 4 center ropes. (Always start with the right side.)
- Run the 2 left outside ropes over the right outside ropes then under the 4 center cords and up through the opening.
- With the outside strands, gently tighten the knot.
- (Now repeat the first four steps, starting with the left side this time.)
With the outside strands, gently tighten the knot.
step 3
Now that you have 28 Lark’s Head Knots tied onto your pole, and you’ve mastered the Square Knot, it’s time to begin weaving the wall-hanging. The project consists of 25 total rows.
- Start with 1st cord: 14K
- Start with 3rd cord: 13K
- Start with 1st cord: 3K – S4 – 6K – S4 – 3K
- Start with 3rd cord: 2K – S8 – 5K – S8 – 2K
- Start with 1st cord: 2K – S2 – 1DN – S2 – 4K – S2 – 1DN – S2 – 2K
- Start with 3rd cord: 2K – S8 – 2K – S4 – 2K – S8 – 2K
- Start with 5th cord: 2K – S4 – 2K – S8 – 2K – S4 – 2K
- Start with 7th cord: 4K – S12 – 4K
- Start with 9th cord: 3K – S16 – 3K
- Start with 11th cord: 2K – S20 – 2K
- Start with 13th cord: 1K – S10 – 1K – S10 – 1K
- Start with 11th cord: 2K – S20 – 2K
- Start with 9th cord: 3K – S16 – 3K
- Start with 7th cord: 4K – S12 – 4K
- Start with 5th cord: 2K – S4 – 2K – S8 – 2K – S4 – 2K
- Start with 3rd cord: 2K – S8 – 2K – S4 – 2K – S8 – 2K
- Start with 1st cord: 2K – S12 – 4K – S12 – 2K
- Start with 3rd cord: 2K – S8 – 5K – S8 – 2K
- Start with 1st cord: 3K – S4 – 6K – S4 – 3K
- Start with 3rd cord: 13K
- Start with 1st cord: 14K
- (Begin this row about 5 inches lower than the last row.) Start with 1st cord: 14K
- Start with 3rd cord: 13K
- (Begin this row about 5 inches lower than the last row.) Start with 9th cord: 1K – S8 – 1K – S8 – 1K – S8 – 1K
- (Begin this row about 4 inches lower than the last row.) Start with 3rd cord: 1K – S8 – 1K – S8 – 1K – S8 – 1K – S8 – 1K
step 4
step 4
Place the wall-hanging on a flat surface (I used the floor) and straighten all the cords. With careful measuring, place the tape across the strands of cord to form a “V.” This is your guide for cutting. (And yes, it does feel a bit like you’re giving Cousin It a haircut.)
step 5
For an extra Bohemian touch, I used ceramic drawer pulls as finials, screwing them into the ends of the pole.
extra tips & explanations
When skipping space between rows, use tape as a guide and a level to make sure they are even.
Once you are finished, grab a glass of cold iced tea, kick your feet up, and admire your handiwork!
Enjoyed the project?
Suggested materials:
- 7/8" dowel rod - 29" long (hardware store)
- 2 ceramic drawer knobs (World Market)
- 5 rolls (100-ft. each) of cotton clothesline (Amazon online)
- Masking or painter's tape
- Scissors

Want more details about this and other DIY projects? Check out my blog post!
Published March 10th, 2017 9:00 AM
Comments
Join the conversation
4 of 86 comments
-
 Vivian Martell
on May 24, 2020
Can’t wait to get my supplies.
looks Awesome !
-
 Wendy at myfrenchtwist.com
on May 24, 2020
Have fun making it!
-
-
-
 Char
on Oct 05, 2022
A lady at work made one a little smaller than this and used tiny clothes pins to add black and white family photos to it. It looks awesome hanging in her cubicle.
-
 Wendy at myfrenchtwist.com
on Oct 05, 2022
That’s a clever idea!
-
-










Frequently asked questions
Have a question about this project?
I am stuck on number 4 and 5, with 4 the last step where there should be two square knots but then when you skip 8 you only have one bunch of four to do one knot. Then on 5 it has you skip 2 but how can you do a square knot?
So, I am completely confused by what the cords mean and I am entirely novice so I am not sure what I am reading....
How can I print this pattern? What do you mean by 1st cord? Third cord? Do u mean to use the 3d cord and then using cord 4,5,&6 to make a square knot? Thank you