How to Apply German Schmear to Give Your Brick Fireplace a New Look

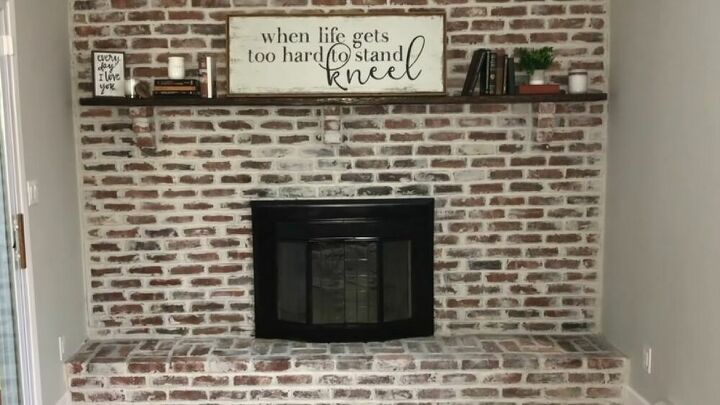
Create a classy fireplace look with this aged brick-and-mortar effect!
Spread Some Cheer onto Your Brick Fireplace with German Schmear
An old fireplace can be a horrifying eyesore to an otherwise beautiful room. While you might be tempted to tear it out, take heart, there is a much easier option! By following our DIY German schmear guide you'll get all the information you need to give your fireplace a hot new look and make it a true centerpiece.
What I used:
- Painters Tape
- Drop Cloth
- Thin-Set Mortar
- Piping Bags
- Painting Gloves (any semi-thick waterproof gloves should do)
- Putty Knife
- Rust-Oleum High Heat Ultra Spray Paint (your choice of color)
Step 1: Gather Your Tools and Materials
Before I could begin, I had to make sure that I had all the tools ready that I would need. Check out the above list for an idea of the necessary parts. Once I had everything collected, I rolled up my sleeves and tried to imagine what the finished fireplace would look like.
Step 2: Tape off the Hearth and Firebox
For the first part of the process, I taped off the hearth around the fireplace and the firebox. This is a really important step because, no matter how careful I am, I always make a little mistake now and then. No big deal if the mortar goes on the tape; I can just peel it off later.
Step 3: Remove the Mantel and Lay Down a Drop Cloth
With the taping done, I removed the mantel for better access. If your mantel can't be removed then tape it up like the other parts I did in step 2, or add another type of cover.
After this, I put down a drop cloth to protect the floor from any falling mortar. If you don't have a professional drop cloth handy, then feel free to use an old bed sheet or table cloth.
Step 4: Fill Piping Bags with Mortar
Now that protecting the ground was done, I put on my gloves and filled a couple of piping bags with thin-set mortar to begin my German schmear look. Note that I had a helper from here on in; if you’re doing this alone, you’ll only need one bag. Be sure to mix the mortar well to achieve a nice consistency.
Step 5: Begin Piping the Mortar
With the piping bags filled and held securely, I began to fill to mortar into the grooves of the brick. This can take a while if you have a lot of brick to cover, so consider employing another set of hands to help the process. It might take a little bribery, but the process will be a lot more fun!
I was also extra careful to pay attention to all the little grooves and details, to ensure a better-finished look. I continued this process all the way down to the hearth.
Step 6: Smudge the Mortar Around Each Brick
Next, I used my gloves to smudge the mortar around each brick to give it a more weathered look. How much you want to do this will depend on your tastes, so experiment if you want! At this point, you should be seeing some real progress towards the finished fireplace and the finished German schmear look!
Step 7: Scrape Excess Mortar
Once this was done, I took my putty knife and used it scrape off the excess mortar that had dripped onto the fireplace. You can avoid this by putting plastic or some other covering on top of the fireplace as you apply the mortar. Since I was going to spray-paint anyway, It wasn’t going to be an issue for me.
Step 8: Tape off the Firebox
When the fireplace was completely dry I taped off the firebox, being extra sure to completely cover any of the screens with tape. We don’t want to get any paint on there, so pay close attention! If you’re an expert with tape, you might be able to make some stencil patterns with this step, but I went for a simple and clean look.
Step 9: Spray Paint the Firebox
With the paint down, I grabbed some Rust-Oleum High Heat Ultra Spray Paint and carefully went over all the exposed areas of my firebox. I chose black, but you can go with whatever color you think is best.
You should also be very careful with the brand and type of paint you use, as some aren’t well suited to high-heat environments like fireplaces, so do check first!
Step 10: Remove Any Tape and Add the Mantel
Once I was done with the painting, I waited for the paint to dry, and then simply peeled the tape right off! With the hard work done, I then replaced the mantel, and gave it some decoration for a personal touch. Your imagination is the key here, and the sky (or the ceiling) is the limit.
Admire Your Work!
With everything finished, you’ll have given your fireplace a new lease on life. Remember, it’s not just a better look, as these updates with German schmear can easily add to the resale value of your home. Just be sure to double-check everything is dry before you take your new fireplace for a test-drive!
If you found this tutorial helpful then feel free to recommend it to a friend, or let us know if you plan on trying out this German schmear method for yourself. Best of luck!












Frequently asked questions
Have a question about this project?
Hi,
Thank you....great idea and result. Do you think this would work outside?
Helen
Great job! Would painting the mortar spaces work better? This seems like a messy job. And seems like ut would fet all over the bricks
My brick is painted. We tried to remove the paint in a small area to get to the original brick and mortar, what a nightmare! There are several layers of paint, so I was wondering whether we could do this on our brick fireplace over the paint?