Edging Your Country Garden in Fieldstones

by
White Oak Studio Designs
(IC: professional)
2 Materials
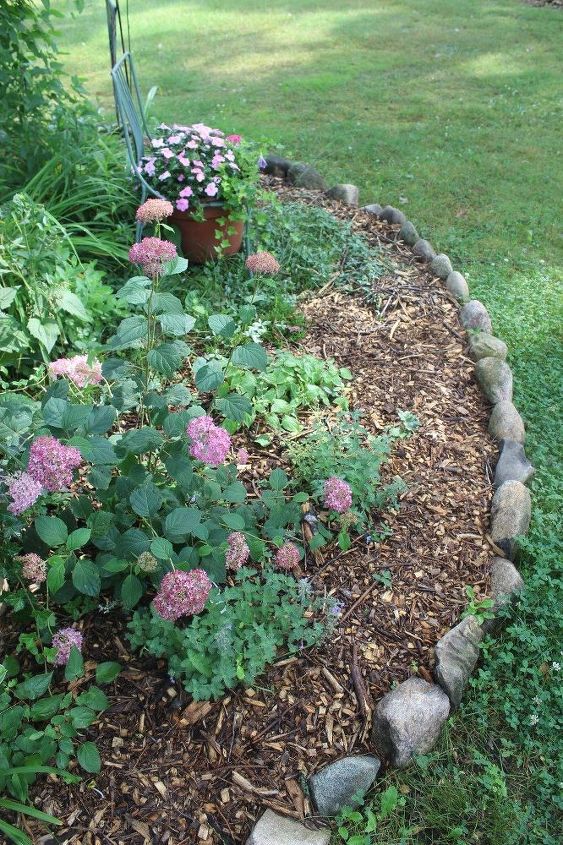
I love a country garden! And part of that garden theme to me means native plantings edged in a natural field stone edging. When we moved to the Small House Big Sky Homestead I knew I wanted a big, exuberant county garden filled with old-fashioned flowers and native plants. So I started collecting field stones to edge my garden in. As I drove to and from the city for appointments I kept my eyes open for stones along the roadway. I soon discovered that spring planting was the best time to find stones discarded in pile along the edges of farmer’s field. I also realized that as soon as the fields were planted it was not kosher to walk in these fields after they were planted. As soon as the corn or soy grew up the stones would be lost in that growth. I’d stop and ask the homeowner if I might have their permission to collect stones and invariably they said “Go for it.!”Thus the collecting began. It wasn’t long until I had a growing pile of stones. As I built my beds one by one, I hauled those stones in our Carts Vermont and placed them around the garden beds. Then I filled in the space with dirt followed by bark chip mulch to keep the weeds down as well as to create “space” between the growing plants and the stones.At some point heavy stones do sink in the soil, so about every 4 to 6 years, I dig up the stones, re-position them, weed carefully and add new mulch. The stones actually create a shallow raised bed to hold in soil and mulch and provide a bit of height to the beds themselves. This is what our garden looks like in 2016 after we re-positioned and re-mulched all the stones in our 2 1/2 acre country garden.
I began our country garden by collecting fieldstones along the roadside, from the edge of farmer's field and from the beach.
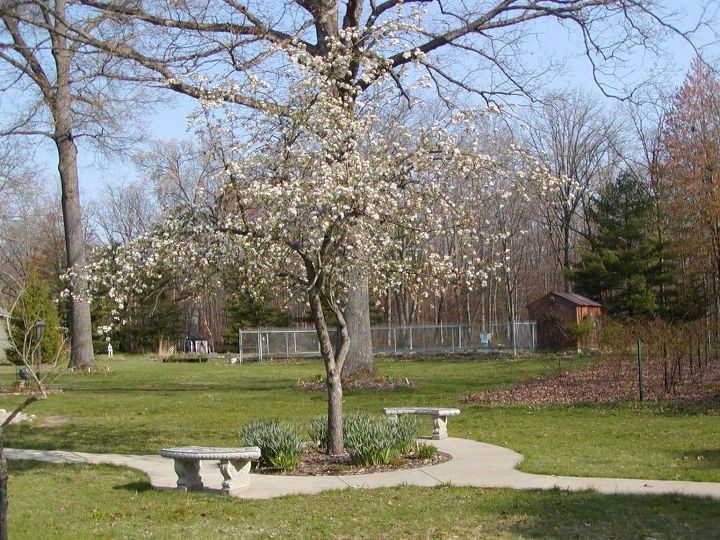
BEFORE: This is an early spring "before" photo of our circle crab apple tree bed. The sidewalk had recently been poured but no field stones had been added to soften the edge of the garden nor any attempt to tie this bed in with the rest of the garden beds. The added field stones came next.
Our bird feeding bed is one of three layers of gardens located behind our three season porch. This island bed is filled with A) shrubs (for the birds to land in and feed safely) B) native plants (to provide nectar for butterflies, hummingbirds and dragonflies) and C) colorful perennials for color and form as found all throughout our gardening season.
This bed is located behind our three season porch and leads the eye to the bird feeding bed, as seen above. This garden was designed to be low so the view beyond it would not be blocked.
This is the back side of the bird feeding bed that is edged first in day lilies and Autumn Sedum Joy, bark chip mulch and then fields stones. Whenever I can I turn the stones on their side to make the bed deeper and to help hold in dirt and bark chips. The stones are slightly buried rather than just setting on top of the ground.
This is a portion of our turn-around-bed off of our gravel driveway. Visitor's pull into the turn-around area and walk up the sidewalk to our three seasons porch. Here field stones rest on pavers that are buried in the gravel to provide a separation between the gravel driveway and the garden bed. The stones soften the edge of the pavers and tie this bed into the rest of the beds.
This is another view of the turn-around-bed also edged infield stones. Here you can see the garden trellis, and side of our Indiana Limestone ranch-style home. The field stones carry out the theme of stone work on our homestead.
Heading farther down the sidewalk toward our porch is our crab apple tree bed in the early spring. This round bed is filled with daffodils, hosta's and day lilies for color and bloom throughout the entire gardening season. Here we had a cement sidewalk poured and I edge the bed with stones to tie in visually with the rest of the gardens.
Our country style pole barn has a flower bed that is edged in field stones as well. This bed is quite rustic and simple and is filled with day lilies and ornamental grasses that grow upright and fill in nicely in the half sun/half shade situation. I put up trellis against the barn and added easy-to-grow climbers of hops and autumn climatis.
This small triangle bed reside right at our porch slider doors. This provides a splash of color when you walk in and out of the porch. Peeking below the foliage of the day lilies are fields stones that creates a shallow raised bed that holds in soil nicely.
Another view of the pole barn edging show the field stones running parallel to the barn as they provide a edge to hold the bark chips in place.
Even where the is no actual edge of field stones, I use stones in my flowers bed to accent and to tie the beds together. This is a autumn vignette that greets friends and family as they pull into our gravel driveway heading down towards the pole barn parking area.
In process: After a few years plants grow and fill in the space I like to think of as "the breather." With the scale of our garden both in terms of physical space and the scale of the plants I choose to use, I feel they need a breather between the field stones and the plants. Here you can see the old crowded space on the right hand side and the newly done chips on the left hand side.
Enjoyed the project?
Suggested materials:
- Natural field stones (Roadside rescues)
- Bark chip mulch (Tree trimmer dumped them)
Published August 18th, 2016 6:04 AM
Comments
Join the conversation
2 of 4 comments
-
-
We love our bird feeding station too. When I designed it I put is behind our home and positiond it so that I can see the birds when eating dinner, from my kitchen window or while sitting in our three season porch. I planted large shrubs for the bird to land in, a birdbath with fresh water and food. The birds are so entertaing.
 White Oak Studio Designs
on Aug 23, 2016
-











Frequently asked questions
Have a question about this project?
Hello..not sure you'll still get this message..I love what you've done with the field rocks..when you talk about repositioning them because of sinking, do you rough up the dirt somewhat underneath them and just put them back in place or do you add some of the landscaping sand that is talked about now? I need to do this but am not sure how to go about it.. thanks so much for you advise/information..Paula