Fun & Beautiful DIY Gazing Ball

I love all things Spring, especially gazing balls! Florida really does have seasons, albeit not the four commonly known to the rest of the world. For us SW Floridians it's a brief but great time of year between our seasons: blistering heat, torrential rain, hurricane/mosquito and tourist season.
For the past few years I've fought the urge to purchase a gazing ball, in part due to price in part because I don't want to clean up glass if it shatters into smithereens. I decided I would make one, but wasn't sure just how I wanted to concur that and then, it struck me!
I've have several packages of air dry clay in my closet for months, purchased for a something I just had to do, but.... I didn't get around to it & now it doesn't seem important. Then a few weeks ago, WHAMO like a ton of bricks the idea for my gazing ball struck me!
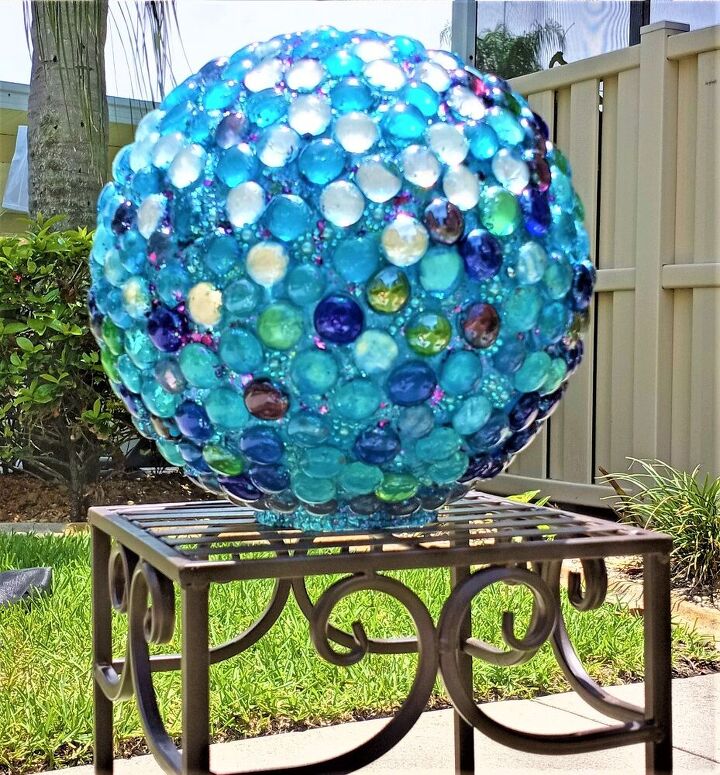
This is my finished product, gleaming in the bright sun. This project was so much fun and really pretty simple, I think it would be great to do with kids.
More Glass Gem Ideas
This project was complete trial and error. I ended up using one full package of clay plus a small amount of a second package but ran out of gems which required a plan b
I used 1 1/4 packages of Sculpy which I found to be very easy to work with. I purchased these at Joann many months ago during their remodel/mega clearance sale.
First, find something to set the ball into so it doesn't roll away. I didn't think of that until I had to chase it around a few times 
I wasn't sure how sticky this clay was going to be so I opened the wrapper and slowly began rolling the clay out inside the wrapper using a dowel left over from my Drying Rack DIY
Once I realized it wouldn't stick to my surface I continued rolling it out to the desired thickness- just tick enough to cover the ball without tearing.
I added a thin layer of Tacky glue to the surface of the ball just to help it stick. I highly recommend wearing gloves at this point
Here's a shot of the ball completely covered in clay
I keep a spritz bottle at my work station at all times. It comes in handy for keeping acrylic paint and glue wet, wiping up mistakes and keeping air dry clay pliable.
I was shocked to find the gems stuck to the damp clay without any added glue.
As I was doing the happy dance I realized I didn't have nearly enough gems. Sigh
I began searching my stash for items I could add.
I decided to add the clear pieces of this old bracelet and some small beads from a fan pull I bought on clearance years ago.
It's coming along but I've stretched what I had as far as I could, I'm going to need to go back to Dollar Tree for more.
I made several trips to various Dollar Tree stores and they were all out of gems so I went to an art supply store. They did have gems but at 7x the price for one container and in different colors I decided to wait.
Dollar Tree got gems in but in a much different color pallet than what I'd purchased before. I bought three more bags and some self stick gems and off I went to finish this project.
Since the clay had now dried I did several things
- mixed a combination of diluted glitter paint with Mod Podge and drizzled it between the existing gems
- for additional adherence and water proof the dried clay
- Glued the rest of the gems on with Weld Bond multi purpose glue
I already had all other items on hand so there was no additional cost
Dollar Tree self stick gems. I cut these to fit and stuck them in between the glass gems and jewelry pieces.
All of the gazing balls I've seen are completely round and displayed upon a stand made specifically for them. I plan to put this on the patio either free standing among my plants or on a plant stand so it was important that it could stand on it's own. While the clay was wet I imbedded a plastic jar lid into it, made sure it was level and added some diluted glue around the edge. I then stood it on my lazy Susan where the weight allowed it to dry in place & made adding gems much easier for me. I covered the based in small gems and sealed with glitter glue.
- Let dry.
- Dampen a towel with rubbing alcohol and wipe off all of the gems to remove any paint and glue that may have gotten on the surface.
This is a close up of the ball completed and standing outside my front door. I'm pretty happy with the outcome especially since I really was winging it.
I found this project so relaxing and so much fun that I may do something similar with my niece.
Playing with clay, sparkly things and glue is FUN and not just for kids.
Enjoy
Enjoyed the project?
Resources for this project:
See all materialsComments
Join the conversation
-
 Bun10605347
on May 22, 2023
Walmart has the glass gems for .98 cents a bag
-
 Kimberley's Joy
on May 22, 2023
That's terrific! We recently got 3 or 4 full gallon sized zip bags at Goodwill. I don't recall the price exactly, just that it was very inexpensive compared to retail stores.
-
-
-
-
 Kimberley's Joy
on May 27, 2023
Hi Cindy, it's a lot of fun. Please post a picture if you do.
-
-








Frequently asked questions
Have a question about this project?
I love this! How heavy is the ball? If I did this, it would be in my front rock bed and with the Kansas winds, I’d be afraid it would end up down the road in a cow pasture. Do you think it would be heavy enough to hold it’s own?
so you cut the base of the ball when you insert the lid as a base? I'm thinking, YES cut the base and maybe insert SAND into the ball for weight.
Not a question. I made a bunch of these using BOWLING BALL. USED GORILLA GLUE & CAULK. THEY HAVE HELDED UP GREAT IN MY GARDEN. THANKS FOR THIS IDEA.