


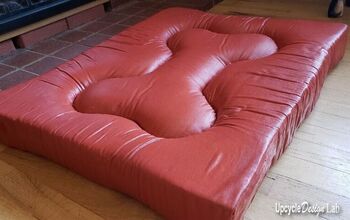
DIY Dog Bone Pillow + FREE Pattern
Regular pillows aren’t all that comfortable when you’re reading a book or watching TV. Your neck starts hurting from them sooner or later, no matter how you set them up.
This dog bone neck pillow is different. Due to its special shape, you can rest on it for hours and not feel any pain in your neck! On top of that, if you happen to fall asleep, your head won't slide off the pillow because it will stay locked in place, again thanks to the shape of the pillow.
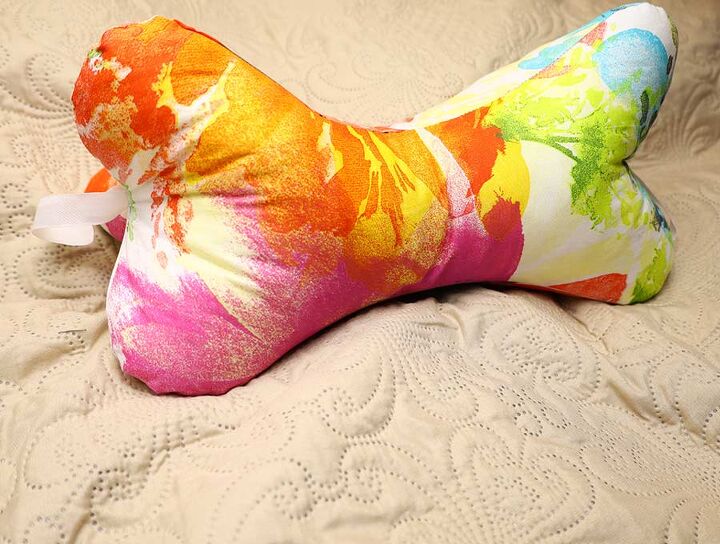
Sewing this headrest pillow is easy and fun, so let me show you how it’s done.
Prepare the pattern and cut the fabric
Download the free dog bone pattern, cut out the pieces, and assemble them together.
Fold the main fabric in half. Put the pattern on the fold of the fabric and cut around it through both layers. Cut three pieces of fabric like this.
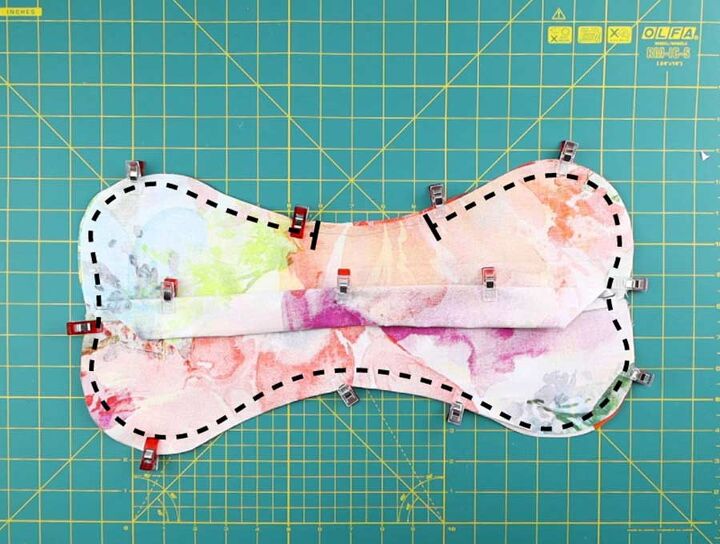
Stack the layers
Put all three fabric pieces on each other and align their edges. Clip the corners where the curves meet, on both sides, through all layers.
Place two fabric pieces on each other with their right sides facing inward.
Start sewing the bone pillow
Using a 3/8 inch seam allowance, sew along the bottom half of the fabric sandwich, from one clipped corner to the other.
Fold the top flap down, and align it with the bottom edge. Now the right side will be facing up.
Place the last fabric piece over the layers with its right side facing down.
Align the edges and pin the two raw edges on top and the two on the bottom so that the wrong side is facing out however you flip the fabric. Make a seam on each flap with raw edges. Use the same seam allowance as before. Leave a gap of about two inches unstitched for stuffing the pillow.
If you did everything right, you will get a piece of fabric with three flaps.
You can put a folded ribbon between the layers before sewing if you want the pillow to have loops.
 Need more guidance? Check my step by step dog bone pillow tutorial over at hellosewing.com

Finish the headrest pillow
Make small cuts all around the curves of the pillow. Turn the pillow inside out through the opening and push out the edges.
Stuff the pillow so that the center is soft and the ends are firm. Use a needle and a thread to stitch the opening shut.
What do you think about our pillow tutorial? Let us know how yours turned out. Enjoy comfortable relaxation with your new pillow!
Resources for this project:
See all materials


Comments
Join the conversation
-
OMG I LOVE THIS
-
Cute and cozy looking!


Frequently asked questions
Have a question about this project?
How do you wash the pillow? It sewed up nicely and I love using as a book pillow too