


How to DIY Above Cabinet Storage: Maximize Space, Boost Home Value!

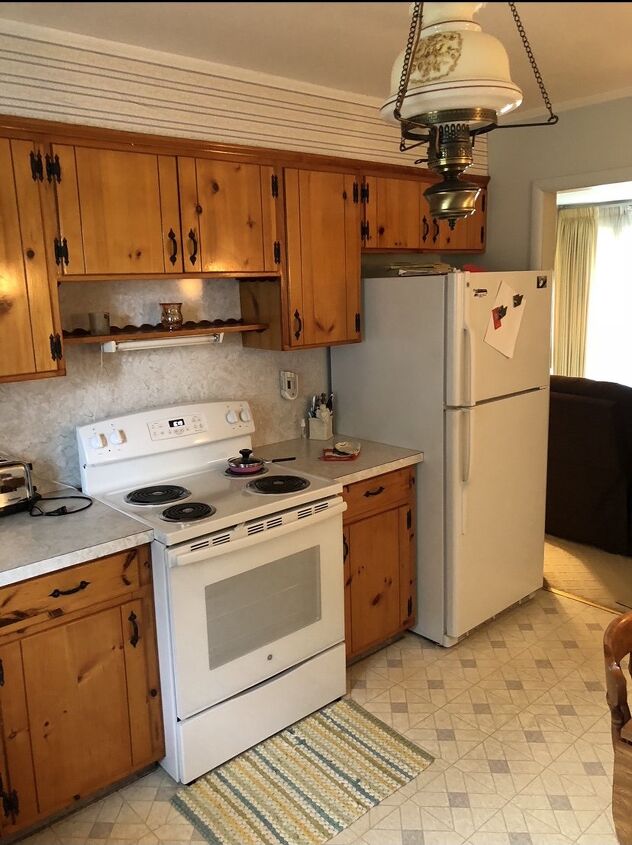
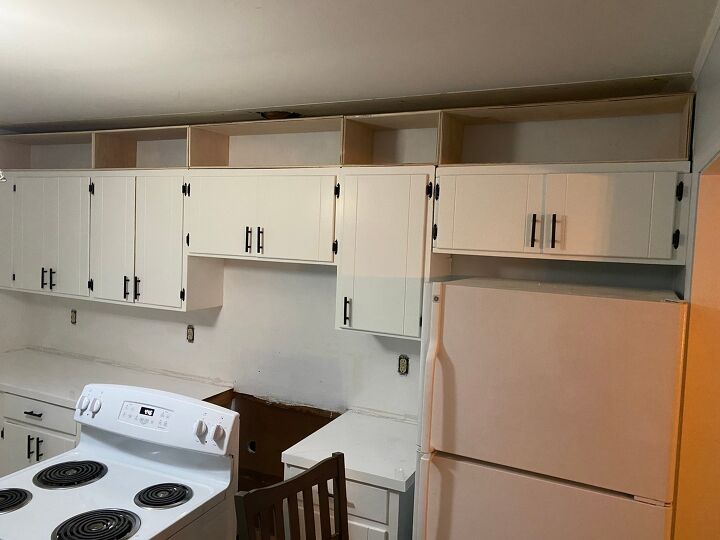
Does your kitchen have soffits above the cabinets like below, that are pointless and a complete waste of space. I know I sure did. And they were driving me nuts! During my kitchen demo I got rid of the soffits, and I painted my cabinets. It looked better. But something still just was not right. Here is the official before of my kitchen when I first moved in and before I painted the cabinets!
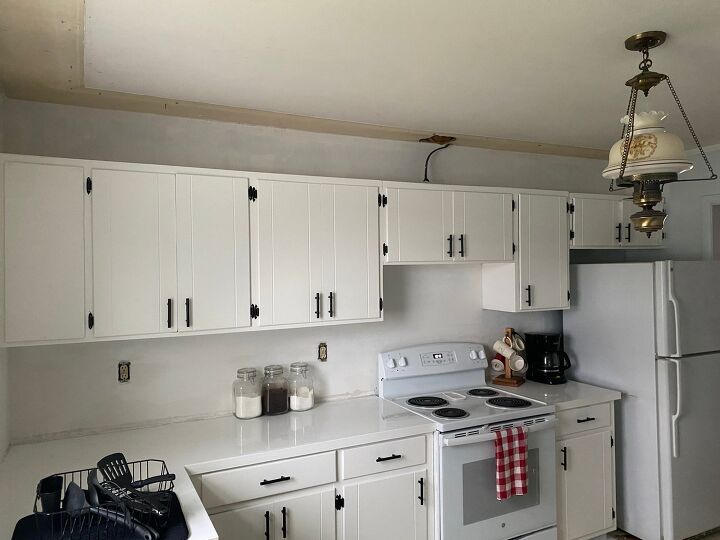
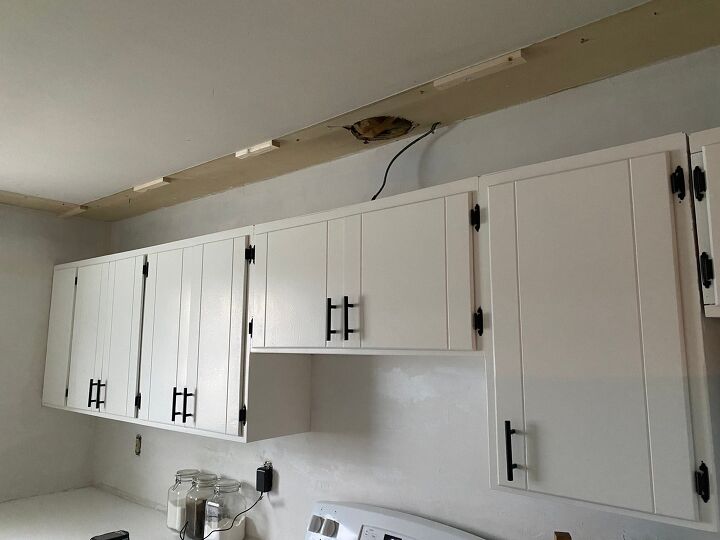
Here is how my kitchen looked after removing the soffits and painting my cabinets…
That space above my cabinets still felt like such wasted spaced, so I decided to add some extra storage! My favorite part is that this entire project cost me less than $80 since most of the materials I already had. But even if I hadn’t already had the plywood, this was a very budget friendly project!
Supplies:
- 4×8 1/2in plywood
- 1/4in plywood
- Miter saw
- Nail gun
- Jig saw
- Orbital sander
- Liquid nails
- Wood filler
- Caulk
- Paint color of your choice (I went with Benjamin Moore’s simply white to match my cabinets)
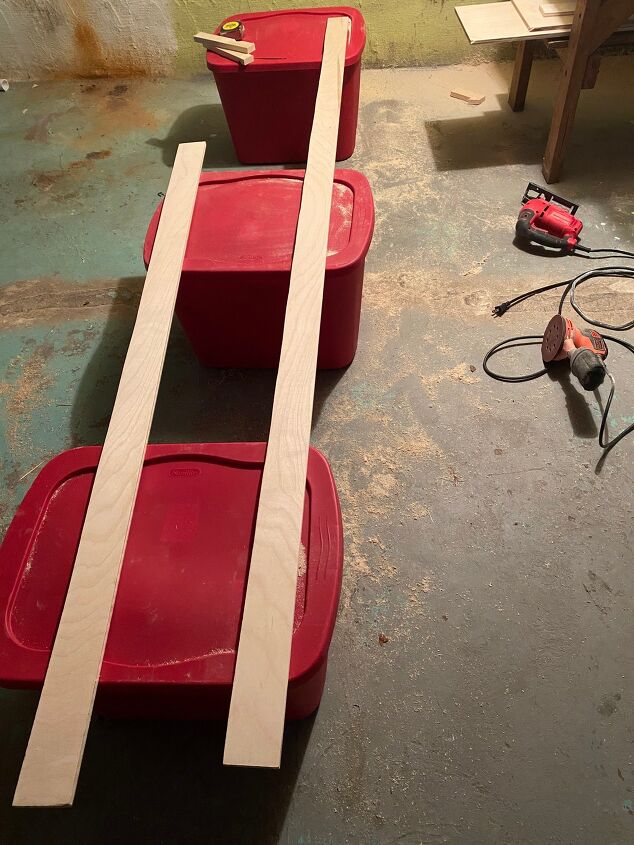
First I ran to Home Depot and picked up 2 sheets of 4×8 1/2in plywood…
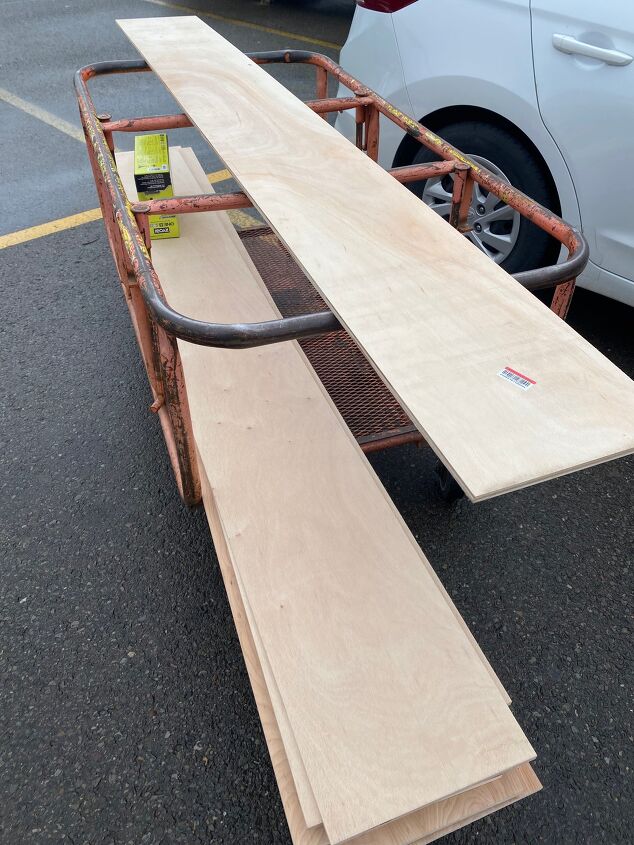
Based off my cabinet depth of 12in, I had Home Depot cut the plywood to 12in strips. Retrospectively, I should have had them cut a 0.5in shorter than my cabinet depth (so 11.5in) to allow space for finishing pieces of plywood to fit on the outer edge of the boxes to seamlessly blend in with my cabinets. But, not the end of the world. I am still happy with how they turned out! Just a learning lesson! Then I came home and made 5 boxes from my 12in strips of plywood to match the sizes of my cabinets.
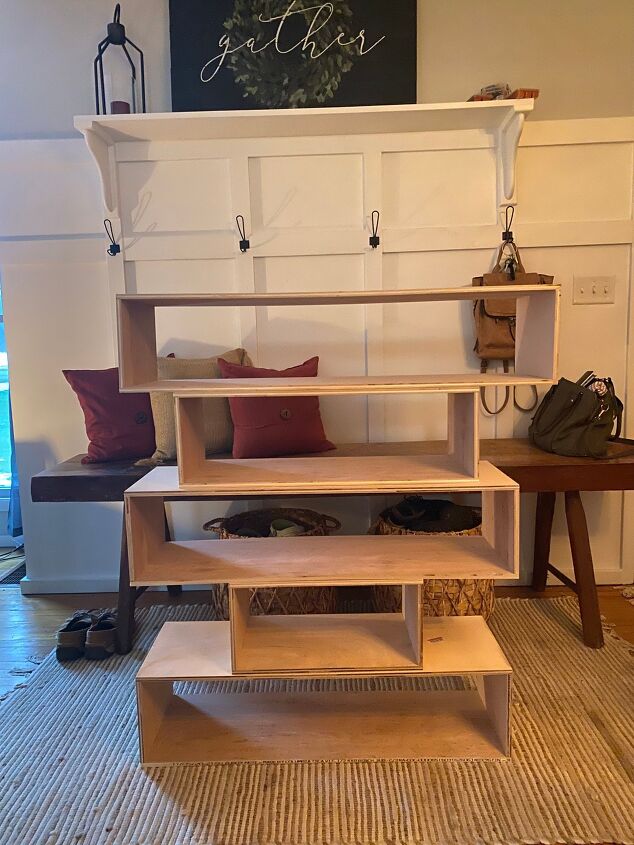
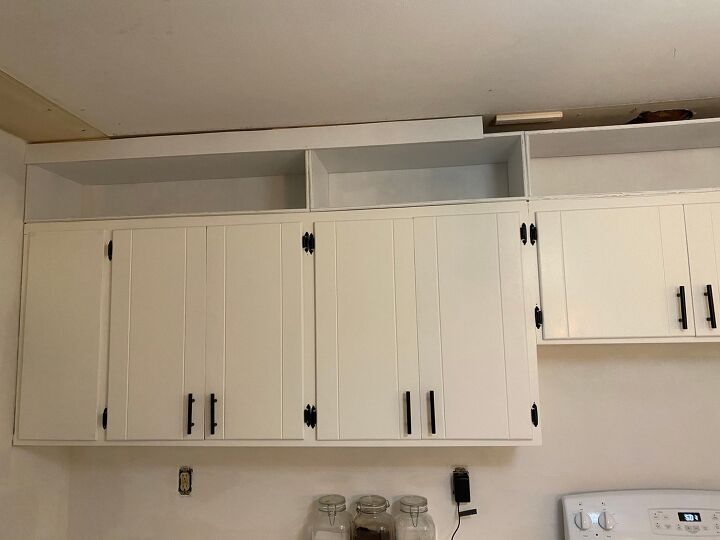
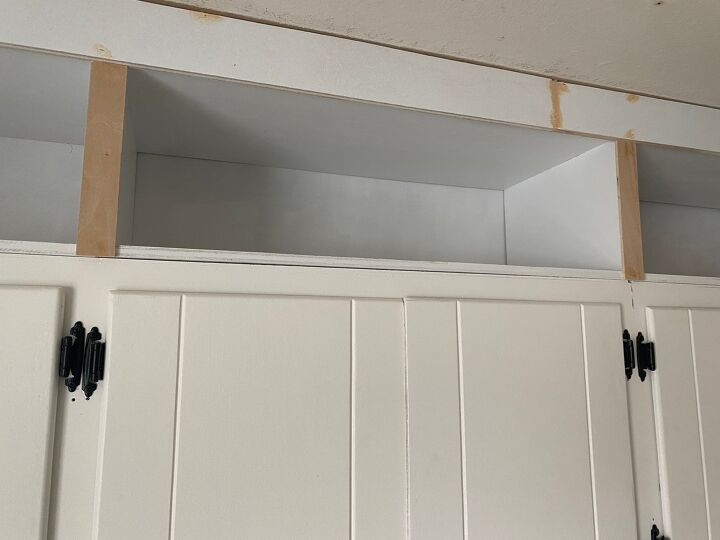
I trimmed these pieces with my miter saw! The height from the top of my cabinets to the ceiling was 11.5in. I made the boxes height 2.5in shorter than that. So each boxes height is 9in. Depth is 12in (but make your depth 0.5in shorter to allow for finishing trim at the end). And width depends on the width of each cabinet, all 5 of mine were different. I made the “boxes” by applying a small amount of liquid nails, and used my nail gun to secure the plywood pieces into each other. Next I placed the “boxes” above my cabinets.
I then trimmed small pieces of scrap 1x2s and nailed them sporadically into my ceiling, but lining up evenly with the face of the cabinets, to act as support pieces for the trim at the top. You will be nailing your trim into these support pieces and you want your trim to sit flush on top of the boxes that you have made. It was just easier to take the boxes out to nail gun the 1×2 supports in.
I then cut a 2.5in wide strip of the plywood the length of my cabinets. My cabinets were 159in long. I ended up needing 2 pieces for this. Later I will use wood filler to hide this seem where the two pieces meet.
Since I do not have a table saw, I made sure to keep one straight edge from Home Depot, and only cut one edge with the jig saw since the jig saw doesn’t cut perfectly straight. If you have a table saw then you will not have to worry about this. This one edge being not perfectly straight was ok with me because I planned on having the messier cut edge be towards the ceiling where eventually my shiplap ceiling will cover this and it will not be noticeable. You may want to have Home Depot pre cut these strips so that both edges/sides are perfectly straight if you are not doing a ceiling treatment. Or, even better, if you have a table saw use that!!
Next, I made sure everything was sanded down well. I then used 1in nails to nail the “boxes” into the cabinets. And also nailed the 2.5in strip so that is sat flush to the top of the cabinet, giving it a clean finished look. This is where those 1x2in pieces came in handy, I nailed the 2.5in strip into these. I primed everything before putting it up just because it was easier. After getting the other strip nailed into place, I applied wood filler to the seem. Next, added 1/4in plywood to the vertical edges where the boxes came together. Again retrospectively I would of cut the depth of the boxes 0.5in shorter so that I could use 0.5in trim on these vertical pieces and also on the bottom of the box. It would look better this way, learn from my mistake! 🙂
I went around and filled all of the nail holes with wood filler, then caulked my seems. This made the unit look built in.
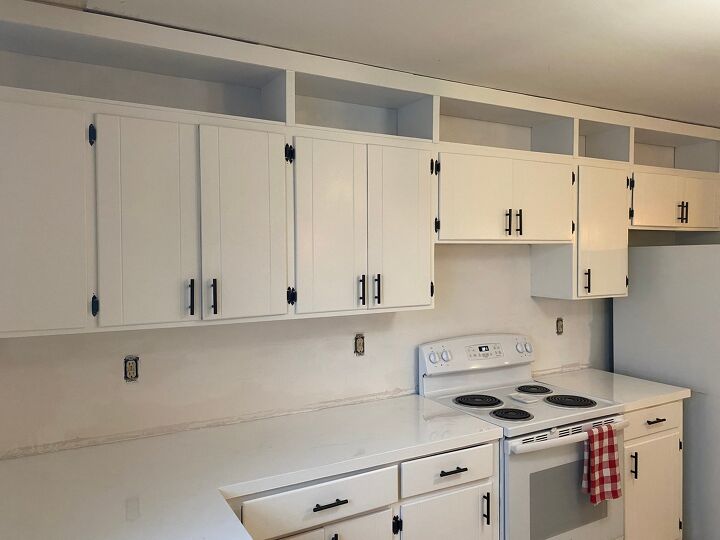
After the caulk and wood filler dried, I applied 2 coats of the same color paint as my cabinets. I used simply white in semi gloss. Again, don’t mind the gap at the ceiling this will be covered with shiplap when I shiplap my ceilings. If you plan on replicating this just make sure your strip has an even cut line, I just knew this wasn’t important in my case. Then my favorite part, decorating!

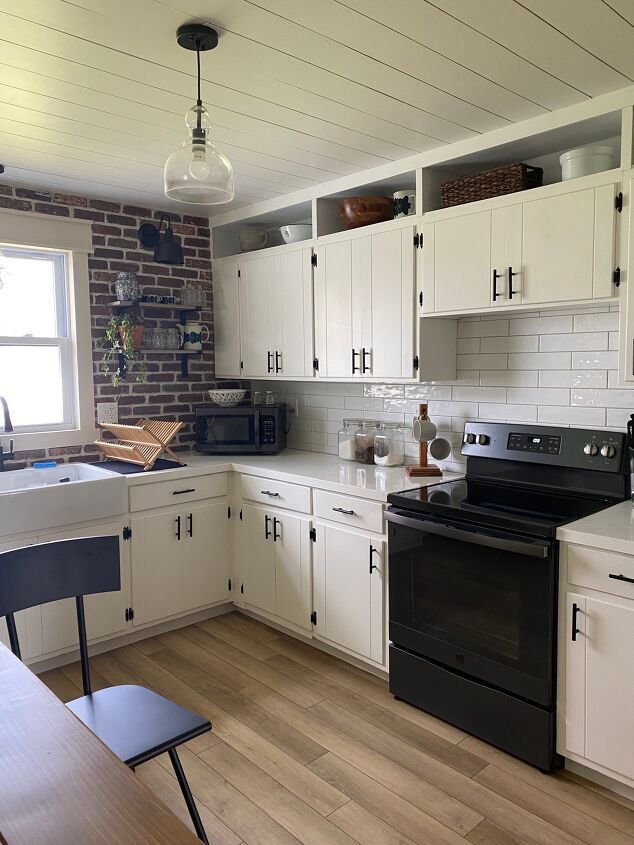
Functional storage space? Yes please! I got rid of my soffits and added this upper cabinet storage for under $80! I am loving how it turned out! Now, whether I use it for actual storage or purely decorations is still to be determined… Either way it’s a win win. Do you have the same soffits in your kitchen? Give this a try, and let me know what you think! 🙂
I have come back to this post to update how the upper cabinets look after I put up the planked/shiplap ceiling! It really completed the whole look that I was hoping for! Follow along with me on Instagram @abbbclark_homeee for more!
Looking for more budget-friendly ways to raise your home's value?
Resources for this project:
See all materials


Comments
Join the conversation
-
Very nice and looks wonderful!
-
Great job! I think I would have raised cabinet above stove so I could have added a above the range microwave and saved counter space in the kitchen. Grante/Quartz looks great, back splash and nice JOB!


Frequently asked questions
Have a question about this project?
I do have a question
do you think this could be done with a cathedral ceiling?
I love your above cabinet storage. My question is I see you painted your pine cabinets and have new handles but what did you do about those old hammered pointed hinges that require 4 nails in each hinge. I have shopped everywhere to find something to replace these old hinges and found nothing. Close up of 1 of your photos looks like a nail hole is visible. I would love to hear from you and again great job on the storage cabinet. Thank you.
Firstly, the white cabinets look amazing, makes the kitchen look so much bigger. i see that in some of the pictures the wall on the left, where the last cupboard is, where i presume the window is, was white and on completion it is face brick?