


How to Replace a Toilet Seat Quickly and Easily

By Marilyn Syarto
Just like toilet paper, your toilet seat can be an affordable luxury if you choose it well. What makes a great toilet seat? Comfort and fit. Comfort for you and your family, and fit for your toilet. In all seriousness, if your toilet seat is uncomfortable and ill-fitting, it can have some unpleasant consequences on your health and well-being.
The good news is that learning how to replace a toilet seat is easier than just about anything you’ve ever tried to DIY in your home. There’s no bad news, unless the toilet seat you choose isn’t right. Use our guide to help you select and install a seat, and you’ll always be in toilet seat heaven.

Photo via Jenn Salsich
Reasons for Replacing a Toilet Seat
Depending on use, the average toilet should last up to 50 years, according to We Care Plumbing, Heating, and Air. However, a toilet seat has a shorter life, only lasting an average of five to seven years before it becomes damaged, depending on the quality and material.
The three main toilet seat materials include high-impact plastic, wood, or foam (padded), but there are models made of bamboo, enamel, and fiberboard, too. Padded seats always wear out much quicker than plastic or wood. Here are signs that indicate you should probably replace your toilet seat:
- A padded seat has cracked and peeled.
- A padded seat’s tear emits an odor because there’s bacteria growing in that crack.
- A plastic seat has cracked, scratched, or chipped from slamming or excessive use.
- You’re tired of a seat that slams shut and you want a “soft close” feature.
- The “soft close” feature doesn’t work anymore.
- The finish on a wooden seat has worn off, revealing wood that is about to splinter.
- The hardware has loosened up or cracked and the seat swerves to the side when you sit down.
- The seat is stained or it just won’t come clean.
- You bought the wrong size toilet seat and it’s uncomfortable or you keep bumping into it.
- You want to update your bathroom with a new color or pattern, add a bidet, or want to try out a heated or raised toilet seat.
How to Measure a Toilet Seat
No need to take your toilet seat into the store to buy a new one of the same size. Instead, all you need to do is take three quick measurements with a tape measure to determine your toilet seat size:
- Measure the distance between the bolts at the back of the toilet seat where it attaches to the toilet. You will likely get a measurement of 5.5 inches.
- Measure how wide (side to side) the toilet bowl is at its widest point.
- Measure the length (back to front) of the toilet bowl from outer back edge to outer front edge. Round bowls will have a standard size of 16.5 inches, elongated bowls will have a standard size of 18 to 18.5 inches.
Square Toilet Seats
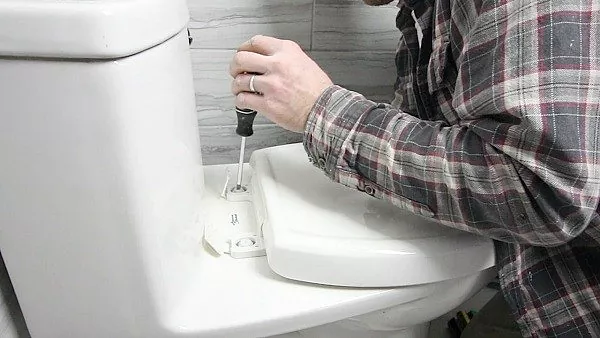
Photo via Home Repair Tutor
How to Remove a Toilet Seat
It couldn’t be any easier to remove a toilet seat—unless the hardware is rusted or the bolts won’t budge, that is. In any case, we're here to guide you through it. Take these quick steps to remove a toilet seat in no time.
Tools and Materials Needed:
- Protective gloves
- Paper towels
- All-purpose cleaner
- Wrench
- Screwdriver
- Toilet cleaner and brush
Step 1: Clean the Old Seat
Put on protective gloves and give the old seat an overall cleaning with paper towels and all-purpose cleaner before you take it off the toilet to eliminate the possibility of spreading germs.
Step 2: Unbolt the Seat
At the back of the seat, you’ll find two bolts that attach the seat to the toilet. There may be a protective plastic cover over the bolts. Pop up the covers to expose the bolts. You may need a screwdriver or wrench to loosen the bolts or they may come unscrewed easily with your fingers.
How to Remove Rusted Bolts
Step 3: Remove the Seat
Unscrew bolts, washers, and any other parts and pieces of the old toilet seat.
Step 4: Clean the Toilet
Give your toilet a good cleaning inside and out to prepare for the new seat. Deep clean the toilet ledge, then clean the area underneath the bowl where the bolts are located—you will need to reach under there when attaching a new seat cover so it helps to have it free of debris.
How to Attach a Toilet Seat
Before attaching a new toilet seat, take a look at the included hardware. Some require a simple tool, while others just require your hands to tighten the bolts.
Tools and Materials Needed:
- New toilet seat and parts
- Screwdriver (optional)
Step 1: Position the Cover
Place the seat on the rim and align the bolts and bolt holes. Sit the bolts through the holes.
Step 2: Tighten Bolts
Use your fingers or the recommended tool (likely a screwdriver) to tighten the bolts. Don’t over-tighten the bolts or the seat will not move correctly. You will need to reach underneath the toilet bowl to tighten washers that secure the seat to the toilet.
Attaching a Specialty or Bidet Toilet Seat
Have you ever had to replace a toilet seat, round, oval, or even a square or specialty model? How did you measure and choose a seat? Let us know in the comments below!


Frequently asked questions
Have a question about this project?