Turn Dollar Tree House Frames Into a Christmas Village

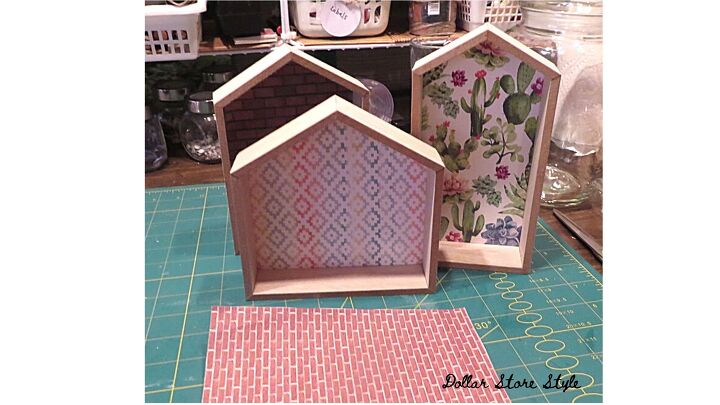
I think we’ve all seen the house-shaped frames at Dollar Tree. I bought the set of three some months ago, not really knowing what to do with them. I liked the shape of them and the fact that there were three different sizes.
Christmas always seems to be when I get my best inspirations for crafting.
Here’s what I did to turn Dollar Tree house frames into a Christmas village.
To copy my idea, you will need:
- brick print dollhouse wallpaper
- small, medium and large craft sticks
- acrylic and metallic craft paint in your choice of colours
- polyresin Christmas village figures and accents
- mini bottle brush trees
- scissors
- glue stick
- tacky glue
- hot glue
- wired pine stem
The Inspiration
You can find these polyresin houses at Dollarama every year and I used one as inspiration for creating my version with these house-shaped frames.
Building Bricks
I liked the idea of my houses being made of brick, so I went online in search of something I could print out on my computer. I found Jennifer’s Free Dollhouse Wallpaper.
This is where I got two of the brick patterns I used. I’m afraid I didn’t take note of where the third one came from but, of course, they don’t all have to be different.
After you print and trim the brick background, turn it over and trace the shape of the frame onto it. It will need to be trimmed further to fit inside the frame.
Score the Edges
I placed the cut out shape into the frame and carefully scored the edges around the inside edges with my fingernail. Take the paper out of the frame and cut off the excess paper a little at a time until it fits perfectly inside the frame.
I was a bit too eager and ended up having to do some patching near the top.
Glue it Down
This is decidedly not the way to glue your paper. Always add the glue to the back of the paper to be inserted, being sure to add glue around all the outside edges so they will lay flat.
House front ready.
Making Doors
Looking at my polyresin model, I liked the rounded shape of the door. I cut two of my doors from either end of a jumbo craft stick. Each of the three doors is approximately 2 1/4- inches long.
After cutting pieces from the craft sticks, lightly sand the cut edges.
I love colour, so I decided to paint my first door red. Full coverage takes two coats of acrylic craft paint.
I used a tiny bead from my stash as a doorknob.
With the first door finished, I used tacky glue to attach it to my first house.
Making Windows
Following the style of the door, I again used the rounded ends of craft sticks to create windows.
I decided that my tallest building would become an apartment building and cut four square windows out of the middle section of jumbo popsicle sticks. I painted all the windows yellow. Each window is approximately 1 1/4-inches long.
I can’t even draw a straight line freehand :(, so I used a small popsicle stick to finish the window details, using a black Sharpie.
I placed the first two windows either side of the door.
Add Details
You can finish off your house anyway you wish. I made a doorstep from a piece of small popsicle stick the width of the door and painted it brown.
You can fashioned a small wreath from a wired evergreen stem. Cut off a small piece, fashion it into a circle and trim off all the excess “needles.” I added some small berries from a holiday stem in my stash. Use hot glue to attach the berries.
The mini evergreen trees are from my Christmas stash, as are the polyresin figures. I hot glued the trees where I wanted them. At first, I thought I’d use small two-sided tape squares to attach the figurines, so I could easily remove them later, but ended up gluing them down too.
More Doors
For variety, I painted the next two doors brown and green. (I got sloppy and had to touch up the brown paint.)
I thought my apartment building door should have a more traditional shape, so I made it rectangular and painted it green, just because I like green.
The handle on the brown door is from the tip of a small craft stick that had splintered when I cut it; a happy accident. It’s painted with brown metallic paint.
My second house got a cork doormat, cut from a cork tile. I added some sticker letters to it and I placed two mini trees either side of it.
Here’s my second house, finished. The wreath here is a wooden sticker from my craft stash.
Apartment Dwelling
I think this last building is my favourite. Because it’s tall, I made it into an apartment building. The two topiaries are polyresin pieces for a Christmas village that I acquired recently. The door handle here is similar to the one on the second house, only a little longer.
I added a piece from a medium-sized craft stick to represent apartment numbers and their corresponding call buttons. I painted it black, trimmed it around the outside with metallic paint and used a pencil to draw (I use the word loosely) the apartment numbers and buttons.
The two swags were made in a similar fashion to the wreath on the first house.
Finished Christmas Village
You can display these pieces separately, of course, but I opted to hot glue them together, from tallest to smallest.
To make my houses a little more Christmas-y, I applied some Mod Podge to the roofs and around the bottom and sprinkled some fake snow.
This idea is completely customizable. You can add whatever accents and door colours that make you happy.
Find lots more Christmas inspiration by following the link below.
***
If you enjoyed this project, sign up for the Dollar Store Style Newsletter. Every month, you’ll get a new article, a Quick Tip, my pick for a Find of the Week and much more.
Enjoyed the project?
Suggested materials:
- 3 house-shaped frames (Dollar Tree)
- Craft paint, regular and metallic (dollar store)
- Brick dollhouse wallpaper (online)
- Small, medium and large craft sticks (dollar store)
- Miniature bottlebrush trees (Dollar Tree)









Frequently asked questions
Have a question about this project?