10 DIY Pizza Pan Crafts That Are Cute & Easy to Make

Let's dive into the world of pizza pan crafts! This collection showcases 10 creative ways to transform a humble pizza pan into something beautiful and functional. From rustic tiered trays to festive wreaths and even abstract wall art, there's a project here to inspire crafters of all skill levels.
Looking for a touch of boho style? Create a nautical rope tray using Dollar Tree finds. Prefer a farmhouse look? Craft a 3-tiered tray perfect for displaying seasonal decor.
There's even a bonus section featuring some DIY pie pan crafts too. So grab your spray paint, hot glue gun, and a little imagination – it's time to get crafting!
Pizza pan crafts
Disclaimer: Hometalk may receive a small affiliate commission from purchases made via Amazon links in this article but at no cost to you.
14-Inch Wide-Rim Pizza Pan
1. Boho tray
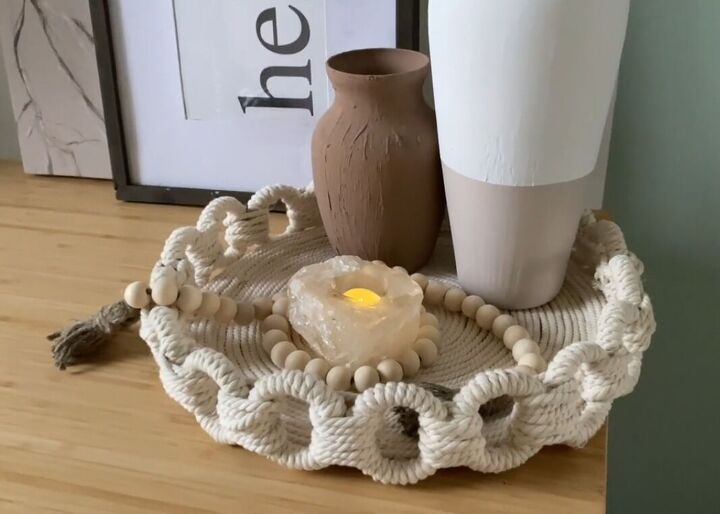
To start, this tutorial by Rachel | Faith Hope Home creates a nautical rope tray using Dollar Tree items, including a pizza pan. The finished piece is perfect for a boho-style home.
Tools and materials:
- Pizza pan
- Nautical rope (5 packs)
- Shower curtain rings (1.5 packs)
- Twine
- Hot glue gun
Steps:
- Use hot glue to adhere the rope to the inside edge of the pizza pan, working your way around the center. Cut off excess rope.
- Wrap the rope around the outer rim of the pan in multiple layers to cover completely.
- Wrap each shower curtain ring with twine and secure the ends with a double knot.
- Tie the wrapped rings together to create a large loop.
- Glue the loop of wrapped rings to the outer rim of the pizza pan.
2. Pizza pan rope tray
This tutorial by Meredith of Arts & Classy also shows you how to make a rope tray with handles using a pizza pan, rope, shower curtain rings, and hot glue, but with a slightly different result.
Tools and materials:
- Pizza pan
- Rope
- Shower curtain rings
- Hot glue gun
- Twine (optional)
Steps:
- Use hot glue to adhere the rope to the edge of the pizza pan, working your way around the pan until you reach the center. Cut off excess rope and secure the center with hot glue.
- Repeat step 1 to cover the edges of the pan from the bottom up, hiding the pizza pan completely.
- Wrap each shower curtain ring with rope and secure the ends with hot glue.
- Tie two wrapped rings together with twine (optional) and secure the connection with rope. Repeat to connect all the rings in pairs.
- Loop the connected ring pairs together with rope.
- Slide the connected rings onto the pizza pan and hot glue them to secure.
3. Pizza pan tiered tray
This tutorial by Gleespen Designs creates a 3-tiered tray using Dollar Tree items and thrift store finds. You can swap out the decor seasonally or keep the decor evergeen.
Dollar Tree:
- Pizza pan (12-inch)
- Oven burner cover
- Round cake pan (8-inch)
- Wedge makeup sponges
- Jute twine
- Shower curtain ring
- Wood bead (large)
- Black paint
- Folkart Metallic Acrylic paint (Gunmetal Gray, Sterling Silver)
- Apple Barrel Acrylic paint (Pewter Grey)
- White paint
Other:
- Candle holders (3, can be thrifted)
- Strong hot glue or E6000 glue
Steps:
- Paint all the pieces (pizza pan, oven burner cover, cake pan, candle holders, wood bead) following this order: black, pewter grey, gunmetal grey, sterling silver (white for candle holders and wood bead).
- Wrap the shower curtain ring with jute twine and push the ends through the wood bead.
- Assemble the tiers by gluing the candle holders between the pans (largest on bottom, smallest on top).
- Attach the handle (shower curtain ring with bead) to the top candle holder.
4. Pizza pan 3-tiered tray
Similarly, this tutorial by Thrifty Artsy Girl creates tiered trays from Dollar Tree items. The rustic farmhouse look is perfect for the holidays.
Tools and materials:
- Pizza pan
- Pie pan
- Cake pan
- 2 candleholders
- White paint
- E6000 glue
- Black Sharpie or black paint
- Clear gloss spray paint
Steps:
- Paint everything white.
- Draw black lines on the candleholders to create a chipped enamelware look.
- Spray paint the candleholders with clear gloss for shine.
- Glue the candleholders to the pans using E6000 glue (let dry for 24-72 hours).
- Decorate the trays as desired.
5. Pizza pan charger & tray
Next, this tutorial by Nicole Juarez DIY shows how to make a tray or plate charger from a pizza pan with just spray paint.
Here's what you'll need:
- Pizza pan
- Spray paint in your desired color
Simply apply 3 coats of spray paint to the pizza pan, letting each coat dry completely before applying the next.
6. Pizza pan flag
This tutorial by Shelly L Nemeth creates an American flag wreath/sign using a Dollar Tree pizza pan. This patriotic DIY project is perfect for the 4th of July, Memorial Day, Veterans Day, or simply to display in your home year-round.
Tools and materials:
- Scrapbook paper (red & white stripes with stars)
- Dollar Tree pizza pan
- Twine
- Ribbons (various colors and widths)
- Beads
- Mod Podge
- Drill
Steps:
- Use the pizza pan label as a template to cut out stars and stripes from scrapbook paper.
- Overlap the red and white striped paper onto the pizza pan and Mod Podge it down.
- Cut ribbons and layer them with the larger ones on the bottom. Tie them together in the middle with twine to create a bow.
- String beads onto twine and tie the ends to two holes drilled at the top of the pan for hanging.
7. Pizza pan tray with legs
This tutorial by The House house turns a Dollar Tree pizza pan into a serving tray. She uses clothes hangers to create legs for the tray.
Tools and materials:
- Pizza pan
- Spray paint
- Stencil
- Dollar Tree rope
- Clothes hangers
Steps:
- Spray paint the pizza pan white.
- Stencil a design onto the pan.
- Glue rope around the edge of the pan.
- Cut clothes hangers into 3-inch pieces and glue them to the bottom of the pan to create legs.
8. Pizza pan wall art
This tutorial by Tresha Armstrong creates abstract wall art from pizza pans, plaster of Paris, and embroidery hoops. You'd never guess that this wall decor was a DIY project!
Tools and materials:
- 3 large pizza pans
- Plaster of Paris
- Mixing cup, mixing stick, gloves
- Spoon
- Ruler
- E6000 industrial glue
- Gorilla hot glue gun
- Spray paint (black)
- Metallic acrylic paint (multiple colors)
- Sponge brush
- Small circular mirror
- 2 mending plates
- 2 large embroidery hoops
- 2 medium embroidery hoops
Steps:
- Cover pizza pans with plaster of Paris and make textures on the surface.
- Let the plaster dry for an hour.
- Spray paint the pans black.
- Sponge metallic paint onto the pans.
- Glue the pans together back-to-back using mending plates and E6000 glue. Let dry for 24 hours.
- Attach the mirror and embroidery hoops to the pans using E6000 glue and hot glue.
- Paint the embroidery hoops to match the pans.
- Hang the art on the wall using command strips.
9. Pizza pan pilgrim hat
This tutorial by Shelly L Nemeth turns a plastic planter and a pizza pan into a pilgrim hat centerpiece for Thanksgiving. It's such a cute addition to your Thanksgiving table decor.
Tools and materials:
- Plastic planter
- Pizza pan
- Spray paint (textured)
- Ribbon
- Fall foliage stems
- Hot glue gun
- E6000 glue
Steps:
- Spray paint the planter and pizza pan.
- Hot glue and E6000 glue the planter to the pizza pan.
- Wrap the ribbon around the rim of the hat and hot glue it in place.
- Create a buckle from ribbon and hot glue it to the hat.
- Glue fall foliage stems inside the planter.
10. Pizza pan sunflower wreath
This tutorial by Single Girl's DIY creates a sunflower wreath using a pizza pan and Dollar Tree items. There are a number of ways you can create a pizza pan wreath, but this bright one is our favorite for summer.
Tools and materials:
- 2 packs of clothespins (72 total)
- Dollar Tree pizza pan
- Yellow spray paint
- Black spray paint
- Wirecutters (optional)
- Boxwood bunch
- Sunflower bunch
- Ribbon
- Hot glue gun
Steps:
- Spray paint the clothespins yellow and the pizza pan black.
- Clip clothespins around the outer edge of the pizza pan, leaving space for flowers.
- Tie a ribbon loop for hanging and hot glue it to the back of the pan.
- Cut greenery and sunflower stems.
- Hot glue greenery to the open area of the pan, then add sunflowers.
Bonus: pie pan crafts
You can also use pie pans to make crafts. With a little paint and creativity, you can transform them into unique home decor, too. Here are a couple of ideas:
Pie pan spring decor
This tutorial by Amber Strong turns a Dollar Tree pie pan into spring decor using Dollar Tree tumbling tower blocks, scrapbook paper, and other craft supplies.
It involves painting the blocks and pie pan, decoupaging the pan with scrapbook paper, assembling a stand from the blocks, and decorating the pan with burlap ribbon, a picket fence, wooden letters, greenery, and rope.
Pie pan tiered tray
This tutorial by Decorate and More with Tip creates a double-tier tray using a Dollar Tree cake pan, pie pan, rolling pin, and other supplies.
The rolling pin is cut and drilled to connect the two tiers. The pans are glued to the rolling pin and painted. Furniture brads and wooden beads are added for detail.
More pizza pan crafts
With a little creativity and these inspiring ideas, you can craft stunning home decor pieces, festive centerpieces, and even unique wall art.
Here are just a few more ideas:
So next time you reach for a slice, remember the endless possibilities that await the humble pizza pan in the world of DIY crafts!






Frequently asked questions
Have a question about this project?