


Building a Window Seat in a Morning and 8 Lessons Learnt
2 Materials
$20
5 Hours
Medium
December was a pretty stressful time for our little family. My son left South Africa to go study in Canada  and my daughter and her dad, aka the ex-hubby, went with to make sure he settled in okay. On top of that the ex-hubby also bought a new house, which meant that my little girl not only had to say goodbye to her big brother, but the new house didn’t feel like home yet.
and my daughter and her dad, aka the ex-hubby, went with to make sure he settled in okay. On top of that the ex-hubby also bought a new house, which meant that my little girl not only had to say goodbye to her big brother, but the new house didn’t feel like home yet. So ex-hubby and I had a little chat and he asked if I would mind making Talea a window seat for her bedroom while they were away. Who doesn’t love a window seat? There was only one problem. I would only have 4 hours to make and install it. On the day they got back from their trip.  Here's how I did it and the 8 lesson I learnt along the way.
Here's how I did it and the 8 lesson I learnt along the way. 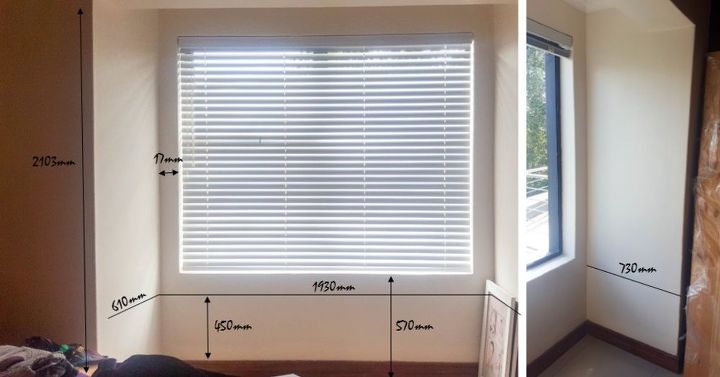
Measure everything at least twice. Measure the height, length and depth of the space. Then measure again and just in case, measure one more time for luck. Write the measurements in a book not a piece paper. I wrote the measurements down on a piece of scrap paper which mysteriously disappeared in my handbag.
Take loads of pictures so you have something to refer back too. Our minds play tricks on us and it’s amazing how quickly you forget the little things.
Do your research and learn from the experts. I watched tons of youtube videos and read everything I could find about building window seats.
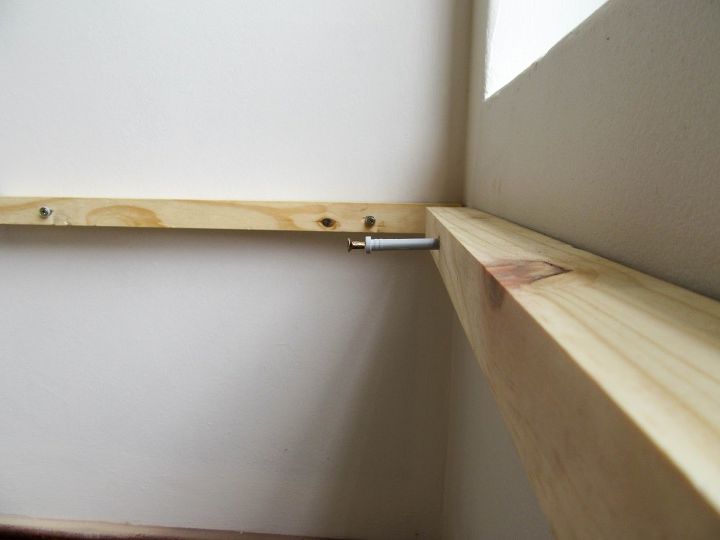
Use the longest, meanest screws you can find to attach the frame to the wall. My baby girl is almost 17 and she still loves dive bombing her bed 
Take everything with you. Everything, even if you don’t think you’ll need it, take it with. Okay you can leave the kitchen sink at home, but take everything else. Make a list of what you need and tick everything off as you load it.
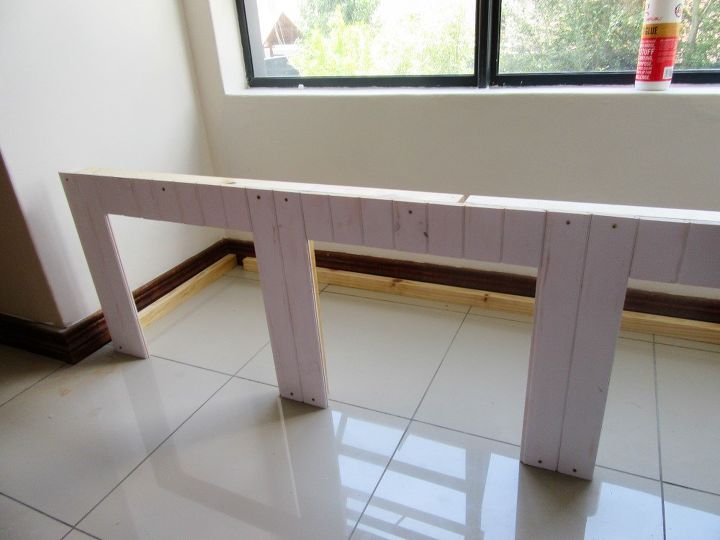
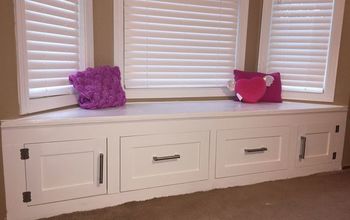
Keep it Simple. I went for a basic frame built out of 2 x 4 which I screwed into the back and side walls. More 2 x 4 were used to create the front of the window seat which was covered with shiplap . The front frame was made ahead of time so all I needed to do was screw it onto the “wall” mounted frame bits using brackets.
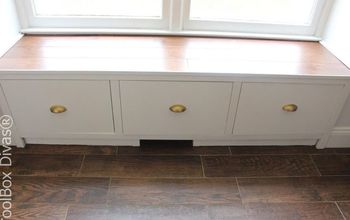
Most standard mattresses won't fit the size of the window seat but a bread knife and a ruler are all you need to make a custom sized mattress. Just use the ruler as a guide and cut the foam. You can buy foam at most haberdasheries but they charge extra if you want a specific size. A lot extra!!
We ended up buying three standard size bits of foam and cutting them to fit the space.

The window seat doubles up as a single bed, so Talea can invite friends for a sleep over. There’s even extra storage underneath the window seat.
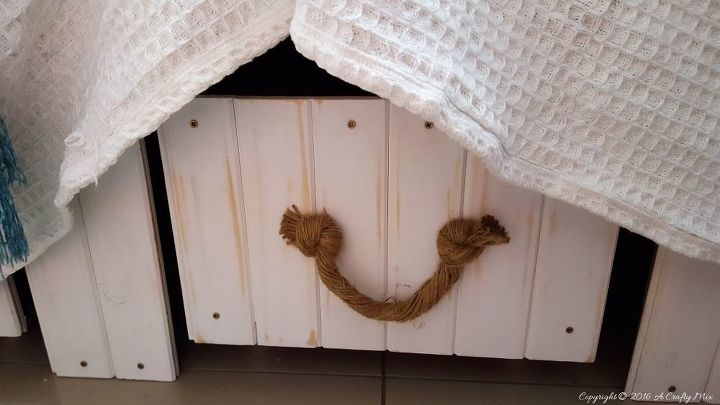
Would you believe that the storage is made from these el cheapo collapsible crates? We just added a mock front using shiplap (tongue and groove) that we cut to size, painted and screwed onto the front. Then we attached rope handles to fit with the nautical theme in Talea’s bedroom.

And finally, believe in yourself because love really does conquer all and there’s nothing that a hammer and a saw can’t fix. Oh and a few pretty pillows and a cuddly toy or two.
And I'm really happy to report, my daughter is super happy with her window seat. It makes me smile every time I see one of her selfies on Facebook and she's sitting on her window seat 


Any price and availability information displayed on [relevant Amazon Site(s), as applicable] at the time of purchase will apply to the purchase of this product.
Hometalk may collect a small share of sales from the links on this page.More info

Want more details about this and other DIY projects? Check out my blog post!
Comments
Join the conversation
3 of 67 comments
-
Its really pretty good work
-
Beautiful, love the colors used.


Frequently asked questions
Have a question about this project?
Beautiful job ! I need one that has a top that flips up for storage of seldom used big kitchen appliances and can be used as a bench seat for a kitchen table when closed, any ideas for that ?