


21 DIY Candyland Christmas Decorations For a Sweet Holiday

Embrace your sweet tooth with these DIY Candyland Christmas decorations. From gingerbread houses to lollipop ornaments, this roundup offers a range of creative projects to infuse your holiday season with sweet magic.
These ideas cater to various skill levels and budgets. Elevate your holiday decor with imaginative and budget-friendly candy-themed Christmas decorations!
For even more ideas, see Hometalk's ultimate guide to DIY Christmas decor here.
DIY candyland Christmas decorations
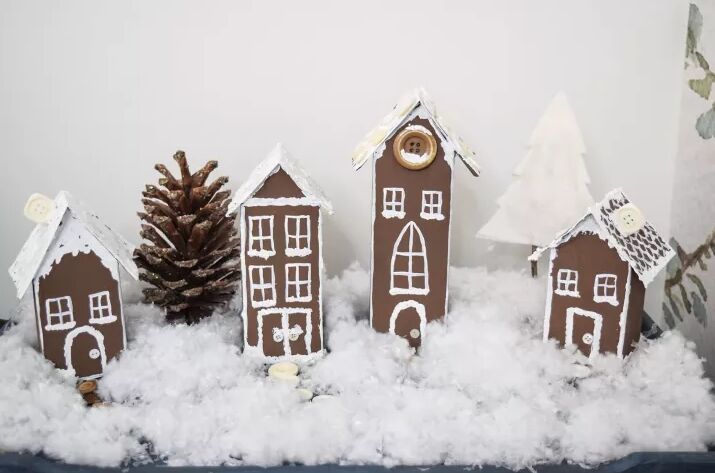
1. Gingerbread houses
Transform ordinary milk cartons into gingerbread houses with this simple guide by Recreated Designs.
Start with clean, paper milk cartons of any size. Apply brown chalk paint to cover the exterior, excluding the bottom and inside. Trim the tops to craft a pointed roof, then fashion a roof using a folded business envelope. After painting it brown, attach it to the carton's peak.
Outline windows and doors with white water-based paint, and embellish with "icing" along the seams. Achieve a snowy finish by blending white paint with Fusion Fresco powder. Let your creativity shine with personal touches like vintage buttons for doorknobs and a sprinkle of glitter.

2. Gingerbread ornaments
Elevate your candy-themed holiday decor with these gingerbread man cookie ornaments from Kiki DiY's. Whether adorning your tree, kitchen, tiered tray, or shelf, they're sure to impress your guests.
Begin by spray-painting plastic toy plates with a festive red hue and allow them to dry thoroughly. Then, use white puffy paint to craft swirls, dots, or rickrack patterns along the plate's border.
Attach adorable gingerbread man cookies to the center of each plate, and secure toy plastic forks and knives along the sides with hot glue for an extra culinary flair.
If using them as ornaments, add baker's twine with a loop and secure it with two knots at the bottom, then glue the knotted part to the plate's back.

3. Gingerbread homestead display
Crafting in Mimi's World guides us through crafting a DIY gingerbread homestead display with a warm farmhouse ambiance.
Start by assembling three Dollar Tree wooden crates, modifying them to form an elongated wooden planter. Paint three Dollar Tree wooden arrows in a rich brown hue like Apple Barrel in Nutmeg Brown. Create a frosting effect around the planter using caulk.
Transform the wooden arrows into houses by affixing craft sticks to the tops for roofs, then frost with caulk and add glitter for intricate detailing. Fill the planter with smaller wooden pieces, ensuring to paint, frost, and add glitter.
Next, craft peppermint-themed decorations by filling a decorative silicone mold with hot glue, allowing it to set, and then painting it in red and white. Decorate the houses with hot glue embellishments, plastic peppermints, candy canes, and ribbons, securing them into floral foam within the planter.
You can craft faux lollipops using wooden dowels, peppermint-striped ribbon, plastic peppermints, and gingham ribbon, painting the floral foam white. Complete the display with additional florals, plastic candy, ribbon, and a pinwheel.
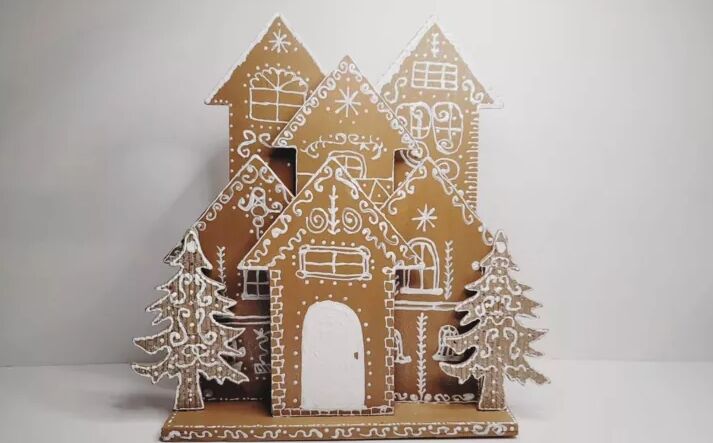
4. Gingerbread village
This time, Crafting in Mimi's World presents an easy guide to crafting a gingerbread village using Dollar Tree materials.
Begin by crafting six wooden arrows, modifying one for a medium-sized house. Apply Waverly Chalk Paint in Hazelnut, then sketch delightful frosting designs like swirls and dots using a paint marker. Add texture with Tulip Slick or Puffy fabric paint. For a touch of sparkle, add a thin coat of Tulip Glitter Fabric Paint.
Create a matching base by painting a wooden plank. Give cardboard Christmas tree ornaments a makeover by removing embellishments, fixing any tears, and redesigning them with paint.
Assemble the village on the base using wood glue and hot glue, securing them with Tumbling Tower Blocks. Complete the scene by attaching trees on either side with hot glue.
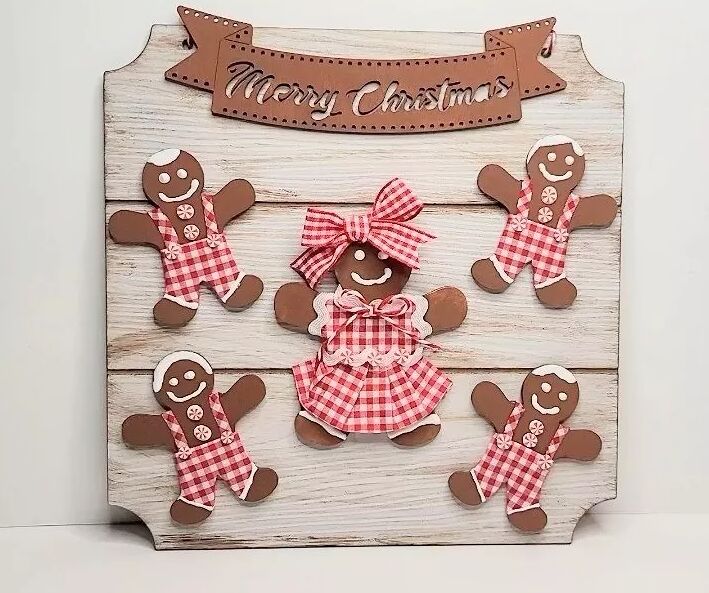
5. Gingerbread family plaque
Crafting in Mimi's World also offers a heartwarming family project with a festive wooden plaque.
Start by painting the gingerbread shapes, each representing a family member, and the "Merry Christmas" banner in Nutmeg Brown. Fashion adorable outfits for the gingerbread men and women using red and white gingham fabric.
For the girls, create dresses with pleats and embellish with ricrac and mini peppermints. Design pants with suspenders for the boys, adding details with slick paint and mini peppermints.
Use white slick or puffy fabric paint for simple facial features. To give the plaque sign an antique touch, apply wax. Finally, assemble all the elements.
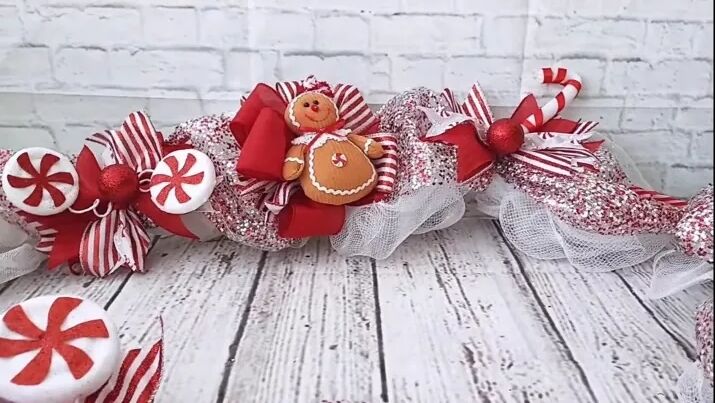
6. Gingerbread garland
Consider crafting this DIY gingerbread garland by Kiki DiY's. Gather supplies, including different rolls of ribbon, and prepare the garland with white and sparkly mesh.
Craft loops and ribbon bows, then add peppermint picks. Create a central bow and attach a gingerbread lady. Assemble the garland with candy canes, bows, and the funky bow at the center.
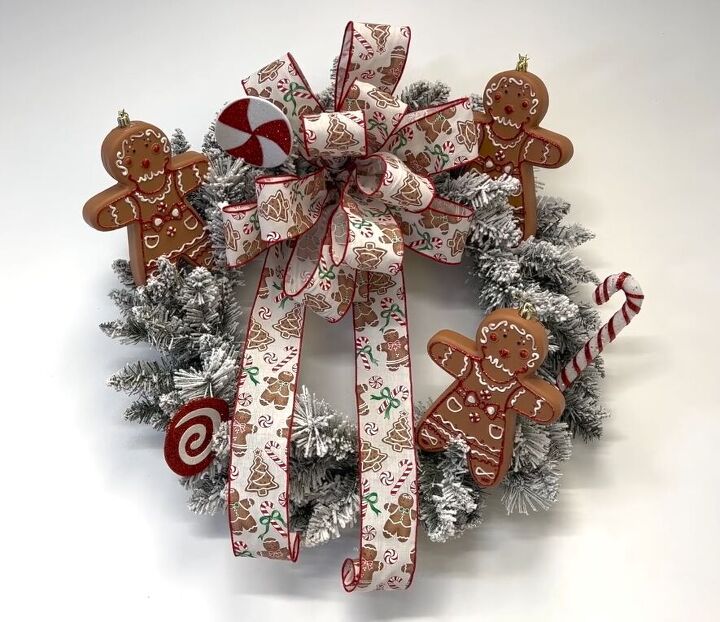
7. Gingerbread wreath
Craft a festive DIY gingerbread wreath following these steps by Nick Kreticos, all without using hot glue or tape.
Begin by fluffing out the flocked wreath for a perfect circular shape. Create an impressive gingerbread-themed ribbon bow and secure it to the wreath using a pipe cleaner.
Incorporate gingerbread men ornaments, matching the ribbon's theme, and attach them securely. Finish off the wreath with peppermint sprays.
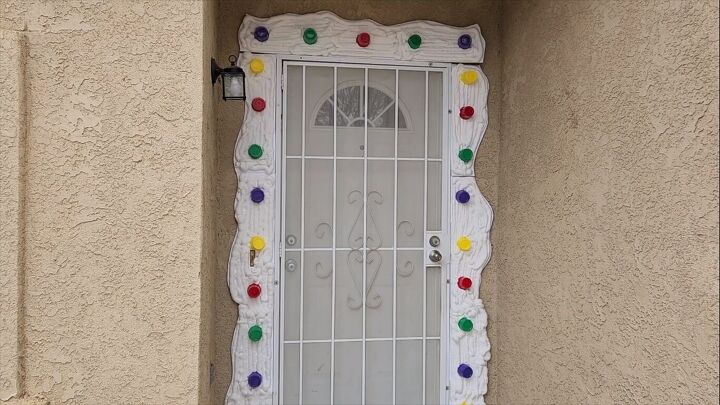
8. Gingerbread house door decoration
Mitch Couch demonstrates how to create a budget-friendly DIY gingerbread house door decoration for an impressive holiday entrance.
Begin by slicing colored cups in half to mimic gumdrops. Cut a foam board in half at the 10-inch mark and create a swirly pattern along one edge to resemble icing. Securely tape the foam board pieces together to form a frame.
Apply bright white expanding foam around the frame, avoiding the edges, to create an icing effect. Attach the colored cup halves to the foam using expanding foam. Finally, use clear adhesive with silicone to affix the frame to the wall.
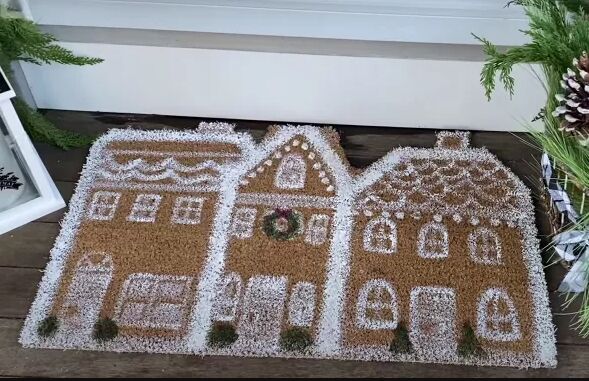
9. Gingerbread doormat
In this project by Jennifer Howard from Cottage On Bunker Hill, learn how to craft a festive DIY gingerbread doormat inspired by a design from Anthropologie.
Using a plain doormat as a base, Jennifer skillfully outlines gingerbread houses, adding intricate details and painting them with white acrylic paint. She further enhances the mat with additional decorations like a wreath and bushes. The final result is a welcome mat that resembles a giant gingerbread cookie.
10. More DIY gingerbread decorations
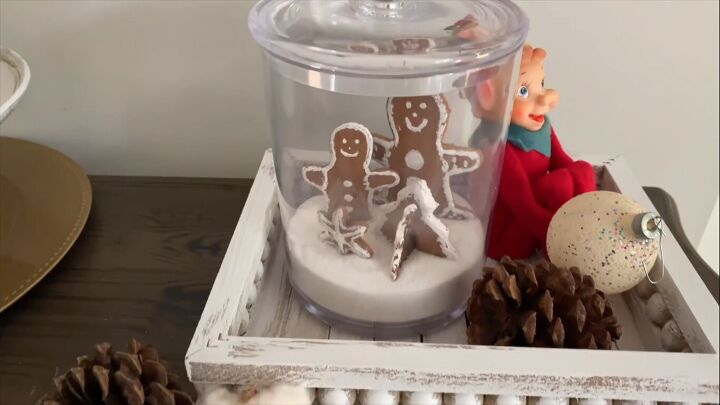
Add a sprinkle of gingerbread sweetness to your holiday décor with these DIY gingerbread decorations from Meredith at Arts & Classy.
Start by whipping up a batch of salt dough, customizing it with rich chocolate brown food coloring. Roll it out and cut out delightful shapes like snowflakes and gingerbread houses. After baking, use acrylic paint to add frosting-like details, creating a charming three-dimensional effect.
For a garland, simply hot glue the gingerbread shapes onto a ribbon, forming an adorable garland. To craft a jar display, fill a clear container with white sand, providing a snowy backdrop for gingerbread figures.
Finally, for a gingerbread box, adorn a cardboard box with gingerbread houses, men, and snowflakes. Finish by covering it with quilting batting to evoke a winter wonderland.
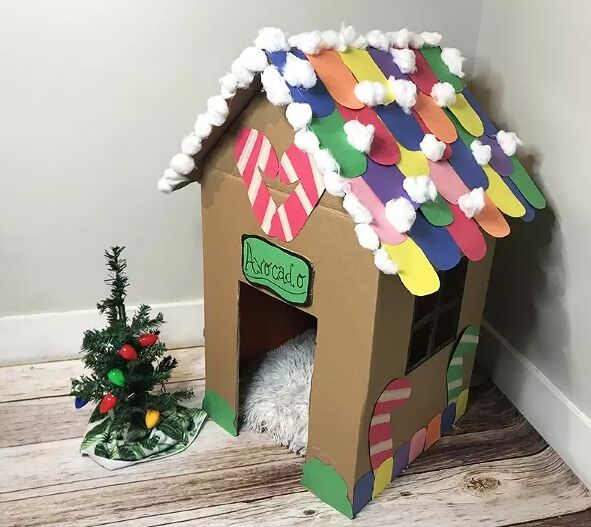
11. Gingerbread cat house
This project by Abbie M involves creating a gingerbread-style cat house from a cardboard box.
Cut and assemble the box, design the roof with colorful construction paper, and add details like windows, a door, and candy decorations using cardboard and construction paper. It's an affordable, pet-friendly DIY to include your furry friends in the holiday festivities!
12. Giant lollipops (version 1)
Kelly-n-Tony embraced the spirit of a Candyland Christmas theme by crafting six impressive oversized lollipops. Surprisingly affordable, each lollipop cost around $5 in materials.
The process involved cutting plywood into discs, painting them white, and adding a delightful lollipop swirl using either a vinyl sticker or hand-painting. The mop handle cleverly served as the lollipop stick, secured with pipe clamps.
After wrapping it in a shrink-tight gift bag and fastening it with a zip tie, the wrap was tightened using a blow dryer. These cute lollipops could be proudly displayed outdoors by inserting the stick into a rebar anchored firmly in the ground.
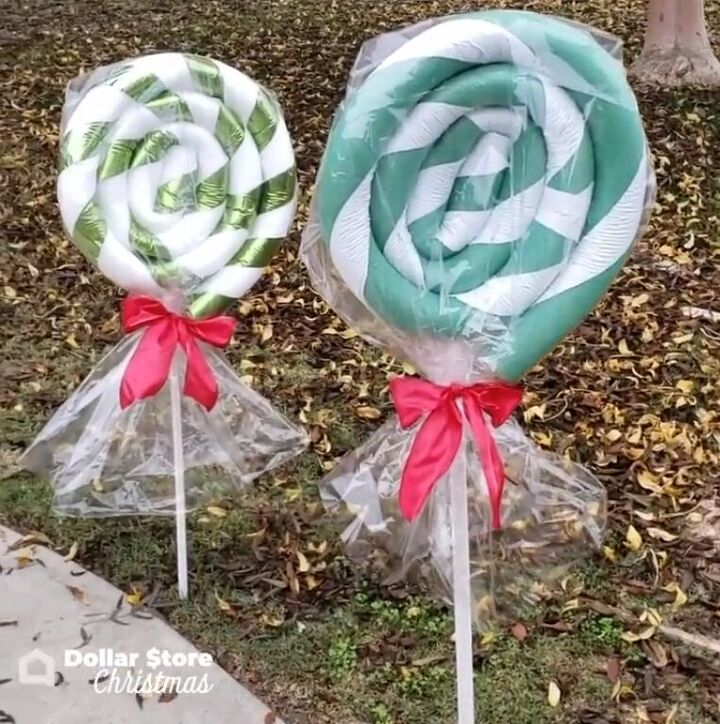
13. Giant lollipops (version 2)
Mitch Couch offers his approach to crafting giant outdoor Christmas lollipops in this budget-friendly DIY tutorial. Utilizing pool noodles, white duct tape, and basic tools, the process is both enjoyable and cost-effective.
First, you'll glue two pool noodles together and secure them with duct tape. Then, coil and fasten the noodles with rubber bands. Create a hole for the stick and attach it using hot glue. Finish by wrapping the lollipop in cellophane.
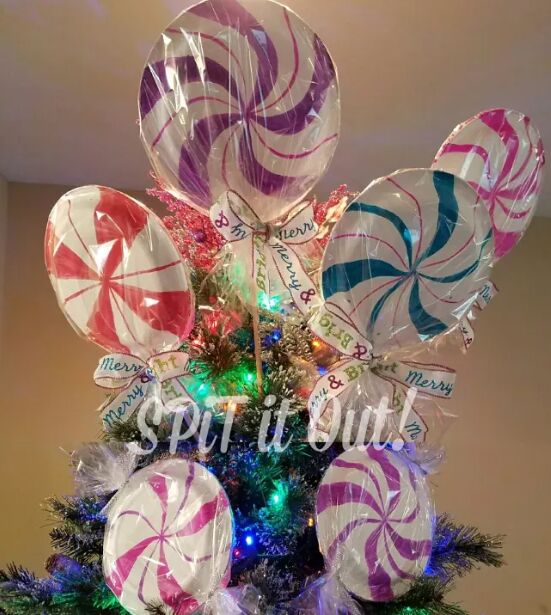
14. Giant lollipops (version 3)
Michelle Lewandowski Kline's creative DIY project offers an affordable way to craft lollipop decorations using paper plates.
By applying Unicorn SPiT Vibrantly Colored Stain and Glaze, these plates magically transform into peppermint-styled lollipops. The process entails painting triangles and lines to achieve the coveted candy stripe effect.
Following this, dowel rods are inserted for support, and the plates are wrapped in cellophane and tied with ribbon. The end result is versatile, and suitable for Christmas trees, stairways, or even outdoor spaces in mild weather.

15. Candy cane vase centerpiece
Learn how to elevate your holiday table with this simple candy cane vase centerpiece demonstrated by Mary @ Home is Where the Boat Is.
Begin by nesting a smaller vase within a larger one, then fill the space between with elements like candy canes and peppermint candies. Arrange your preferred flowers in the inner vase, and for an additional flourish, affix pine cones.
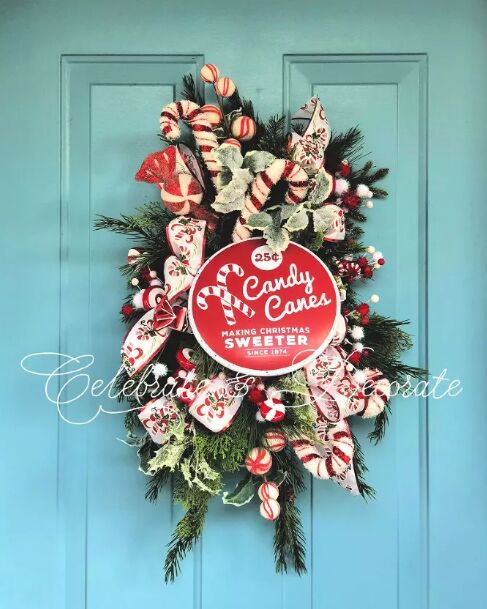
16. Candy cane swag
Create an adorable candy cane swag for your candy-themed Christmas effortlessly with this DIY guide by Chloe Crabtree. Begin with a styrofoam base, forming a hanging loop with wire and suspending it from a Command brand hook.
Layer the swag with artificial evergreens, paying special attention to the edges. Secure a festive sign firmly and embellish with candy canes and peppermint ball picks. Finish off with ribbon loops and tails.

17. Peppermint sticks
Learn how to craft festive DIY peppermint sticks for your Christmas decor with Corine Mapes from Junk to Gems.
Utilize chenille cleaning cloths, tearing them into strips for a rustic texture. Secure these strips around six-inch wooden dowels with hot glue, and let them tea-dye overnight for an antiqued effect.
Add red and white homespun fabric strips as stripes, and give it a sparkling finish with glitter applied using spray adhesive. Complete the look by tying three pieces together with muslin and attaching a "peppermint sticks" tag.
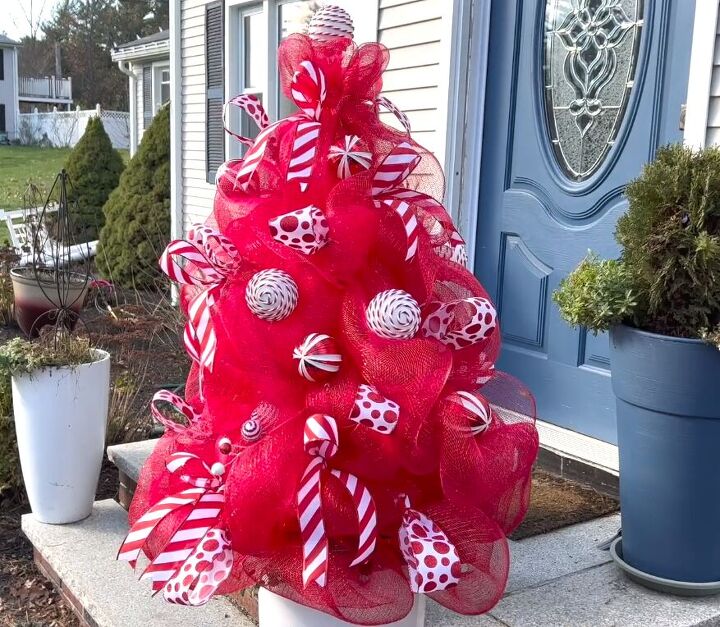
18. Peppermint Christmas tree
Nick Kreticos demonstrates a clever way to transform a tomato cage into a festive Christmas tree. Begin by securing the top with a zip tie to form a conical shape. Then, attach scrunched deco mesh using pipe cleaners, repeating the process for each layer.
Add charming bows with peppermint ribbon, securing them with pipe cleaners. Apply ornaments by dipping them in hot glue and placing them strategically. For easy insertion, use ornaments on sticks.
Complete the look with decorative sprays, peppermint candies, and single-loop ribbon pieces.
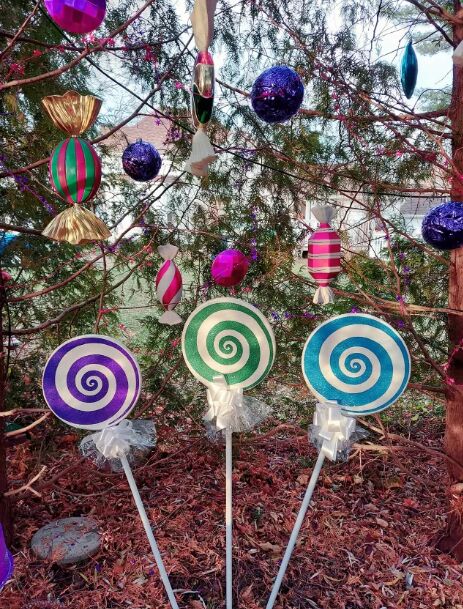
Other candyland-themed ornaments
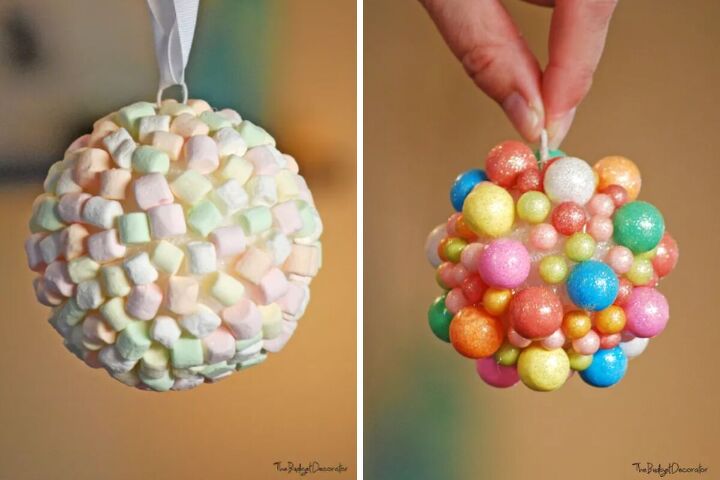
19. Candyland Christmas ornament ideas
Create a candy Christmas tree with these DIY Candyland Christmas ornament ideas by Remi @ TBD•TGG•OhMeOhMy.
Start by flocking the tree for a snowy effect. Craft various candy-themed ornaments like small candy lollipops using styrofoam balls and glue, rope lollipops from dollar store candy, and peppermint candy lollipops with paint.
You can also make gumball and marshmallow ornaments using a glue gun. This budget-friendly, family-friendly theme adds a sweet touch to your holiday decor.
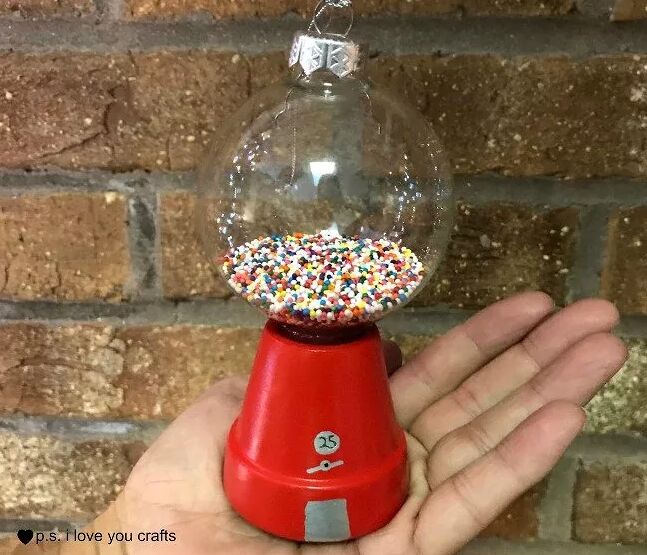
20. Gumball machine Christmas ornament
Pam - P.S. I Love You Crafts shares how to make a DIY gumball machine Christmas ornament with Dollar Store supplies.
This fun craft is perfect for kids with a bit of adult supervision. You'll need a clear Christmas ball, red paint, a small clay flower pot, sprinkles, Mod Podge, a silver paint pen, and a glue gun.
Paint the flower pot red, attach the ornament, and fill it with sprinkles. Draw details with the silver pen, add a faux coin, and hang it on your tree.
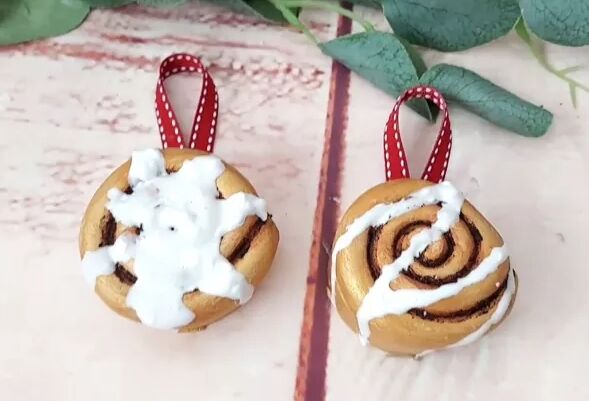
21. Cinnamon roll ornaments
This DIY project by Kiki DiY's involves making realistic-looking cinnamon roll ornaments using Plaster of Paris, foam clay, and paint.
After creating the base shapes and swirls, the process includes painting the rolls to resemble dough, adding cinnamon, and crafting a glaze. Don't they look good enough to eat?
DIY Candyland Christmas decorations
Whether you're crafting with family and friends or enjoying some solo creative time, these delicious Candyland-themed Christmas ideas are sure to spread holiday cheer.
Which of these sweet decorations caught your eye and made you hungry? Let us know in the comments below.


Frequently asked questions
Have a question about this project?