


37 DIY Mini Christmas Tree Craft Ideas for the Holidays

Have you ever thought of crafting a Christmas tree out of Qtips? How about a plunger? Coffee filters? Or even plastic spoons? Get ready to make your own little Christmas trees that can bring holiday cheer to your home.
These DIY projects are easy and fun. You can use them to decorate your table, shelf, or even make cute ornaments. We've gathered some great ideas that use simple and affordable materials.
Let's explore these DIY mini Christmas tree projects that will make your holidays special!
For even more ideas, see Hometalk's ultimate guide to DIY Christmas decor here.
DIY mini Christmas trees
Bottlebrush Christmas trees
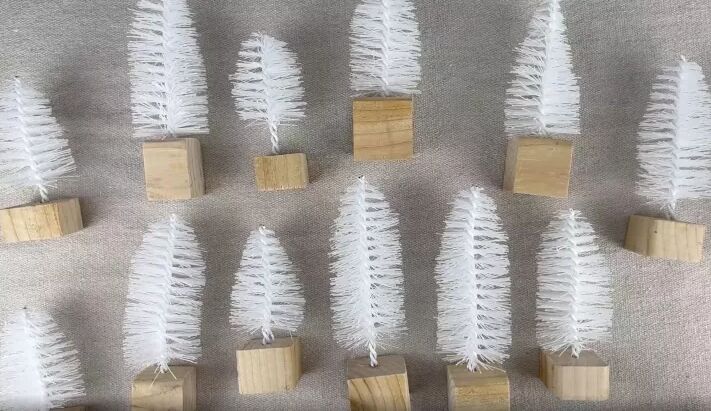
1. Dollar store bottlebrush Christmas trees
This DIY project by Audrey Kuether guides you in creating bottlebrush trees for holiday decor using Dollar Store toilet brush cleaners.
By removing the handles and shaping the bristles, you'll form the basic tree structure. Wooden blocks serve as bases, secured with hot glue, and then the trees are painted in various colors for a vibrant and festive look.
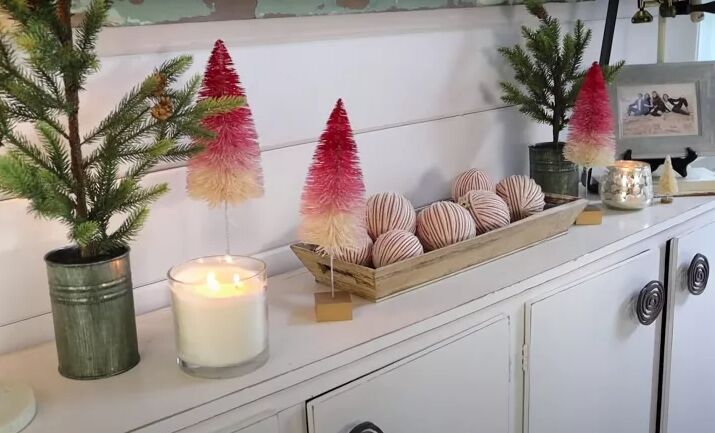
2. Ombre bottlebrush Christmas trees
This DIY project by Bella Branch DIY guides you in creating ombre Christmas trees using neutral bottle brush trees and red/pale pink craft paint.
Start by painting the top with the darkest shade, then blend lighter shades downwards, creating a beautiful ombre effect. End with a neutral color at the bottom for a subtle finish.
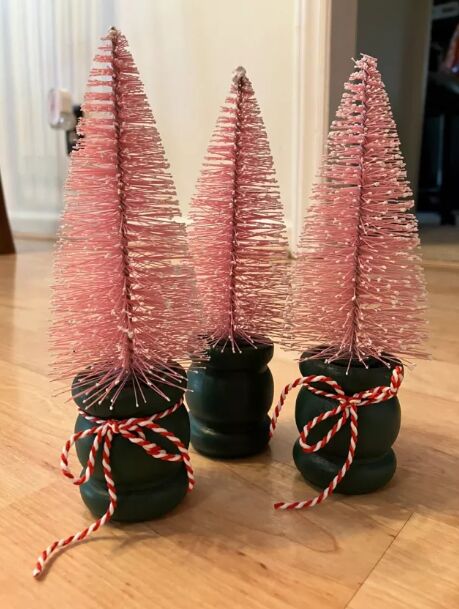
3. Bottlebrush trees in spindles
This DIY decor project from Carla Neubauer repurposes discarded cart legs into Christmas tree stumps for bottlebrush trees.
By salvaging solid wood spindle legs from a curbside find, Carla used a miter saw to cut them and created perfect bases for mini Christmas trees.

4. Burlap bag Christmas tree
Corine Mapes from Junk to Gems presents a project that entails crafting rustic burlap Christmas trees from a repurposed coffee bag. No sewing machine is needed, as hot glue can be used as an alternative.
The steps involve cutting out tree shapes, gluing them together, stuffing them, and affixing a trunk, then decorative elements such as fabric bows and jewelry accents are incorporated.
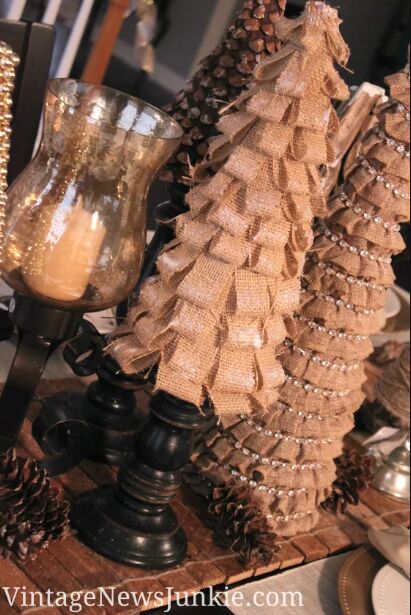
5. Burlap ribbon Christmas trees
Candace from Vintage News Junkie has a soft spot for burlap and embarked on a DIY Christmas tree project she affectionately calls "Loopy."
This tree, crafted using burlap, is straightforward to create; just loop the ribbon to form the Christmas tree shape. For a dash of sparkle, finish it off with a touch of glittery Mod Podge on top.
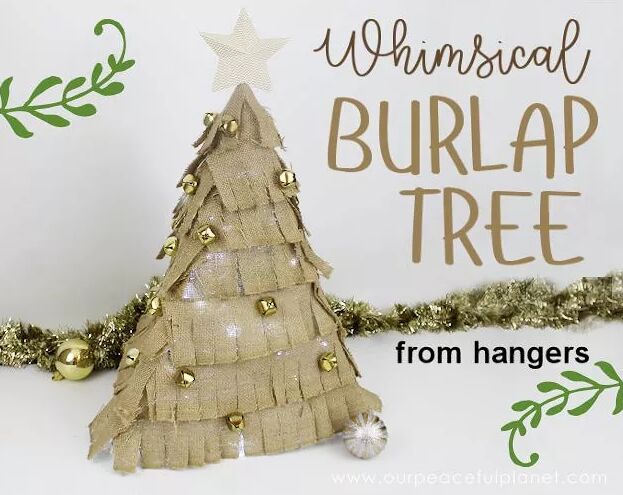
6. Burlap and hanger Christmas trees
Nancy from Craft Your Happiness presents a clever DIY Christmas tree crafted from six plastic hangers and burlap. Perfect for compact spaces or as an additional tree.
You'll require hangers, burlap, chenille stems, LED lights, jingle bells, and a 3D star template. The hangers are fastened together to create a frame, which is then elegantly draped with burlap. Finally, it's adorned with twinkling lights and bells, and crowned with a star topper.

7. Brown paper bag Christmas trees
In this project by Lisa@ Sweet Tea N' Salty Air, shabby chic Christmas trees are crafted using brown paper bags from the local grocery store. Gather 2-3 bags, along with hot glue, white paint, and decorations such as ribbon.
To create the trees, carefully cut the bags into tree-like shapes. Apply paint and, if desired, add a touch of glitter for decoration. Complete the look by adorning them with garland and place them on a tray with tealights.

8. Grocery bag Christmas trees
Dayna demonstrates a unique approach to crafting a rustic Christmas tree by utilizing recycled materials. Instead of purchasing a craft cone, opt for a cereal box and a paper bag to construct a tree standing at approximately 13 inches tall, ideal for a bookshelf or table display.
Gather basic supplies like scissors, a cereal box, paper bags, and a hot glue gun. Follow straightforward steps to shape cones, layer them, and wrap them with twisted paper strips for a textured, rustic aesthetic.
Plus, when the holiday season concludes, you can easily recycle the tree.
9. Wrapping paper Christmas trees
Sarah Vanderkooy's project offers a creative way to craft Christmas trees using wrapping paper. Gather cardboard tubes, wrapping paper, and basic supplies to get started. Begin by cutting the tubes into varying sizes to create the tree's layers.
Next, fashion cones from squares of wrapping paper and attach them onto the tubes. Complete the tree with a festive bow on top. These DIY trees can be personalized with different colors and bows.

10. Book page Christmas tree
Shawna Bailey's project takes an old dictionary and transforms it into a Christmas tree using a similar approach as above. Collect materials like book pages, a paper towel roll, hot glue, and a star topper.
Begin by rolling the pages into cones and securing them with glue. Then, attach them to the paper towel roll to form the tree shape. Create multiple levels of cones for a fuller look and finish it off with a star.
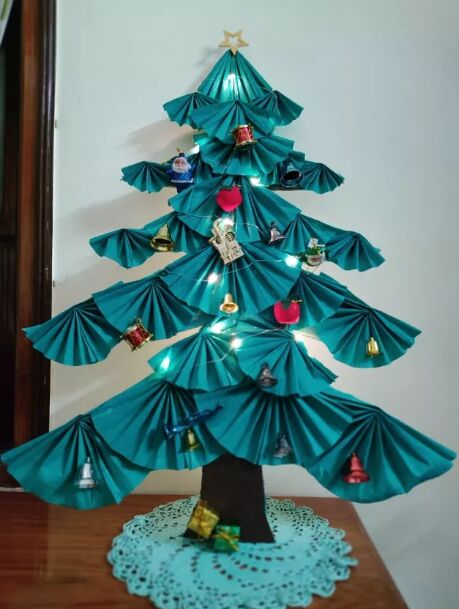
11. Paper fan Christmas tree
Deborah's budget-friendly DIY Christmas tree project centers around crafting pleated paper fans.
Begin by sketching and cutting out a Christmas tree shape from cardboard, covering it with green crepe paper while leaving the stem exposed. Create pleats with the paper and affix them to the tree.
Work your way up, attaching smaller pieces. Paint the stem brown and fashion a golden star for the pinnacle. Add fairy lights and small Christmas tree ornaments.
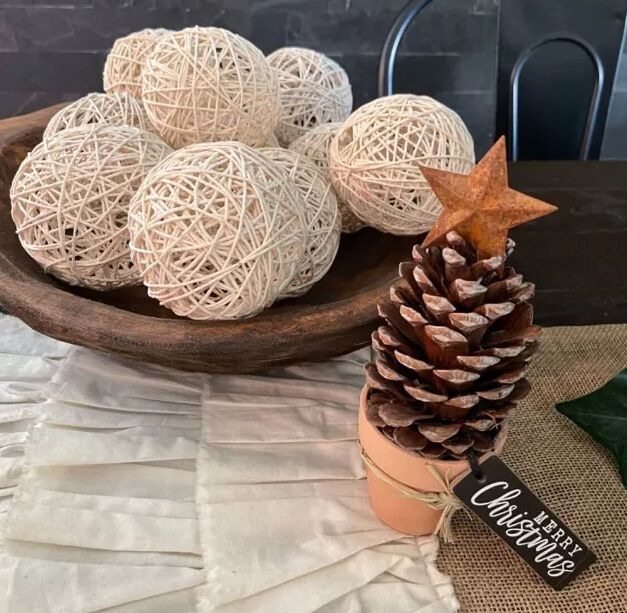
12. Mini pine cone Christmas tree
Shelly L. Nemeth presents an easy and cost-effective method to craft mini pine cone Christmas trees, ideal for sprucing up your living space. Gather pine cones, mini pots, a hot glue gun, and some simple decorations like stars and Christmas tags.
After baking the pinecones, affix them to the pot rims, crown with a star, and adorn with tags and twine. This enjoyable and straightforward project is great for kids too.

13. Silver pine cone Christmas trees
In the following tutorial, Tresha Armstrong demonstrates how to fashion a sophisticated Christmas tree using pine cones, elevating the elegance of your holiday decor.
Begin by oven-drying the pinecones, followed by spray-painting them along with a cone and candle holder. Delicately remove the pine cone scales and affix them onto the cone, arranging them in rows to construct the tree. By angling the scales at the apex, a pointed tip is achieved.

14. Ribbon loop Christmas trees
Elevate your holiday decor with 3D ribbon trees using Nikki Wills' project as inspiration. Armed with paper, a low-temperature hot glue gun, and your preferred ribbon, you're ready to go.
Slice the ribbon into concise segments, tailored to your tree's dimensions. Shape loops with the ribbon and affix them to paper cones. Play around with diverse shapes and sizes.
15. Ribbon fringe Christmas trees
Craftidly's Dawn Stewart presents a fun DIY project for crafting festive fringe ribbon Christmas trees, ideal for holiday-tiered trays or centerpieces.
For the base, opt for a budget-friendly posterboard, then build up the trees by layering fringe ribbon with hot glue. Trim away any surplus strings for a polished final look.
Tomato cage Christmas trees
16. Deco mesh tomato cage Christmas tree
This DIY project by Nick Kreticos transforms a tomato cage into a whimsical peppermint-inspired deco mesh Christmas tree. The step-by-step tutorial covers everything, from securing the cage's top to adding deco mesh, ornaments, and ribbon. This tree can be displayed inside or outside.
17. Dollar Tree tomato cage Christmas tree
This DIY faux tree by Shelly L Nemeth is incredibly easy and budget-friendly. All you need is a tomato cage and some green garland (opt for a realistic green for an authentic look).
Simply wrap the garland around the tomato cage, securing it with glue as you go. Layer the garland closely to achieve a full appearance.
Once covered, you can place it anywhere you like. Add natural-looking branches, berries, and pine cones for a beautiful finish.
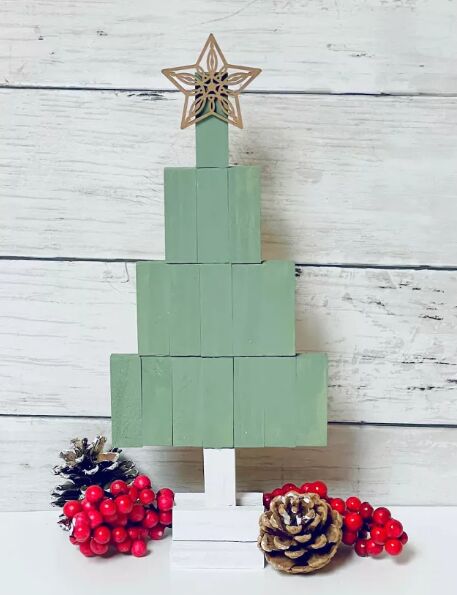
18. Jenga block Christmas tree
In this project from Single Girl's DIY, a Christmas tree is crafted using Tumbling Tower blocks from Dollar Tree. Here's a simple guide: Assemble the blocks into sections of 3, 5, and 7, forming the tree's shape. Allow about an hour for the glue to set.
Join the sections by using either wood glue or hot glue. Apply a coat of green chalk paint to give the tree its festive hue. Additionally, paint a selection of blocks white. Secure the white blocks to the base and trunk for stability.
Optionally, crown your tree with a star ornament for an added touch of holiday magic. You'll find you still have some blocks left over, perfect for crafting other seasonal decorations like snowman hats or Christmas present ornaments.
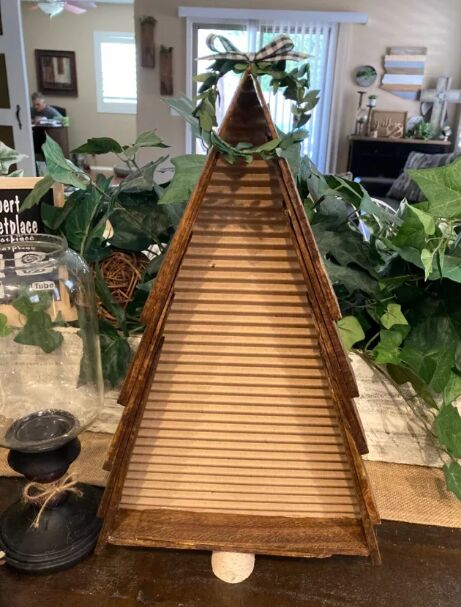
19. Wood shim Christmas tree
Shelly L Nemeth's DIY project guides you in crafting a Christmas tree using budget-friendly wood shims, all for under $5.
Simply arrange the shims into a tree shape, affix them to a foam board, and optionally, add a stain for a finishing touch. This project is a speedy and distinct way to enhance your Christmas decor.
Yarn Christmas trees
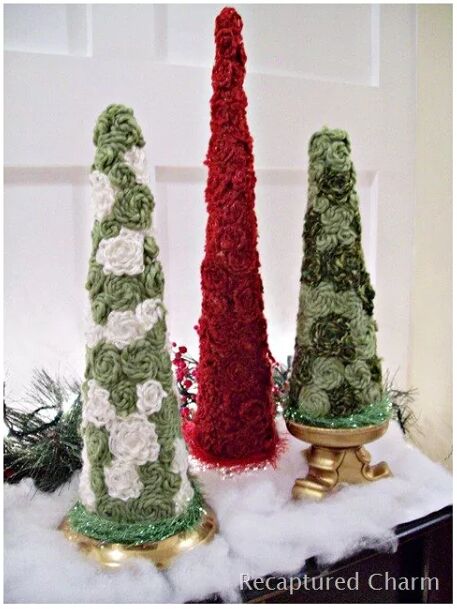
20. Yarn swirl Christmas trees
Create your own festive yarn trees with minimal supplies, following this tutorial by Recaptured Charm.
Opt for different colors and textures of yarn for various sizes and styles. No hot glue gun is needed, making it a kid-friendly project. Add personal touches like battery-powered lights or a star for extra flair.
Utilize leftover yarn or pick up some from a craft store. Apply white glue in sections and wind the yarn in spirals. Display on candle holders or atop batting for a snowy effect. These lightweight trees are easy to store away for future holidays.
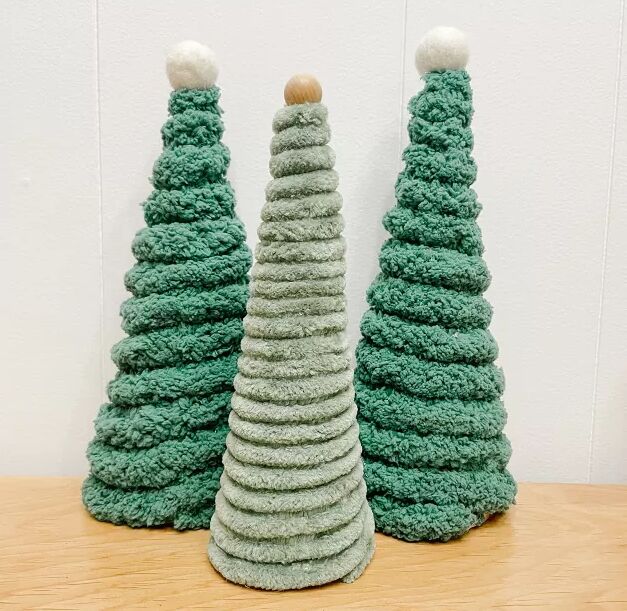
21. Yarn spiral Christmas trees
Crafting these DIY yarn Christmas trees is a breeze, making it a great project to do with kids. Following the instructions from Sew Bright Creations | Jackie, grab some cereal boxes and fluffy yarn, and let's get started.
Create cone shapes from the boxes and secure them with tape. Apply hot glue to the cone and wrap it with thick yarn, starting from the bottom and working upwards.
Finish by decorating the top with embellishments like felted or wooden balls. Display these charming yarn trees with your holiday decorations for a festive touch.
More DIY mini Christmas trees
22. Cardboard tube Christmas trees
Transform leftover cardboard tubes into a DIY cardboard Christmas tree with this simple craft by Mitch Couch. Start by cutting and stacking the tubes to create the tree's structure. Cover them with festive fabric, securing it with hot glue.
Then, glue the tubes together, adding a paint stir stick for support. Finally, let your creativity shine by decorating the tree with ornaments and embellishments of your choice.
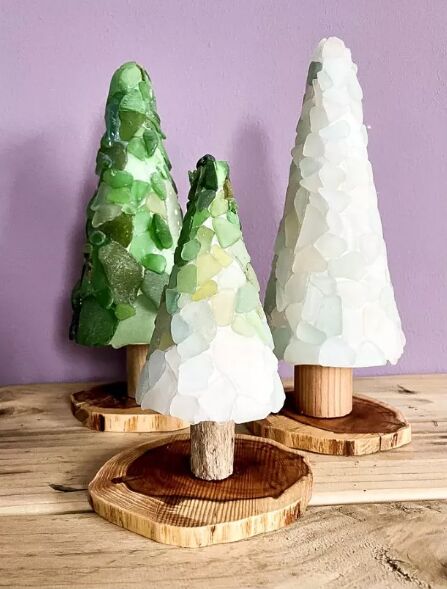
23. Sea glass Christmas trees
Next, Vickymcreations demonstrates how to create stunning sea glass Christmas trees to showcase your beach glass collection. You can choose a single color scheme or create an ombre effect. Personalize further by adding a starfish or keep them as year-round decor.
The materials needed include polystyrene cones, sea glass, a hot glue gun, wood slices for the base, and a sturdy trunk (like a curtain pole or branch).
Start at the base, gluing the sea glass in rows. Prepare the base and trunk, ensuring they're stable and aesthetically pleasing. Finally, assemble the tree by attaching the trunk to the base and securing the sea glass ornament.

24. Wine cork Christmas trees
For some festive party decor, Anna M fashioned a miniature Christmas tree from wine corks. The project was relatively straightforward, with the only time-consuming aspect being the cork-gluing process. This tree could serve as a convenient and charming gift idea for friends or colleagues.

25. Wire hanger Christmas trees
This DIY project by The Cofran Home creates a DIY Christmas tree using wire hangers, offering a budget-friendly decorating option.
By overlapping and securing hangers to form a triangle shape, the tree's frame is constructed. Lights and garland are wrapped around the frame, and a simple ribbon adds a decorative touch.

26. Crystal ice filler Christmas tree
Next, Gail@Purple Hues and Me demonstrates how to transform a paper mache cone tree into a glamorous holiday decoration with crystal ice fillers.
Begin by painting the cone white. Apply silicone along the bottom and press in crystal fillers. Continue adding fillers, securing them with your hands. Let the silicone dry for 24 hours. The finished tree shines and reflects light beautifully.

27. Felt Christmas tree
Create DIY felt Christmas trees using basic supplies and following these instructions from Rachel The Ponds Farmhouse. You'll need felt, sticks, wooden bases, a cordless drill, a hot glue gun, and a Christmas tree template.
Cut the trees from folded felt using the template, saving time and material. Secure sticks in wooden bases and attach the folded felt trees with hot glue, covering the stick completely. Add a felt star or other decorations as desired.

28. Qtip Christmas trees
Next, Julie McDowell - Design Artist shares how to make mini Christmas trees using tin foil and Q-tips.
Shape a foil cone, trim the ends, and cut Q-tips. Attach the Q-tips to the cone with hot glue to resemble tree branches. Add cotton wool to the back for a snowy effect.
For an alternative, use a microfiber mitt by gluing the tufts to the cone. Finish with stars and snow.

29. Plunger Christmas trees
This project by The Garden Frog with C Renee involves using a dollar store plunger to create a unique Christmas tabletop tree.
By using wired garland, a drill, and wire cutters, you can transform the plunger. It may take a bit of time and planning, but once you decide on the number of branches, it's straightforward.
Simply trim branches, drill holes, and paint the plunger. Despite its unexpected use, the plunger serves as an ideal base size for a tabletop tree.
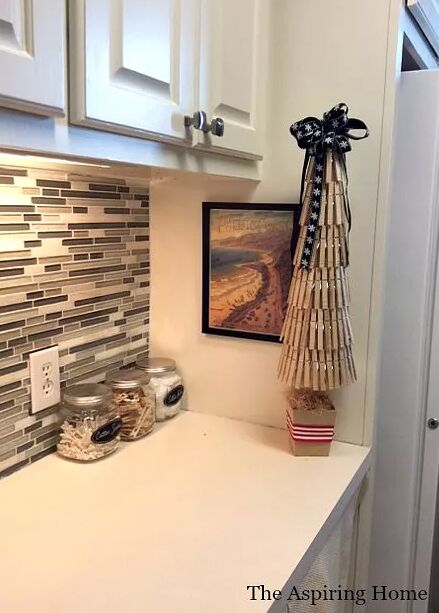
30. Clothespin Christmas trees
This project by Joy involves creating a DIY Christmas tree using clothespins and a few simple materials. It's designed to add a festive touch to the laundry room, which also serves as a mudroom and side entrance.
The tree is made by gluing clothespins to a styrofoam cone, allowing them to flare out for a unique look. A ribbon is added for decoration, and a bow tops the tree. The finished tree is placed in a container filled with filler material for stability.

31. Ruffle foam sheet Christmas trees
This next project by Gail@Purple Hues and Me involves creating elegant Christmas tree cones using foam sheets and glitter.
It's a DIY craft that starts with making a cone from poster board. Circles of foam sheets are then cut and transformed into ruffles using an iron. The edges are coated with glue and sprinkled with glitter before being glued onto the cone with hot glue.
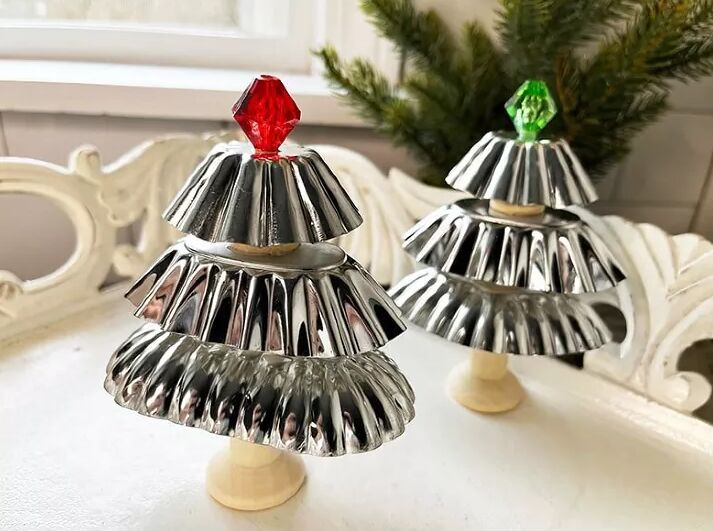
32. Tart tin Christmas trees
Next, Craftidly | Dawn Stewart shares how to create DIY Christmas trees using tart tins.
Whether you use vintage ones or buy new, these trees make great gifts, table decorations, or ornaments. This DIY project requires E6000 adhesive, tart tins in different sizes, and wooden spools.
Glue the spools between the tins for elevation, add a larger spool as the base, and let it dry. You can further embellish the trees with beads.

33. Coffee filter Christmas trees
Following guidance from All Within the Home, learn how to create affordable and elegant Christmas tree decor with coffee filters and poster board. You can make these charming trees for about $1 each.
Simply roll the poster board into a cone shape, tape it together, and start layering coffee filters and cupcake liners for texture. It's a quick and budget-friendly project, perfect for holiday decorations or events.
Different sizes can be made from one poster board, and they can be enhanced with twinkle lights and candles for a festive touch.

34. Glass gem Christmas trees
Holly Grace shares how to create gem Christmas trees using glass gems, wood blocks, and a touch of creativity.
Start by painting the wood block as a base. Then, arrange glass beads in a Christmas tree shape, gluing them down with a hot glue gun. Add a plastic snowflake for the star.
For the base, use cut wood log slices for a realistic tree stump effect. Enhance the project with gold leafing and shimmer paint for an elegant touch.

35. Plastic spoon Christmas trees
Holly Grace also has another great mini Christmas tree DIY. This time, she shows us how to transform simple plastic spoons into a festive Christmas tree centerpiece.
Cut the handles off the spoons, leaving a small portion. Attach them to a styrofoam cone using hot glue, starting from the base and working up in layers.
Create a tree topper by gluing a metal star to a skewer, painting it with Mod Podge, and adding gold glitter. Insert the topper into the cone. Finish by adding a final layer of spoons.
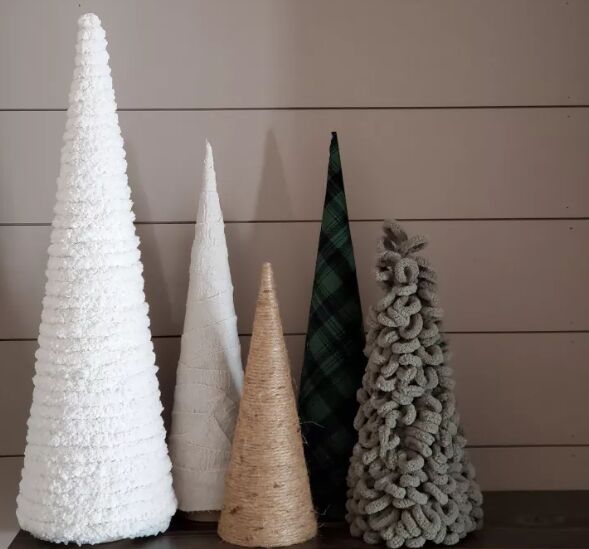
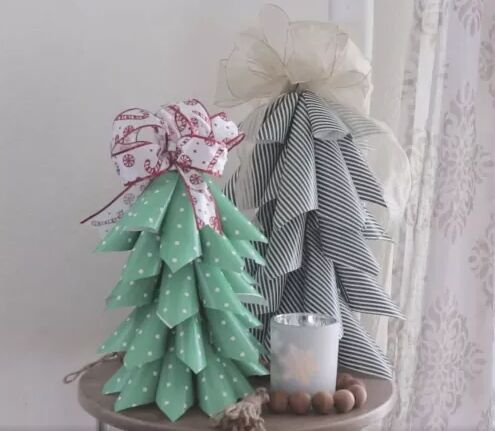
36. Paper cone Christmas trees
This DIY project by Staci Marie involves creating five different decorative winter and Christmas trees using paper cones as a base and various materials like loop yarn, chunky yarn, drop cloth, fabric, and jute twine for decorating.
The trees are made by wrapping and gluing these materials around the cones to create different textures and looks. This DIY project is budget-friendly and can be a fun activity to do with kids.
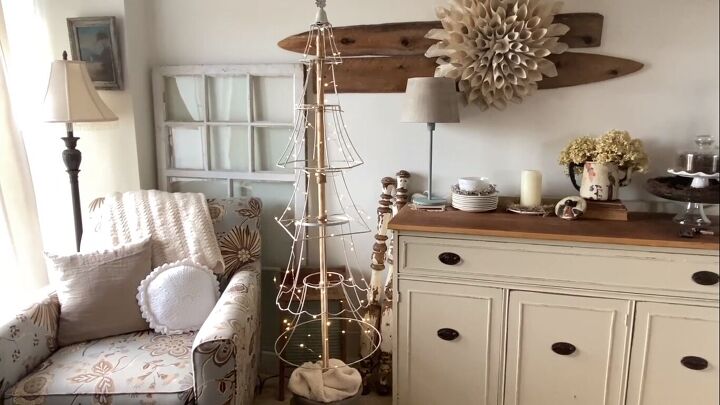
37. Lampshade Christmas tree
This DIY project from Recreated Designs offers an unconventional twist on the traditional Christmas tree by creating a Christmas tree out of lampshades!
The process involves gathering lampshades, removing fabric and center rings, then preparing a pole (like a broom handle) secured in concrete. Painting the lampshade frames and assembling them onto the pole, illuminated with copper lights, results in a unique, festive decor piece that's easy to customize.
DIY mini Christmas trees
We hope you enjoyed these DIY ideas and found inspiration for your holiday decorating. Wishing you a joyful and festive holiday season! Let us know your favorite project in the comments below.
Comments
Join the conversation
-
I liks so many of these I am going to try the Ribbon trees and the coffee filter trees. Thank you for posting


Frequently asked questions
Have a question about this project?