


73+ DIY Christmas Ornaments That Are Super-Easy to Make

Are you looking to add a personal touch to your Christmas tree this year? You can easily do so by crafting your own DIY Christmas ornaments.
These handmade treasures are not only adorable additions to your tree but are fun to make (especially with family and kids) and often more cost-effective than buying new ones. Plus, you can bring them out year after year and remember the joy of creating your own festive decor.
In this roundup, we'll dive into a trove of imaginative homemade Christmas ornament ideas, ranging from traditional to whimsical, ensuring that this year's decorations are not only beautiful but uniquely yours.
Wondering how to make your own Christmas ornaments? Keep reading!
For even more ideas, see Hometalk's ultimate guide to DIY Christmas decor here.
DIY Christmas ornaments
- Angel ornaments
- Clay ornaments
- Clear ornaments
- Decoupage ornaments
- Fabric & felt ornaments
- Glass ornaments
- Mercury glass ornaments
- Painted ornaments
- Paper and card ornaments
- Ornaments made from natural materials
- Ornaments made from recycled items
- Wood ornaments
- Yarn ornaments
- Other DIY ornaments
- Other ways to use Christmas ornaments
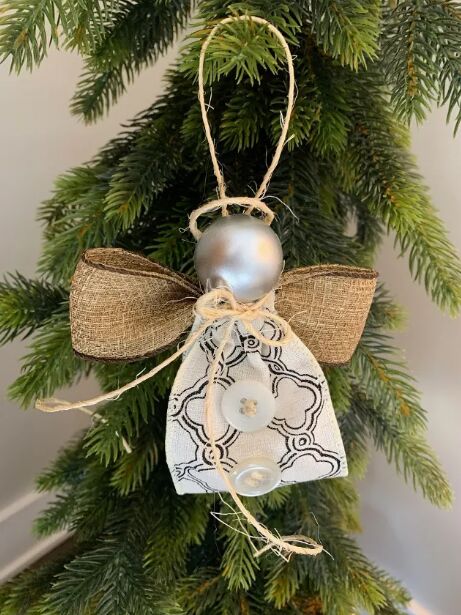
1. Ribbon angel ornaments
Honoring her mother's cherished crafting tradition, Niky from The House on Silverado uncovered her mother's old notes for crafting ribbon angel ornaments.
The process involves delicately cutting and skillfully looping wired ribbon to form the angel's body. Folded ribbon is then used to craft graceful wings. Assembling these wings and the head brings the angelic figure to life, as well as a twine bow and halo.
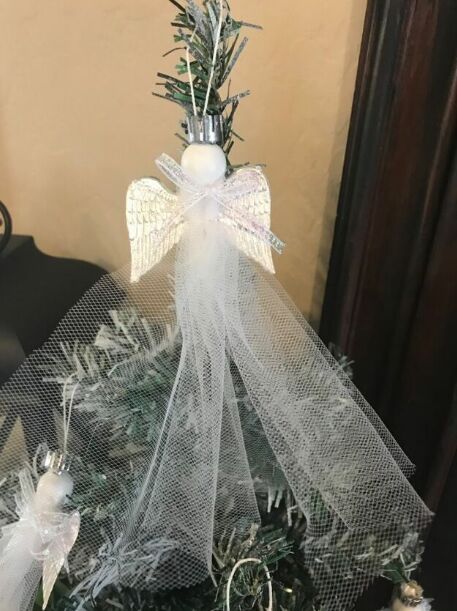
2. Tulle angel ornaments
Create an elegant tulle angel ornament using this user-friendly DIY tutorial by Shelly L. Nemeth.
Start by neatly folding the tulle into an accordion-style pattern, securing it securely with a string, and trimming the edges. Next, affix a cap onto a wooden bead, forming the foundation of the ornament. Then, securely glue a white bead onto the top of the angel's head.
Complete the angel by attaching wings and a bow. Thread a string through the cap, and presto—unveil an ornament ready to grace your Christmas tree.
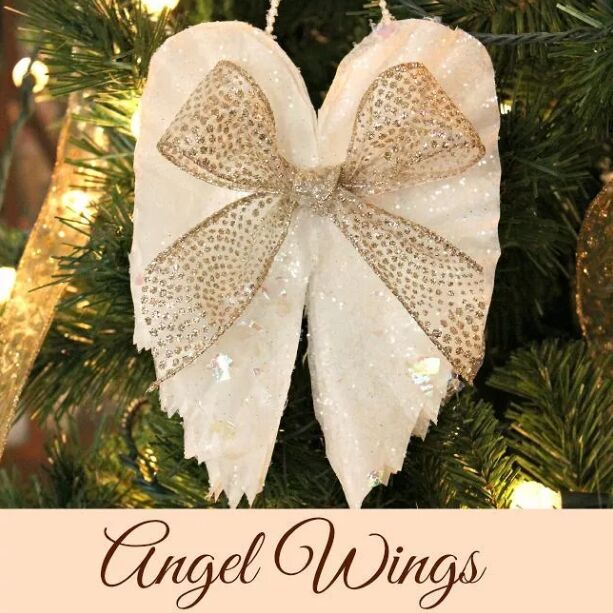
3. Coffee filter angel wings ornaments
Moving forward, Linda B will guide us through crafting coffee filter angel wing ornaments using only five white coffee filters.
Begin by folding the coffee filters in half and then use a template to carefully cut out the wing shapes. Once you unfold them, add a touch of sparkle, glitter, and a charming bow to bring this ornament to life.
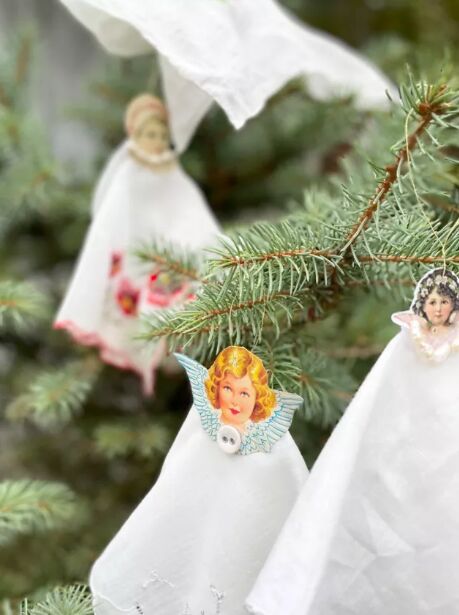
4. Handkerchief angel ornaments
Silvia Acevedo Eldredge Gloor of Los MiMis Armoire shares her tutorial on crafting handkerchief angels. All you need are antique handkerchiefs, wire, angel faces, and decorative elements.
Begin by applying hot glue to the handkerchief's center, then affix the angel's face with adhesive. Using a needle, create a hole and thread wire through it. Embellish your angel with a selection of charms, buttons, pearls, or other ornaments.
These vintage-inspired angels bring a sense of nostalgia to your holiday decorations.
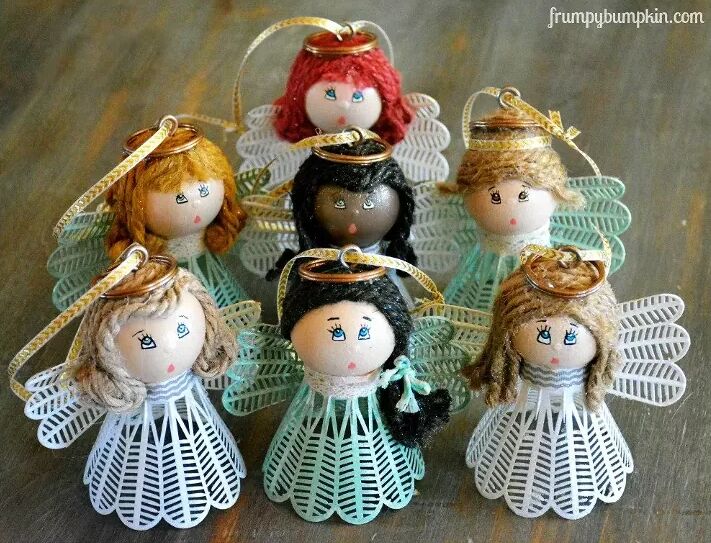
5. Angel birdie ornaments
Stefanie's project crafts these DIY angel birdie ornaments using ping pong balls and plastic bird figures from Dollar Tree. The steps include painting the birdies, affixing ping pong balls as heads, and adding wings.
Jute cord forms their hair, while ribbons serve as necklines and hanging loops. These ornaments receive a personal touch with painted faces and a touch of glitter spray. This craft is not only cost-effective but also a fun activity.

6. Angel feather ornaments
Cynthia from Clockworkinteriors showcases her "angel feather" ornaments, utilizing glass bulbs, pristine white feathers, shimmering glitter, spray adhesive, and either ribbon or metallic string, along with a hole punch.
Begin by applying a fine mist of spray adhesive within the glass bulb, followed by a generous sprinkle of glitter. Once the adhesive has dried, carefully insert a pure white feather into the bulb. Use a hole punch to create an opening in a printed verse or message, and secure it to the bulb using your choice of ribbon or metallic string.
These handmade ornaments serve not only as elegant decorations but also make thoughtful gifts.
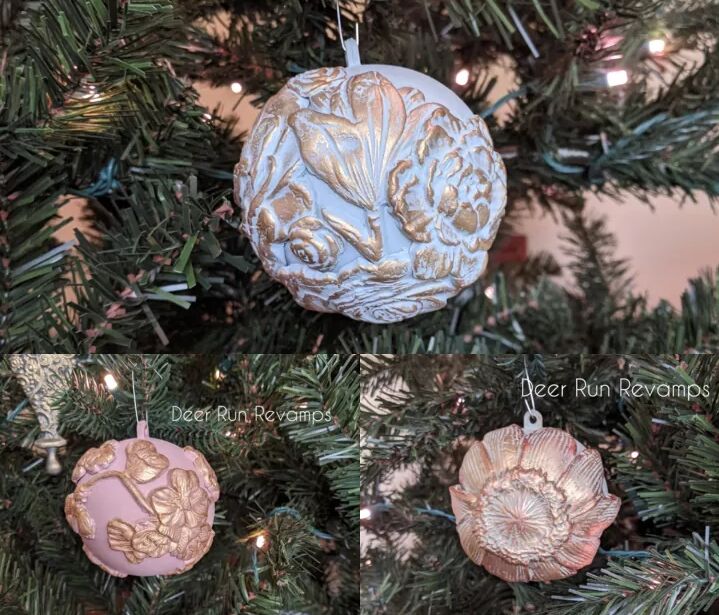
7. Paperclay applique ornaments
This project by Deer Run Revamps involves creating unique Christmas tree ornaments using molds and a variety of materials, including paper clay and resin. The handmade ornaments are painted and embellished with waxes and metallic powders for a beautiful finish.
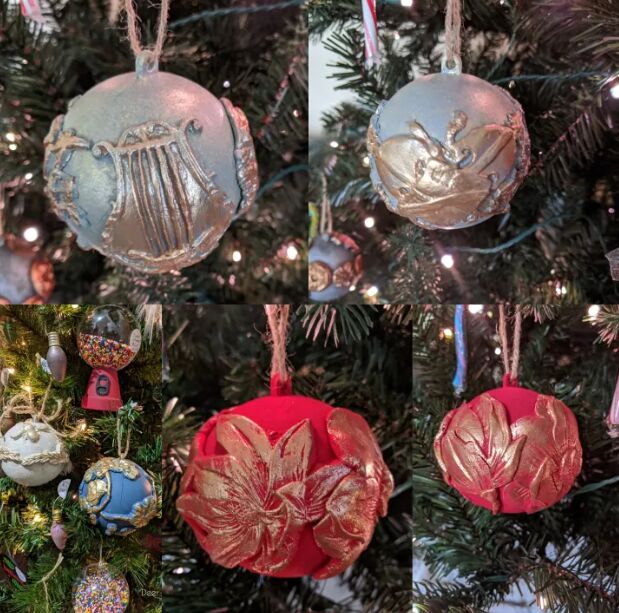
8. More paperclay applique ornaments
This time, Deer Run Revamps uses silicone molds and paper clay to craft Christmas ornaments. Plastic ornaments are painted and then adorned with paper clay appliques made from the molds.
After drying, the paper clay molds are painted to match the ornament's base color and enhanced with metallic Frensheen pigment.
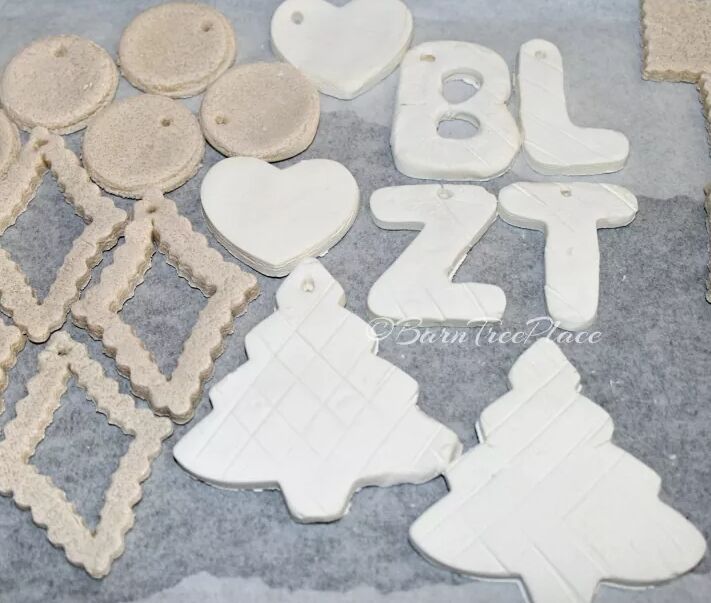
9. Salt dough and cornstarch clay ornaments
Consider trying out DIY clays with this project from Barn Tree Place, offering a simple activity to craft homemade ornaments, gift tags, or various shapes using either salt dough or cornstarch clay.
Salt dough lends a traditional, grainy texture, made from a mixture of flour, salt, and water. Conversely, cornstarch clay results in a smooth, white finish, achieved by cooking a blend of cornstarch, baking soda, and water on the stovetop.
Both materials can be molded using cookie cutters or custom-made molds, and textured using common household items. This project encourages children and adults alike to let their creativity flow and fashion heartfelt gifts.
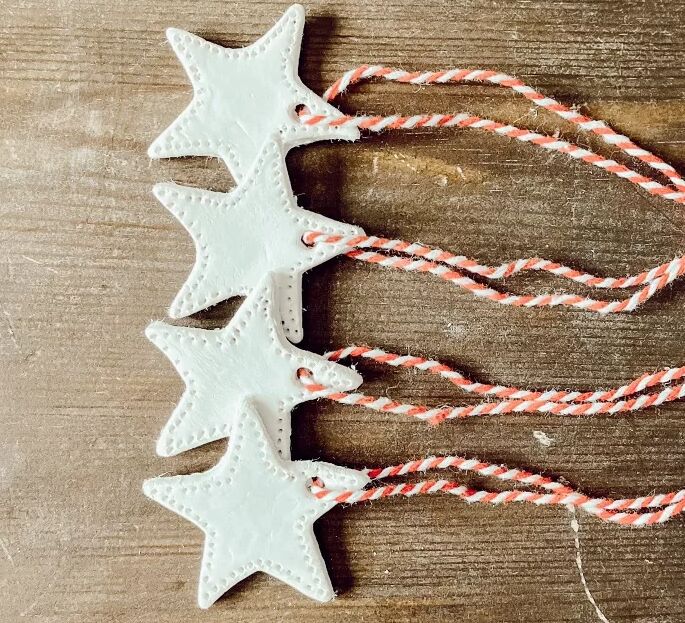
10. Air-dry clay ornaments
This project by Rachel | mapleandgrey involves creating DIY clay Christmas ornaments using air-drying clay and various design techniques.
The steps include cutting out shapes, stamping designs, cutting holes for ribbons, using a cocktail stick for added detail, drying the ornaments, filing the edges for a smooth finish, and attaching ribbons.
These beautiful ornaments are cost-effective and fun to create, making them a perfect addition to your holiday tree.
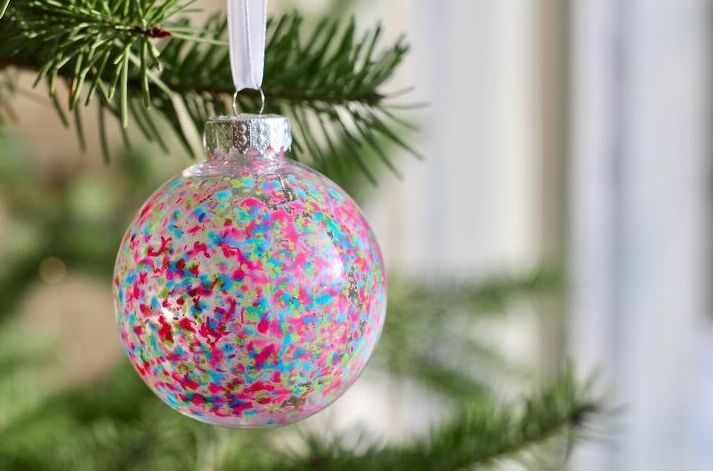
11. Paint-filled ornaments
What can you fill Christmas ornaments with? To start, Julie McDowell - Design Artist keeps it simple by demonstrating how to craft a simple mixed paint ornament.
Begin by pouring paint into both halves of the ornament, then connect them and gently shake to blend the colors. For added flair, consider drawing some designs with markers on the outside.
12. Melted snowman ornaments
Shawna Bailey guides us through creating a cute DIY melted snowman ornament. This kid-friendly project is both simple and enjoyable.
Begin by filling an empty ornament with rock salt to represent melted snow. Then, attach sticks for arms, use peppercorns for eyes and buttons, affix an orange felt triangle for the nose, and wrap a fringed red felt strip around as a scarf.
13. Melted crayon ornaments
Mary Jane Duford from Home for the Harvest showcases how to make melted crayon Christmas ornaments. The process involves filling clear, fillable round ornaments with crayon shavings. Grate your old crayons using a kitchen grater and experiment with color combinations. Carefully fill the ornaments with these shavings and reseal the cap.
Next, use a hair dryer to melt the crayon shavings, allowing them to cool before handling. Attach a ribbon for hanging and marvel at the vibrant results.
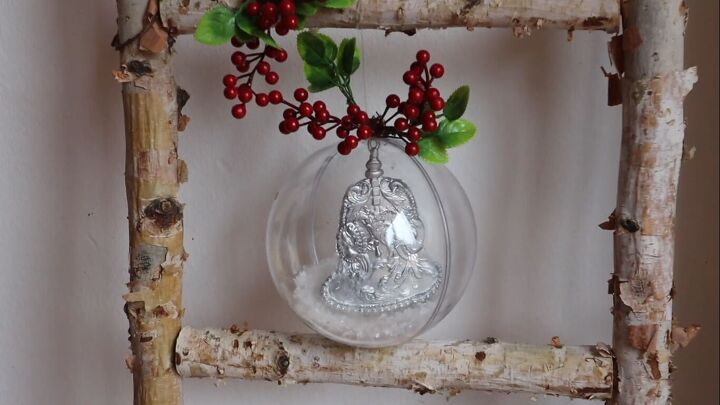
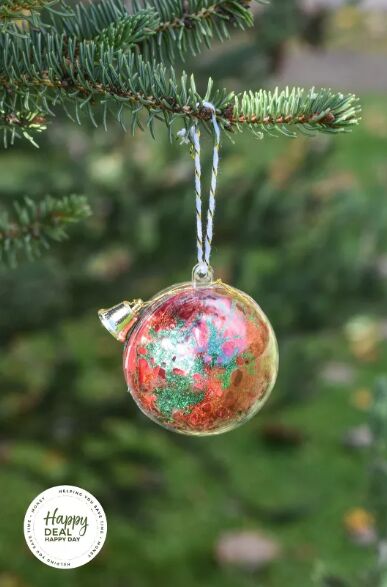
14. Ornaments with Christmas items inside
Bella Renovare by Crys'Dawna shows us how to add a festive surprise inside clear Christmas ornaments in this simple tutorial.
Start by blending and pouring crafting resin into a bell-shaped mold. Carefully glue the two halves together, coat the bell with a gleaming silver finish, attach a transparent thread for hanging, embellish with faux snow, and securely seal the ornament.
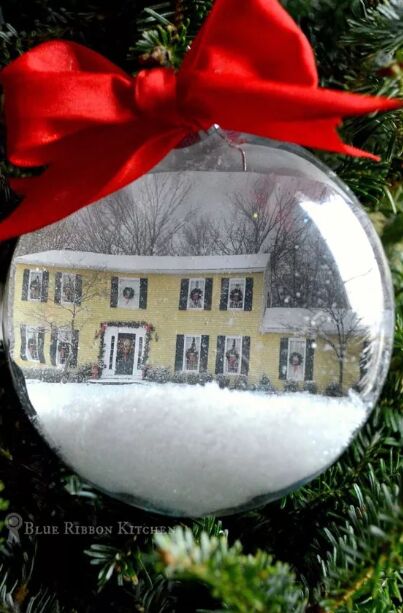
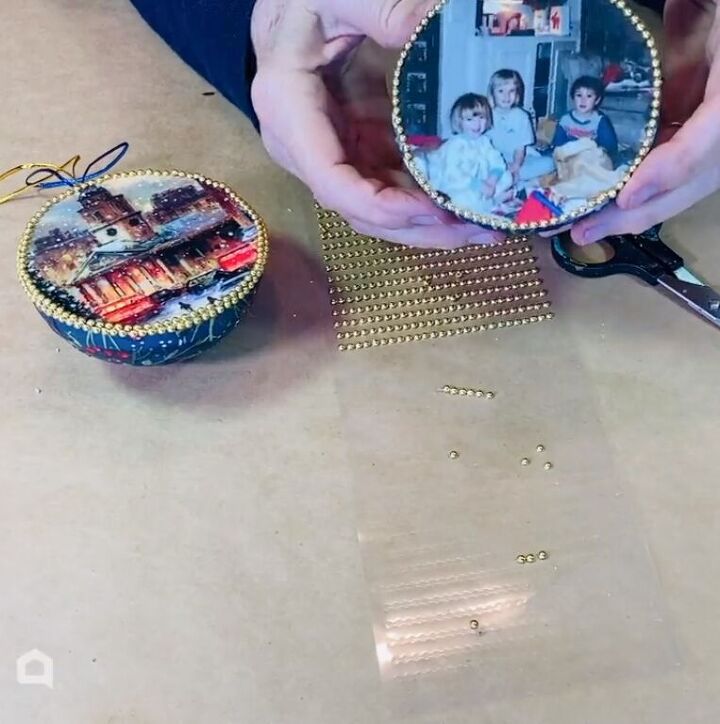
15. Photo ornaments
If you're experiencing a bout of homesickness or a wave of nostalgia this Christmas, Karri from Blue Ribbon Kitchen has a heartwarming idea to help you create a sentimental photo ornament that captures the essence of "home for the holidays" by featuring a picture of your childhood home.
Using a plastic craft ornament, imitation snow, and a duplicated image of your cherished home, follow these steps to craft a treasured memory.
Begin by applying glue and craft paint to one side, sprinkle it with glitter, then carefully place the photo (cut and rolled) onto the ornament. Smooth out the image, sprinkle some imitation snow for a snowy touch, and finish it off with a ribbon.
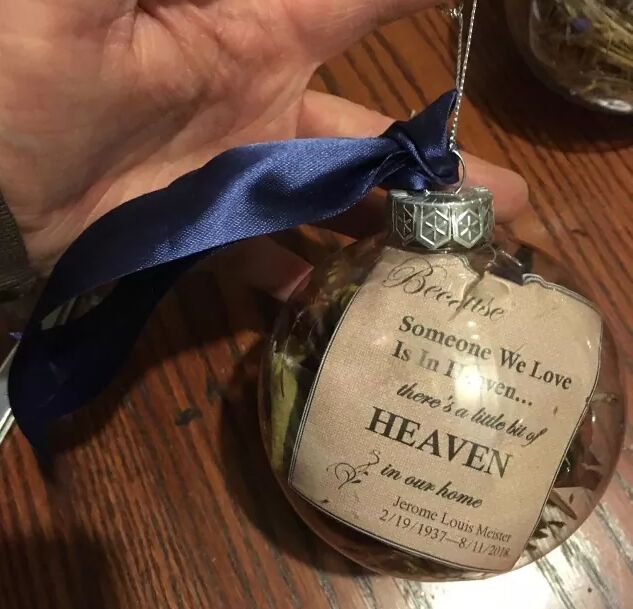
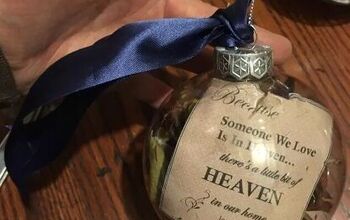
16. Memorial ornaments
Annette also offers a touching suggestion for fashioning sentimental Christmas ornaments by repurposing flowers from a funeral. She carefully chose clear, seamless plastic bulbs and dedicated each ornament to her father, incorporating dried petals, leaves, and a heartfelt memorial note.
The outcome is an ornament that serves as a heartfelt tribute to a beloved family member.
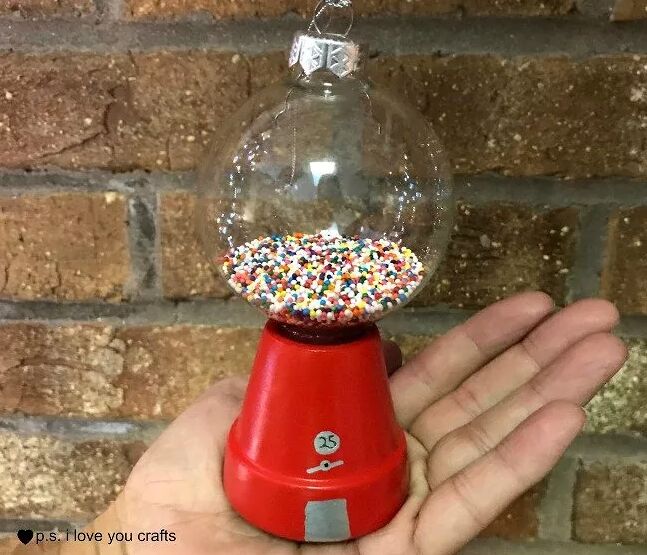
17. Gumball machine ornaments
Pam from P.S. I Love You Crafts shares a project guiding you through creating a Christmas ornament that resembles a gumball machine. This kid-friendly craft is simple, though adult supervision is advised.
For this project, you'll need a clear Christmas ball, red paint, a small clay flower pot, sprinkles, Mod Podge, a silver paint pen, and a glue gun. The process involves painting the flower pot, affixing the ball, adding sprinkles, and embellishing it to achieve the gumball machine look.
18. Glitter ornaments
Maura White presents an uncomplicated DIY project for crafting dazzling Christmas ornaments using clear plastic spheres and glitter glue.
The process involves applying glitter glue in a random pattern inside the ornaments, allowing it to dry between layers to achieve a sparkling finish. For an extra touch of shine, you can insert small, shiny bows into the ornament halves.
Complete the ornaments by adding bells or stars and use them to adorn your tree or as festive embellishments for gifts.
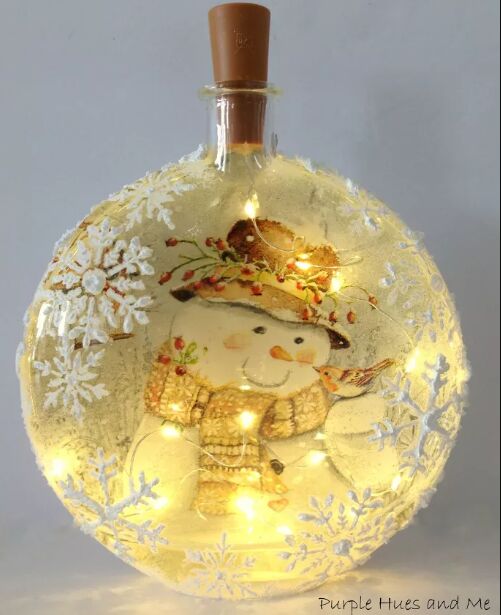
19. Light-up decoupage ornaments
In Gail@Purple Hues and Me’s reverse decoupage tutorial, learn how to personalize a glass bottle using a winter-themed napkin and three-dimensional snowflakes.
The process involves wetting, tearing, and carefully applying the napkin to the bottle, sealing it with Mod Podge. To reduce transparency, paint the back with white chalk paint, introduce snowflake stencils using Snow-Tex for a textured effect, and ensure the edges are smooth.
Insert cork twinkle lights, and voila – you'll have a delightful night light that captures the warmth and coziness of the season.
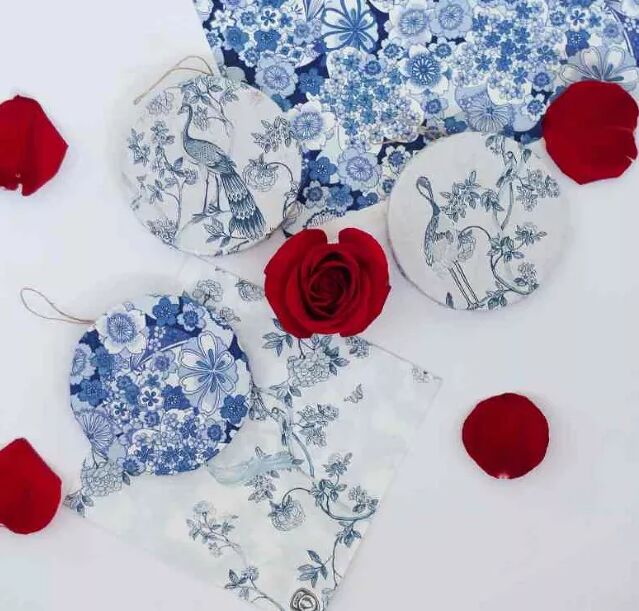
20. Chinoiserie decoupage ornaments
Learn how to create DIY decoupage Christmas ornaments with guidance from This Dear Casa. Utilizing versatile blue and white floral paper from Paper Source, along with delicate paper napkins, you'll use Mod Podge to affix the paper onto the ornaments.
Ensure a centered design by aligning the focal point, trim, and glue separate paper sections, then seal them with an additional layer of Mod Podge, then simply let them dry.
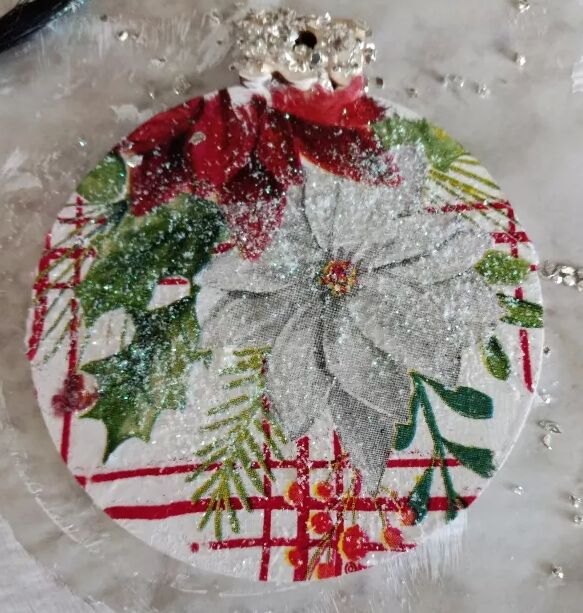
21. Festive decoupage wood ornament
Corine Mapes- Junk to Gems also has a festive decoupage tutorial to share. Begin by painting the ornaments white to create a pristine base, then sprinkle crushed glass on top to achieve a vintage aesthetic.
The next step involves decoupaging stunning 2-ply napkin designs onto the ornaments using glue, followed by careful removal of excess paper through gentle sanding. To add dimension, distress the edges using an ink pad, and for the finishing touch, adorn them with glitter and ribbon.
22. Photo ball ornaments
Julie McDowell - Design Artis, demonstrates how to create a personalized DIY photo ornament in a few simple steps. Begin by cutting a styrofoam ball in half and sanding the top to achieve a smooth surface. Resize a photo and protect it with clear contact paper.
On the back of the ornament, use decoupage techniques to attach a festive Christmas napkin. Securely glue the photo to the ornament's flat side and add a personal touch with gold trim or other decorative elements. Finish by inserting a hanging cord.
Fabric & felt ornaments
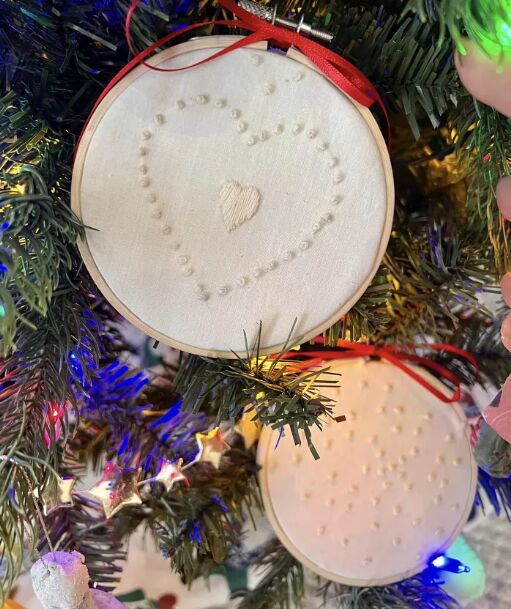
23. Mini embroidery hoop Christmas ornaments
Chickie W.U. demonstrates a crafty way to fashion personalized ornaments using mini embroidery hoops. You can lock in cherished fabrics or keepsakes within the hoops, such as wedding dress fragments, christening gown remnants, or baby blanket pieces.
After trimming any surplus fabric, you can opt to attach a layer of felt to the back for a polished appearance. Alternatively, embrace the vibrancy of plastic embroidery hoops for a playful variation, making it an ideal project for children.
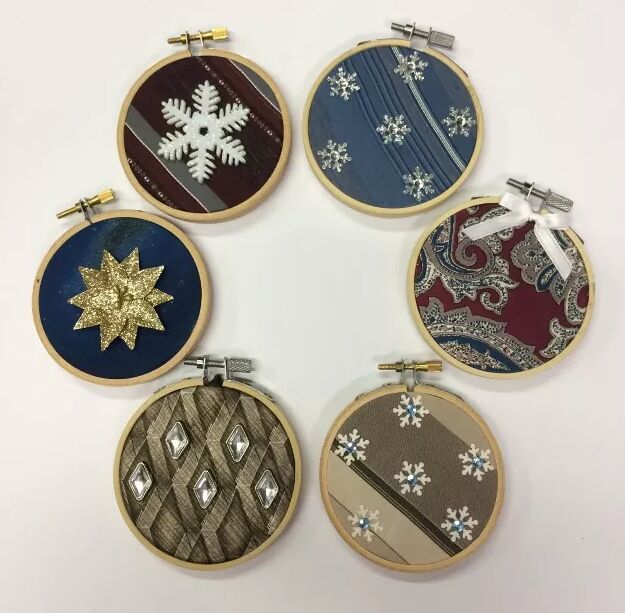
24. Necktie ornaments
Next up, Judy Tosh demonstrates a straightforward project that turns old neckties into Christmas ornaments. Taking inspiration from sweater ornaments found on Pinterest, this do-it-yourself endeavor involves a 3" wooden embroidery hoop, a necktie, and various personalized details.
To begin, unfurl the tie and secure the chosen fabric within the hoop, ensuring it's taut. Trim any excess fabric for a clean finish. Then, add embellishments such as holiday stickers, jewels, or foam cut-outs.
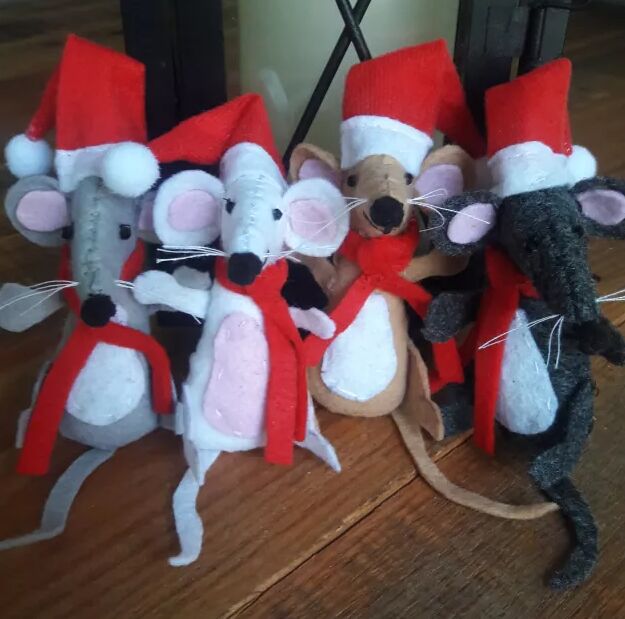
25. Felt mouse ornaments
Every year, Pamela creates a special Christmas ornament for her granddaughters, and this time, she decided to craft adorable Christmas mice ornaments.
After cutting the felt pieces and gluing the pink inner ears, she sewed the head and body pieces together, leaving openings as marked on the pattern. Carefully turning them inside out, Pamela filled them with stuffing and then stitched the head to the body.
Adding eyes, a nose, and a mouth completed the faces. She also attached ears, hands, feet, tails, and bellies to give each mouse character. To add a festive touch, Pamela topped the mice with miniature Santa hats and scarves, as well as whiskers.
Glass ornaments
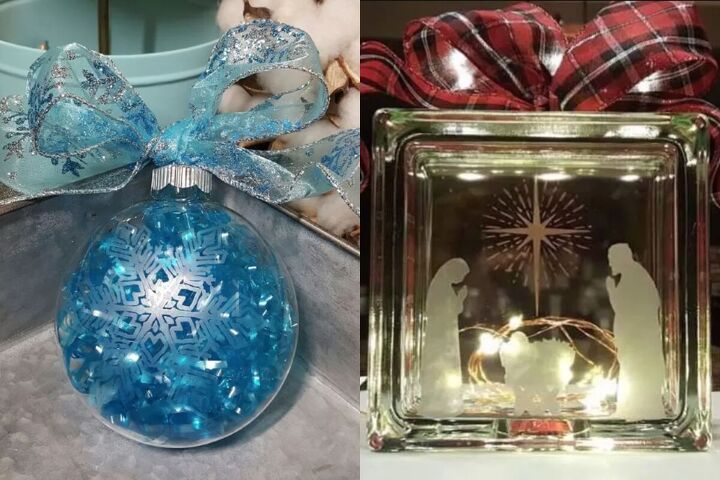
26. Glass etching ornaments
These budget-friendly projects by Terina - Create with Tree That's Me involve using Armour Etching Cream and Chalk Couture transfers to create personalized glass ornaments and glass blocks.
The first project involves etching a glass Christmas ornament with a chosen design, while the second project features etching a glass block. These projects can be used as gifts or for home decoration.
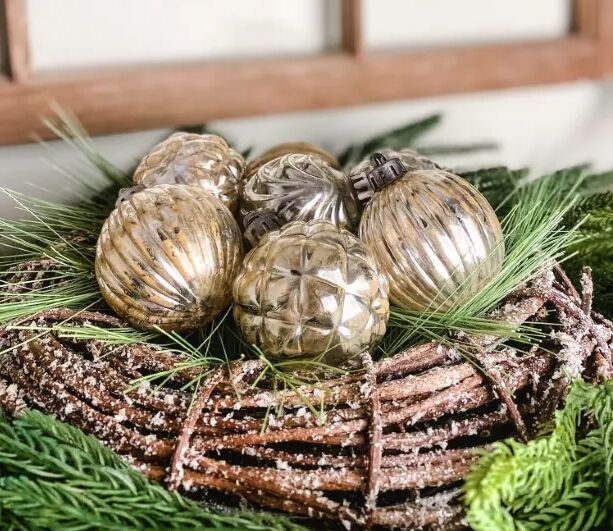
27. Mercury glass ornaments - technique 1
Jennifer Howard from Cottage On Bunker Hill demonstrates how to create affordable faux mercury glass ornaments inspired by high-end designs.
By using materials such as Krylon Looking Glass Paint, clear plastic ornaments, a vinegar and water solution, and metallic paint, you can replicate the vintage mercury glass effect.
The process involves a few paint squirts, rolling, hairdryer heat, and a vinegar mist to transform regular ornaments into elegant faux mercury glass decorations. Experiment with colors like antique gold or black acrylic paint for unique and eye-catching results.
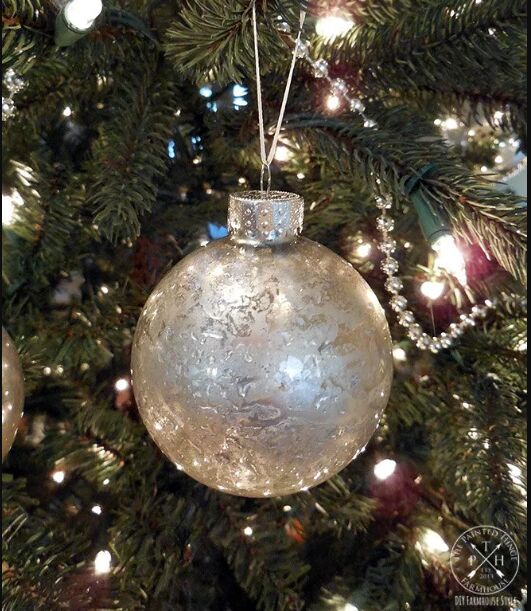
28. Mercury glass ornaments - technique 2
Craft your own budget-friendly faux mercury glass Christmas ornaments using this DIY guide from The Painted Hinge. You’ll need clear glass balls, Rust-Oleum Mirror Effect Spray, Rust-Oleum Hammered Metal Finish Spray in Copper, vinegar, rubber gloves, and a hair dryer.
Start by removing the metal tops from the ornaments, apply the copper and mirror spray inside, then use the hair dryer to spread and dry the paint. Reattach the tops and hang your new ornaments on your Christmas tree.
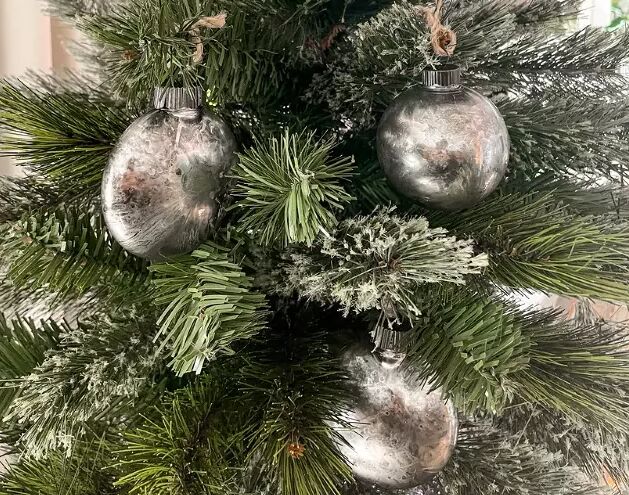
29. Mercury glass ornaments - technique 3
To create her mercury glass Christmas ornaments, Emily Rone Home utilizes Rustoleum Mirror Effect Spray and white vinegar, along with metallic oil-rubbed bronze spray for her creative process.
Begin by applying Mirror Effect Spray and vinegar inside the ornaments, using a hair dryer to expedite the drying process. Repeat this procedure to achieve your desired coverage, incorporating metallic oil-rubbed bronze spray for added dimension.
For a finishing touch, spray paint the top caps to create contrast.
Painted ornaments


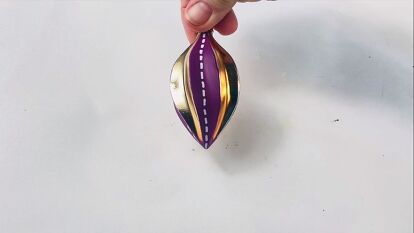
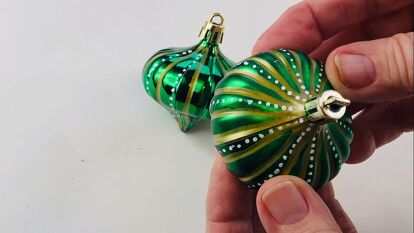
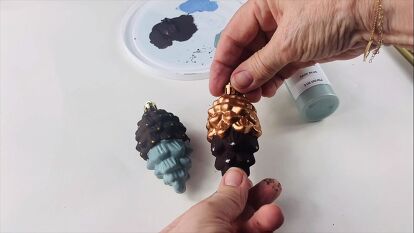
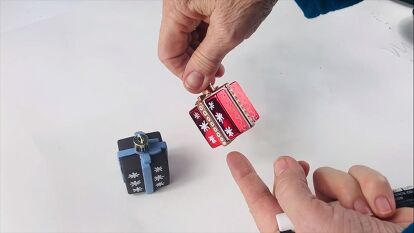
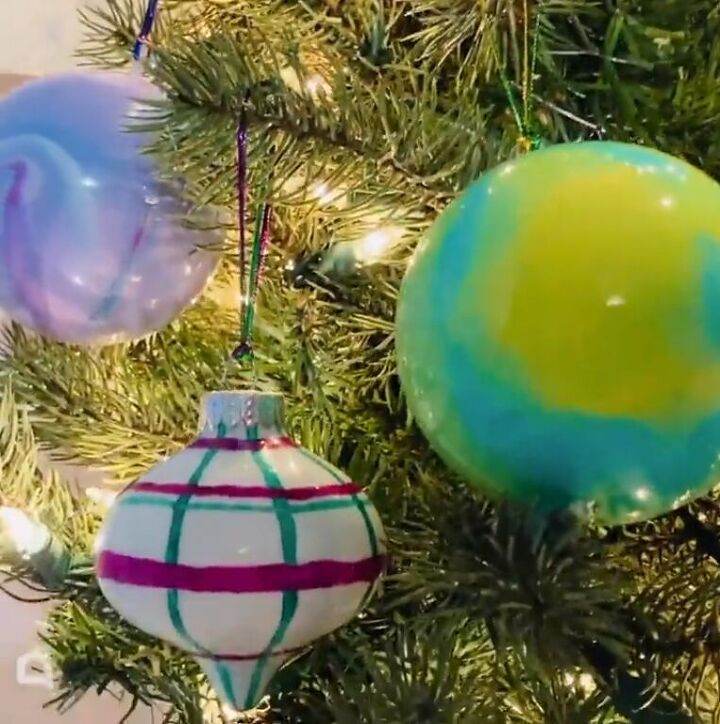
30. Painted ornaments
Refresh your Christmas tree decorations with these easy DIY painted Christmas ornament ideas from Julie McDowell - Design Artist. Transform your old ornaments with just paint, a gold Sharpie, and a white Posca pen.
Various design ideas include creating lines and dots, painting Christmas gift-inspired patterns, giving a two-tone look to pine cone ornaments, alternating segments of color, and more. The possibilities are endless, and you can customize your ornaments to match your holiday decor.
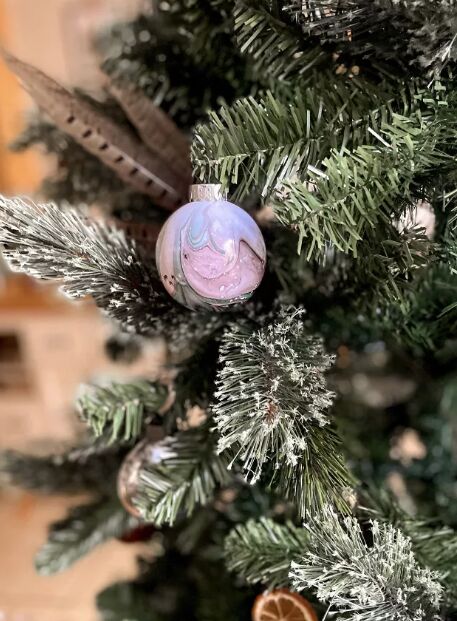
31. Marbled ornaments
Learn how to create DIY marbled Christmas ornaments using nail polish in five easy steps, with this tutorial by Emily Rone Home. Prepare your workstation, cut slits in solo cups for holding ornaments, and fill a wide-mouth bowl with water.
Pour drops of nail polish into the water, swirl them with a toothpick, and dip your ornaments. Make sure to replenish the nail polish in the water as needed. After dipping, let the ornaments dry in the slits of solo cups, or use a hair dryer for faster drying.
Clean up with acetone, and you'll have beautiful marbled ornaments for the holidays.
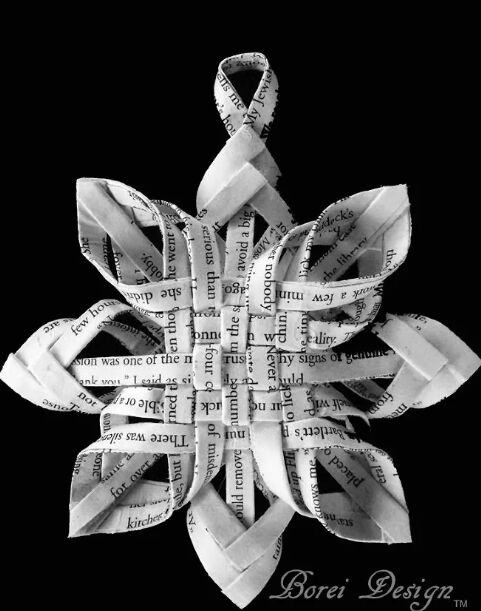
32. Swedish advent star ornament
Next, Borei Design shows us how to create a Swedish advent star ornament or decorative hanging using recycled book pages.
Cut a 5x7 book page into quarters, fold each piece to create weaving strips, and make 21 strips in total. Weave two sets of strips to form the star's sides, secure corners with glue, and connect them by looping the center strips together.
Trim the ends and create a hanger from the remaining strip. Finish with a coat of satin finish Mod Podge and consider adding silver glitter for extra flair.
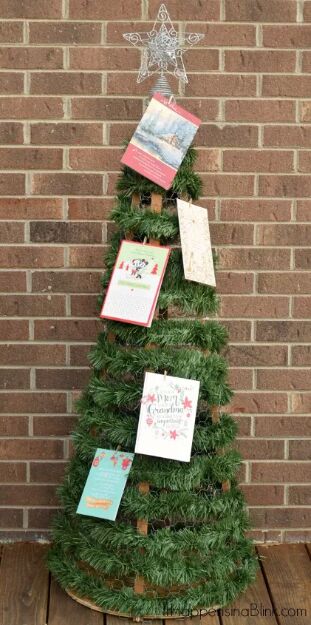
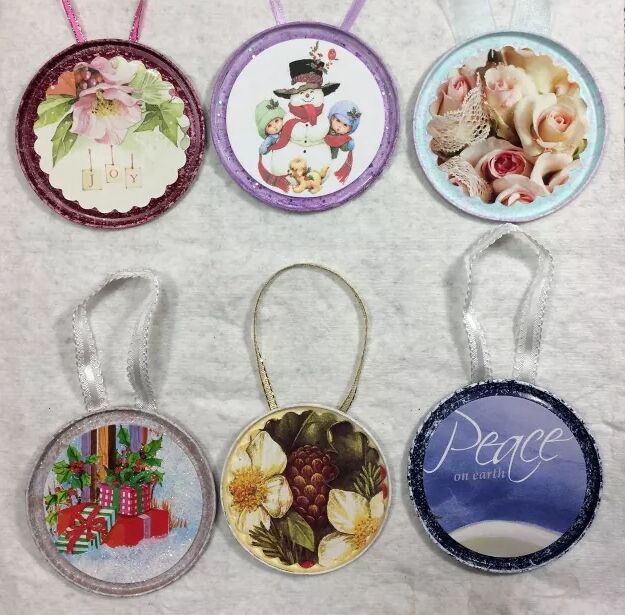
33. Christmas card ornaments
In this project, Melanie E makes a Christmas tree out of chicken wire. However, what also caught our eye was her ingenious idea of using Christmas cards as ornaments! This is a great way to display the cards you receive around the holidays and decorate your tree with minimal effort and budget.
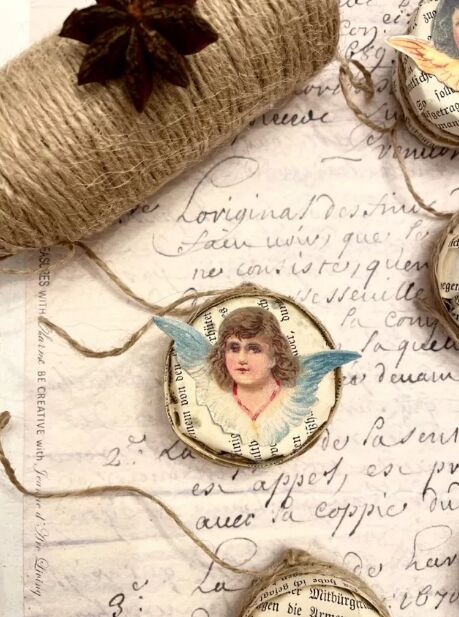
34. Book page ornaments
Upcycling empty tealight containers into unique DIY Christmas ornaments is a fun and straightforward project, beautifully demonstrated in this tutorial by Silvia Acevedo Eldredge Gloor from Los MiMis Armoire.
Start by cleaning out any remaining wax residue and then cut circles from book pages with small snips. Apply these paper circles inside the containers and attach a thread loop for hanging. Add your personal touch with angel faces, buttons, or even star anise for a decorative flair.
These repurposed ornaments can be used in wreaths, given as thoughtful gifts, or incorporated into various decor arrangements.

35. German bell ornament
Next, Gail@Purple Hues and Me shares how to create elegant folded German bell Christmas ornaments with ease using decorative wrapping paper glued to cardstock.
Begin by folding the square, ensuring crisp folds, and follow a pattern of diagonal and corner folds until the paper takes on a star-like shape. Manipulate the center and points to form a bell, glue the top points, leaving an opening for a tassel or hanging cord.
Explore variations with metallic wrapping paper or scrapbook paper glued to cardstock for different looks.

36. Pumpkin seed poinsettia ornaments
Jackie from Sew Bright Creations demonstrates a creative Christmas craft: repurposing pumpkin seeds into DIY poinsettia ornaments. Using felt, pumpkin seeds, and painted wood beads, she guides us through crafting these festive ornaments, perfect for decorating your Christmas tree, wreaths, or garlands.
The process involves arranging dried pumpkin seeds in a circular pattern on felt, adding a wood bead in the center, and hanging the ornament with craft cord.
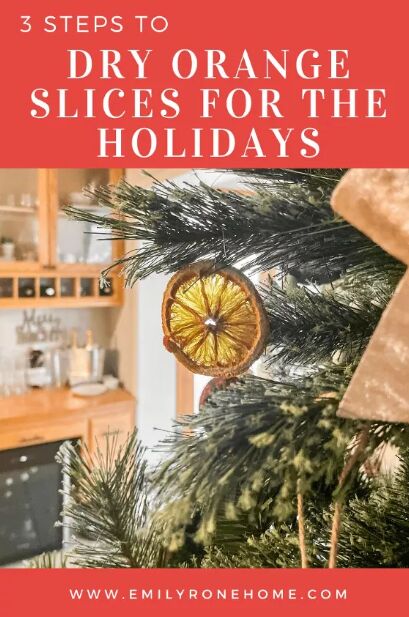
37. Dried orange slice ornaments
Discover how to make eco-friendly Christmas decorations with this detailed guide from Emily Rone Home.
Begin by thinly slicing oranges using a mandolin slicer and then carefully bake them at a low temperature for approximately 6 hours to achieve thorough drying.
Once they've cooled, these dried orange slices become charming additions to your Christmas tree, wreaths, and garlands, infusing your holiday decor with a sense of nostalgia and organic beauty.
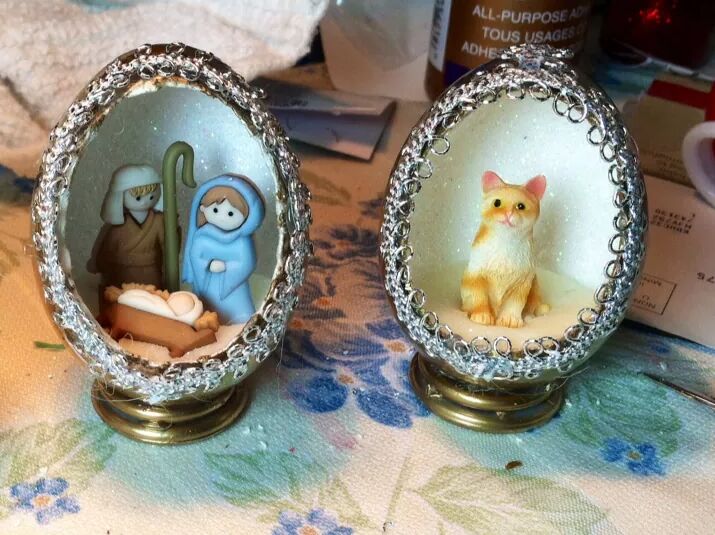
38. Eggshell ornaments
Next, Diane shares her grandmother's eggshell ornament craft. Utilizing genuine eggshells, you'll delicately craft a hole, cleanse them thoroughly, and fortify with Mod Podge for durability.
Add a sprinkle of clear glitter and decorate them with intricate trimmings and miniatures. Fill these ornate eggs with cornstarch dough, then place miniature figures inside.

39. Willow ball ornaments
Craft Invaders' project revolves around crafting rustic willow balls, versatile for both Christmas and year-round garden decorations.
The process entails weaving pliable willow sticks into wreaths, which are then assembled into a spherical shape. You can also try out different types of willow or other local materials.
These finished willow balls can be used in several different ways, from holding tea lights to acting as a base for Christmas kissing balls or even functioning as homemade bird feeders.
40. Pine cone ornaments
Pine cone ornaments never go out of style, and in this DIY guide, Zest it Up reveals how to fashion Scandinavian-inspired Christmas decorations by bleaching pine cones to achieve a wintery wonderland appearance.
Begin by gathering pine cones, give them a good wash, and gently dry them in the oven. Next, immerse them in a mixture of water and bleach in equal parts for a 24-hour period, using a weight to keep them submerged. Finally, allow them to air dry.
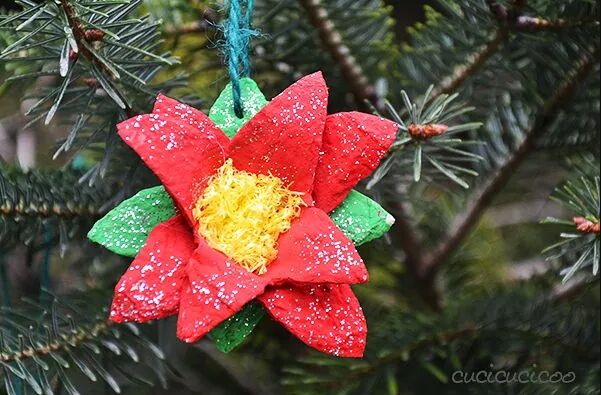
41. Egg carton poinsettia ornaments
What can you make ornaments out of? Just about anything! Cucicucicoo: Eco Sewing & Crafting shows us how to upcycle cardboard egg cartons and yellow fruit netting into charming poinsettia ornaments.
Start by cutting the egg carton into distinct shapes, painting them in green and red hues, and adding a sprinkle of glitter for that festive flair. Assemble the pieces by gluing them together, layering the colors to create the petal effect.
To hang these delightful decorations, simply attach a loop of cord or ribbon. These adorable poinsettias are ideal for crafting with kids.
42. Tin can lid ornaments
Learn how to upcycle tin can lids into DIY Christmas ornaments with this straightforward guide by Judy Tosh. Begin by safely cutting the lids off tin cans, ensuring there are no sharp edges using a Safety Can Opener.
Next, paint the lids in an array of colors, and while the paint is still wet, you can add stenciled designs or a sprinkle of glitter for extra flair. Alternatively, use vibrant scrapbook paper as a colorful backdrop.
Punch out images from Christmas cards or employ small decorations, then securely glue them onto the center of the lid. Attach a ribbon or yarn for hanging.
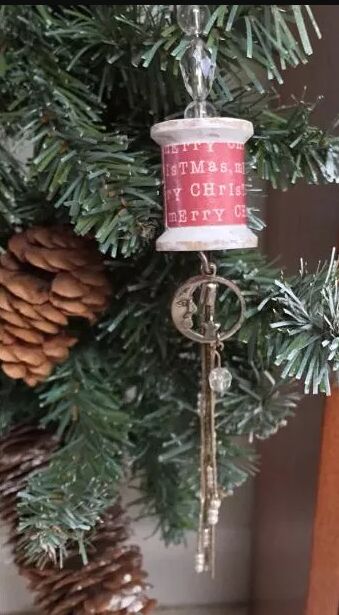
43. Wood spool ornaments
Teri.jeffrey offers a wonderful tutorial on transforming classic vintage wood thread spools into festive ornaments.
Upon stumbling upon these hidden treasures while organizing old threads, she breathed new life into them by carefully sanding off labels. She then painted the ends with CraftSmart paint in a cheerful color and chose a red-and-white "Merry Christmas" scrap paper that perfectly fit the spool's center.
She distressed the spool ends and securely attached the paper using ModPodge. For an added touch of sparkle, she repurposed scrap jewelry, artfully straightened a beaded ornament hanger, and threaded the spool and jewelry through it.
44. Lysol wipe lid ornaments
In the following tutorial, Vivian Siu demonstrates a clever way to upcycle plastic lids from Lysol wipes containers, old Christmas greeting cards, and wrapping paper into one-of-a-kind Christmas ornaments.
The process starts with painting the lids, tracing their outline onto the cards and wrapping paper, and attaching pipe cleaners for easy hanging. Secure the lids with glue and use ModPodge to affix the card and wrapping paper.
To add a festive touch, embellish with red beaded garland. These ornaments offer the opportunity for personalization with family photos and serve as an eco-friendly and enjoyable addition to your Christmas tree.
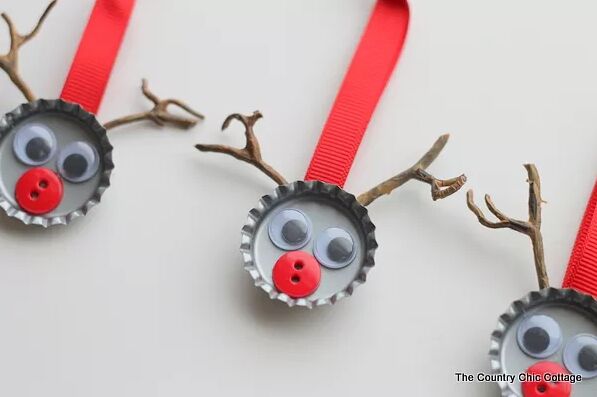
45. Reindeer ornaments using bottle caps
Angie from CountryChicCottage presents how to craft reindeer ornaments using bottle caps. By placing googly eyes and buttons inside the inverted cap, and attaching red string and twigs, you'll fashion endearing festive decorations. This project is perfect for a spur-of-the-moment holiday craft session with little ones.
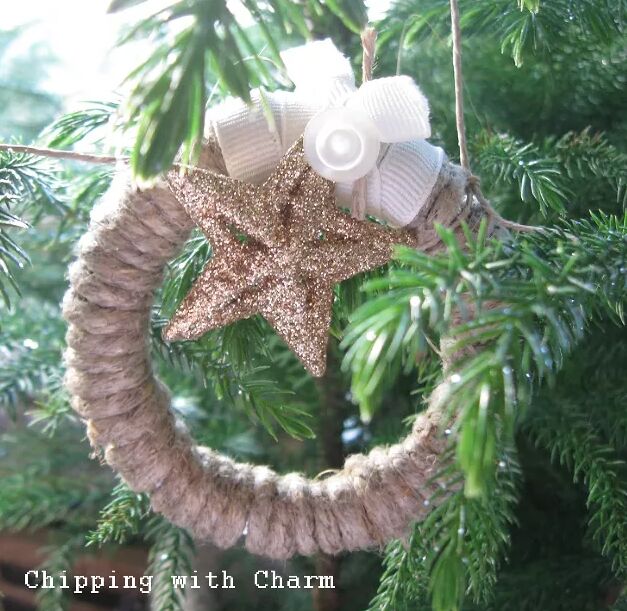
46. Twine mason jar rim ornaments
Laurel from Chipping with Charm presents a project centered around upcycling leftover mason jar lids and rims into rustic Christmas tree ornaments. The steps involve starting with a knot inside the rim, followed by wrapping it with twine and securing the end. This simple craft yields a cute farmhouse-festive holiday decoration.
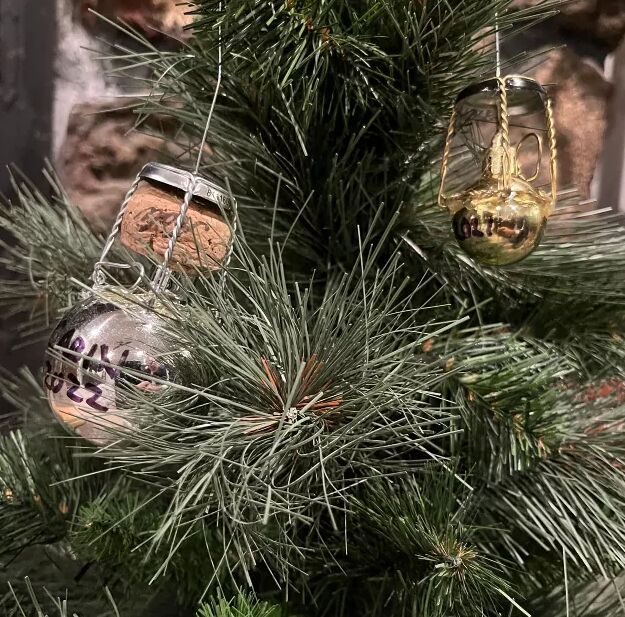
47. Champagne cork and muselet ornaments
Jim Cox's project centers on crafting meaningful champagne bottle wire top ornaments for the Christmas tree. He repurposed wire tops from champagne bottles, affixing hooks and attaching small ornaments using hot glue.
Each ornament carries a cherished memory, with one bearing the mark "NYE 2021" and another commemorating a friend's graduation.
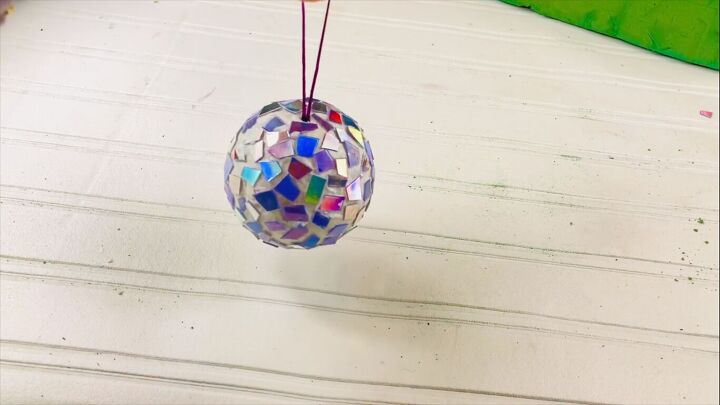
48. DVD glitter ball ornament
Julie McDowell - Design Artist is back again and this time, she shares an imaginative holiday project that breathes new life into old DVDs, turning them into dazzling glitter ball Christmas ornaments.
The process involves cutting the DVDs into small pieces and affixing them to a Styrofoam ball using gel medium, resulting in a masterpiece that glimmers with vibrant colors and plays with the light.
By adding a straightforward ribbon loop, this upcycled DVD ornament brings a distinct and attention-grabbing element to your holiday decor.
49. Glass-effect ornaments
Woodpeckers Crafts presents a DIY project that turns wooden cutouts into glass-like ornaments using Modge Podge's Dimensional Magic.
The process entails painting the cutouts, affixing snowflake stickers to create depth, and applying Dimensional Magic for a glossy, three-dimensional effect.
For added dimension, you can incorporate more stickers, glitter, and additional layers of Dimensional Magic.
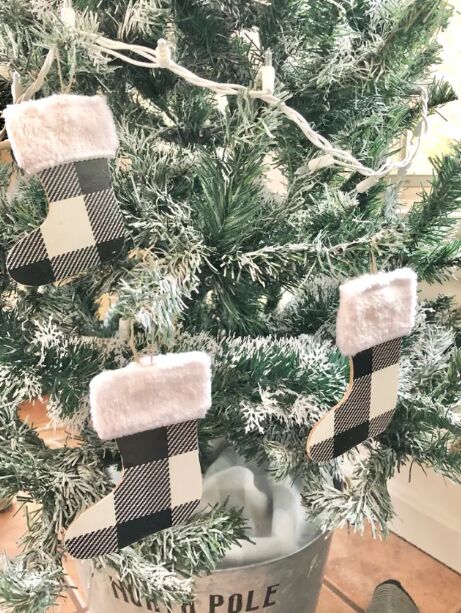
50. Check stocking ornaments
Delphine from C bête comme chou demonstrates how to create cute stocking ornaments for the holiday season.
Using wooden stockings from Dollar Tree, along with wrapping paper and soft white fabric, you cut and adhere the paper to the wood using Mod Podge, sand it for a polished appearance, add twine for hanging, and attach the fluffy fabric.
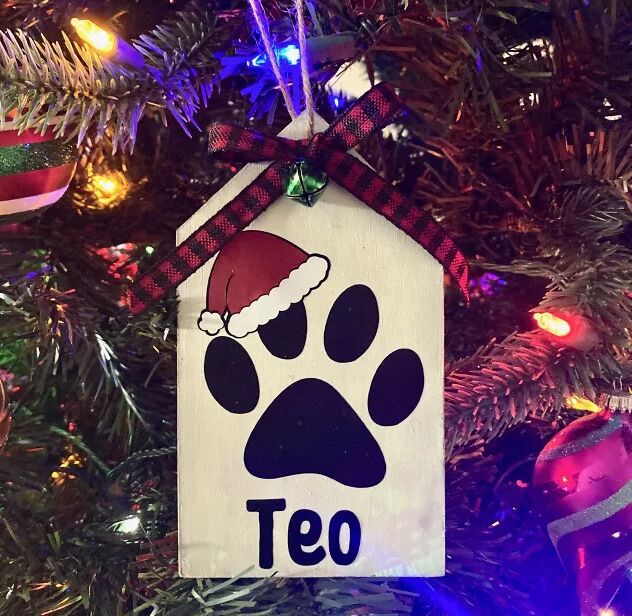
51. Dog tag ornaments
In this DIY project by The Crafty Pumpkins, a personalized dog-themed Christmas ornament is crafted from leftover wood pieces. Materials include MDF, stain, white paint, jute string, Christmas ribbon, hot glue, a jingle bell, vinyl sheets in black, white, and red, a Cricut machine, a jigsaw, and a drill.
The process begins by cutting the MDF into a tag shape and creating a hole for easy hanging. After painting the tag white and applying a light stain for a charming rustic finish, the chosen dog design is printed and carefully transferred onto the wooden surface.
A piece of jute string is attached for hanging, and a festive Christmas bell is added for a cheerful touch. The ornament is further adorned with a dainty ribbon bow secured at the top.
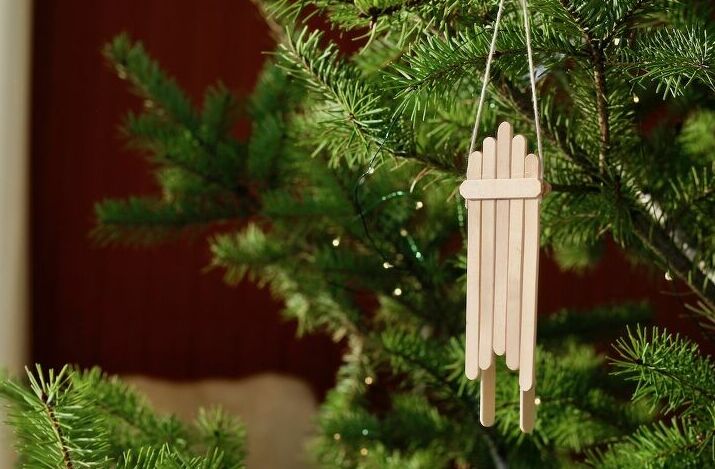
52. Popsicle sled ornaments
This project by Home for the Harvest | Mary Jane Duford involves creating sled-shaped ornaments using popsicle sticks from the dollar store.
The steps include lining up popsicle sticks to form the sled deck, adding cross-braces, gluing on the rails, and allowing the glue to dry. Another cross-piece is added for stability, and a loop of string is attached for hanging.
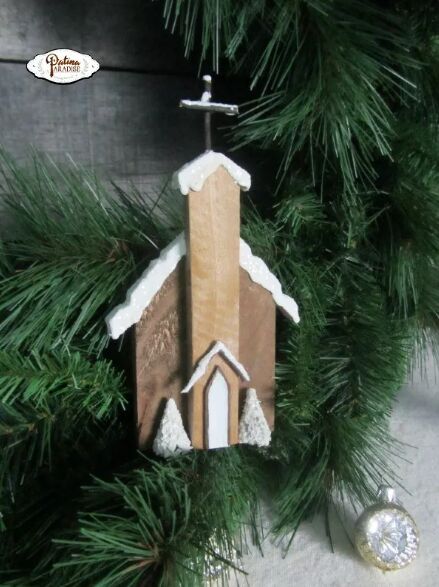
53. Church ornaments
Inspired by a love for small country churches, Patina Paradise creates rustic church ornaments using salvaged pallet wood.
The main materials needed are pallet wood, clothespins, and thin twigs, along with common household items, as well as the template provided by the creator.
The final ornaments feature added details like clothespins for steeples, painted wooden doors with twig awnings, and miniature snow-covered pines.
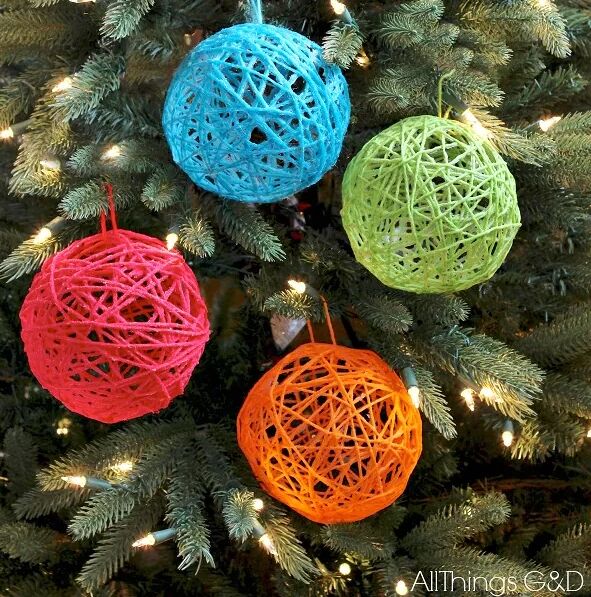
54. Yarn ball ornaments
These DIY yarn ball ornaments by All Things G&D are perfect for adding vibrant colors and making a statement on your Christmas tree.
You'll need balloons, yarn, and glue. Coat the yarn in glue, wrap it around partially inflated balloons, and let them dry. Once dry, remove the balloon and add a string for hanging.
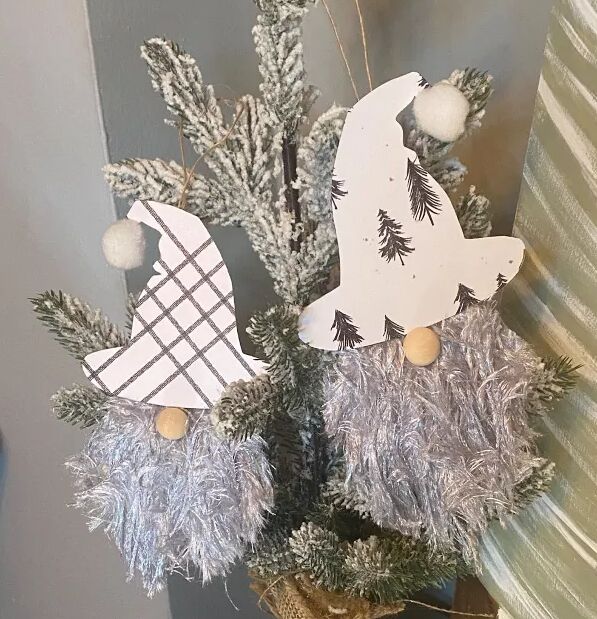
55. Yarn gnome ornaments
Next, Megan | The Crafty Quinn shows us how to make yarn gnome ornaments for your Christmas tree using Dollar Tree yarn and wood cutouts.
These gnomes have braided-like yarn beards and are made from wooden witch's hat and ghost cutouts. Attach scrapbook paper to the hat, glue the yarn to the ghost cutout, and cut open the yarn loops to form the beard.
Add a wooden bead for the nose, a witch's hat, and a Pom Pom on top. Finish by attaching a loop of string or jute twine to hang them as ornaments.
56. Yarn hat ornaments
In this DIY project, Stacy Summer Malimban demonstrates how to create miniature Christmas beanies using red acrylic yarn, a toilet paper roll, baker's twine, and some basic crafting supplies.
Cut and assemble the circular base of the beanie from the toilet paper roll, then attach 16 pieces of yarn using lark's head knots. Secure all the strands together, stuff the beanie, and trim the top.
Add a baker's twine hanger to complete these festive ornaments, perfect for decorating your tree, garland, or crafting Santa Gnomes or Snowman decorations.
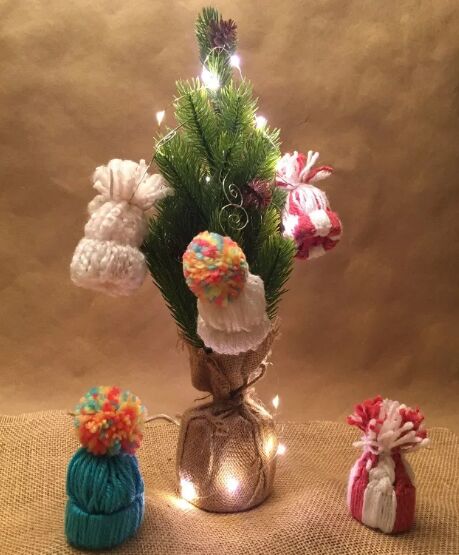
57. Mini stocking hat ornaments
Stacy Davis has her own take on the yarn hat ornaments, which she refers to as stocking hats. Her method involves crafting mini stocking hat ornaments using yarn and cardboard rolls from everyday items. You can choose to add store-bought pom poms or opt for a more natural look using yarn ends.
The process entails folding the yarn, threading it through the cardboard roll, and securing it to form the hat shape. For added structure, tissue paper can be included. This project is not only budget-friendly but also offers room for personalization based on the materials you have at hand.
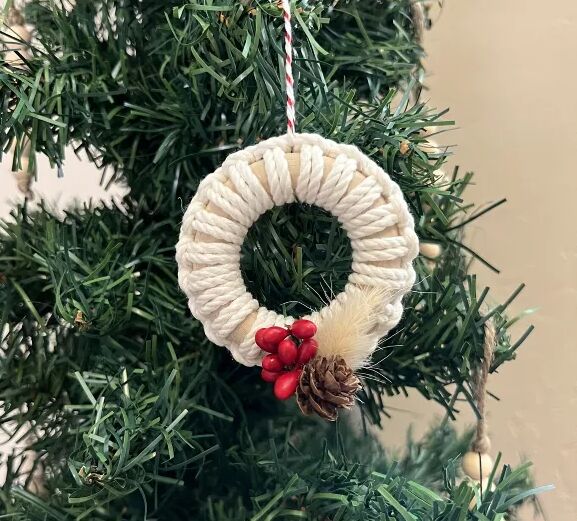
58. Macrame wreath ornaments
This DIY project by Stacy Summer Malimban guides you in making a macrame Christmas wreath ornament, perfect for adding a cozy boho touch to your holiday decor.
The finished dimensions are 2.5" in both length and width. You'll need macrame cord, baker's twine, a hot glue gun, an unfinished pine wooden ring, metal berry picks, a mini pine cone, natural dried laguras, a yarn needle, and scissors.
The tutorial provides step-by-step instructions with labeled images, making it easy to follow along. Once complete, these ornaments can be used on a Christmas tree or even as decorative napkin ring holders for your dining table.
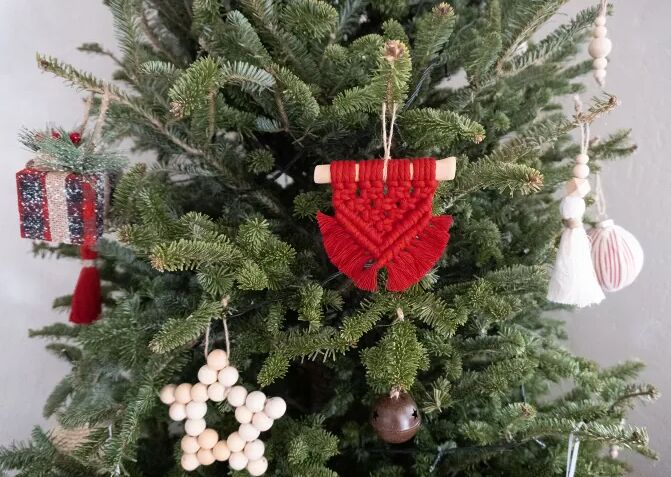
59. Macrame wall hanging ornaments
This project provides instructions for creating a macrame design that can be used as a mini wall hanging or as Christmas ornaments, gift embellishments, or handmade presents. The finished dimensions are 4.5 inches in both length and width.
You'll need 8 pieces of 30-inch macrame cord, a 4.5-inch piece of driftwood (alternatively, cinnamon sticks or a wooden dowel can be used), 12 inches of jute twine, scissors, and a comb.
The tutorial guides you through each step, including tying lark's head knots, creating square knots, and making diagonal double half-hitch knots. The project finishes with attaching jute twine for hanging.
Other DIY ornaments
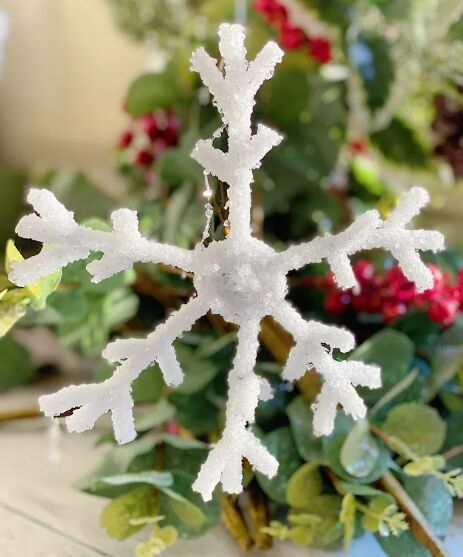
60. Crystal snowflake ornaments
This project by My 100 Year Old Home involves creating beautiful crystal snowflake ornaments using chenille pipe cleaners and Borax. The process includes cutting and twisting the pipe cleaners into snowflake shapes, then soaking them overnight in a Borax solution.
The resulting crystal-covered snowflakes are stunning and make for a delightful winter decoration. We love how the light catches the crystals on the finished ornaments.

61. Flocked ornaments
This DIY project by Sonata Home Design demonstrates how to create faux-flocked ornaments for your holiday decor using a simple hack with baking soda.
The process involves removing the tops of ornament balls, mixing flour and baking soda, spray-painting the ornaments, and dipping them in the flour and baking soda mixture.
After reattaching the tops and dusting off excess flour, you can tie a string for hanging. The finished faux-flocked ornaments can be displayed in a bowl or hung on your Christmas tree.
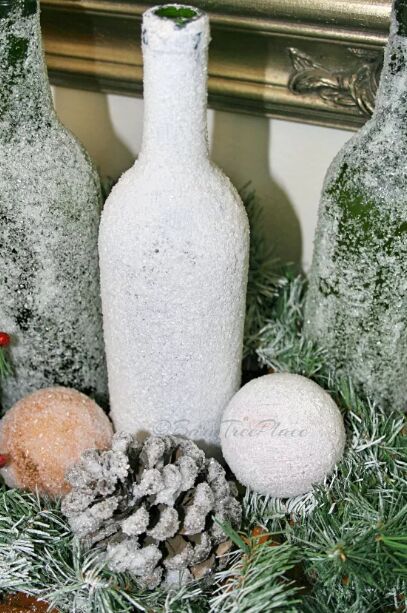
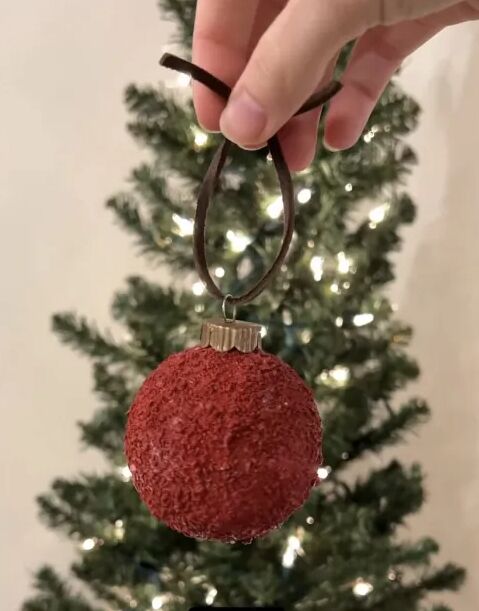
62. Epsom Salt shimmer ornaments
In a similar vein, this project by Barn Tree Place introduces using Epsom Salts to add a sparkling effect to ornaments and festive decor instead of traditional glitter. It's an affordable option, with a box costing only $1.
Combine Epsom Salts with Mod Podge to create beautiful holiday decorations and more. The process involves brushing Mod Podge onto the project's surface, rolling it in Epsom Salts, and allowing it to dry.
This technique can be used to give items a snowy, crystallized look. Additionally, consider sealing the finished projects with a clear spray for added durability.
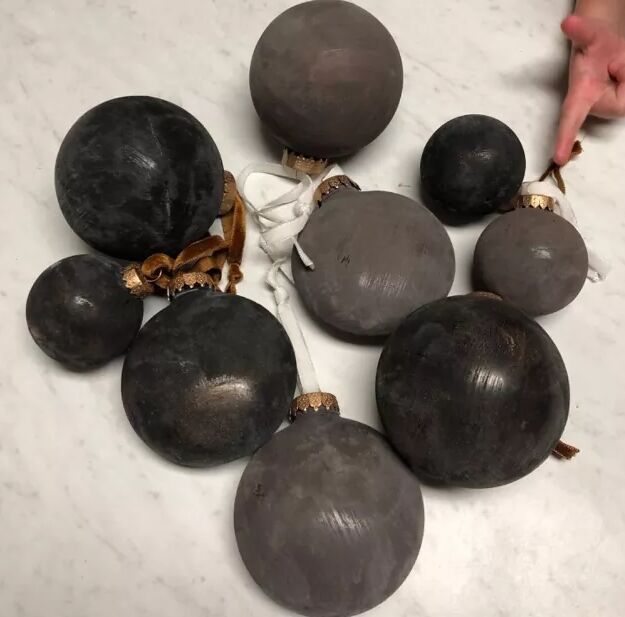
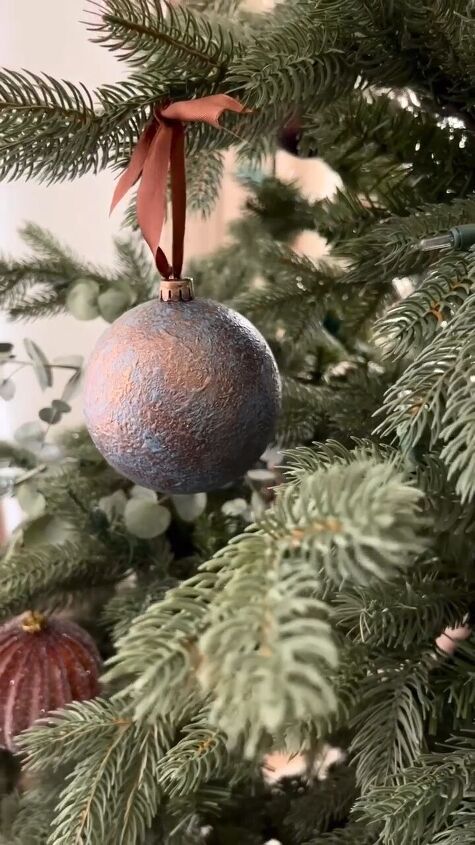
63. Antiqued ornaments
Moving ahead, JessaHomeOnTheAvenue guides you in creating “antiqued” Christmas tree ornaments. You'll need clear or old ornaments, acrylic paint, baking soda, rub n' buff, and paintbrushes.
Mix baking soda with acrylic paint and generously brush it onto the ornament. Sprinkle more baking soda while the paint is wet and let it dry for at least an hour. Meanwhile, apply rub n' buff to the ornament toppers.
After the paint dries, brush off the excess baking soda and add an extra dimension with a touch of Rub n' Buff. Attach velvet ribbon for hanging.
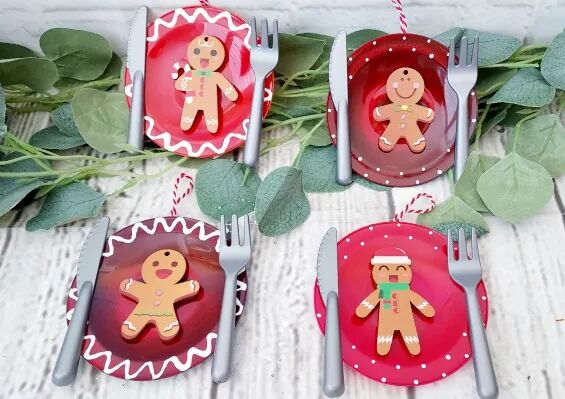
64. Gingerbread ornaments
This project by Kiki DiY's guides you in creating adorable DIY gingerbread man cookie ornaments to impress your guests this Christmas. You'll need plastic toy plates, red spray paint, white puffy paint, gingerbread men cookies, a hot glue gun, and toy plastic forks and knives.
Start by spray-painting the plates and adding puffy paint details for decoration. Then, glue the gingerbread men to the plates and attach the cutlery. To turn them into ornaments, add baker's twine and hang them on your tree.
65. Candyland Christmas ornaments
Keeping with the sweet theme, Remi @ TBD•TGG•OhMeOhMy shares ideas for a Candyland-themed Christmas tree. To start, consider flocking the tree for a whimsical snow effect. You can use spray snow, or make a DIY flocking paste with Ivory snow and water.
For ornaments, you can make small candy lollipops by gluing candies onto foam disks and adding a wooden dowel as a stick. Create rope lollipops by coiling and gluing rope-style candy from the dollar store, also adding a dowel. Paint swirls on foam disks for peppermint candy lollipops and wrap them with cellophane.
For gumball and marshmallow ornaments, use a glue gun and secure a twisted wire as a hanger.

66. Resin ornaments
This project by Resin Inspirations By Soph involves creating easy metallic Christmas tree ornaments using chameleon powders from the brand "Let's Resin."
Soph brushes the chameleon powders inside the ornament molds and mixes 100ml of resin and hardener (depending on the resin's ratio). Slowly pouring the mixture to avoid bubbles, she leaves it to cure for 24 hours. To hang the ornaments, red ribbons are threaded through the holes.

67. Potpourri ornaments
This project by Shelly L Nemeth involves creating Christmas potpourri ornaments using wire mesh ornaments or jars. You'll need lemons, oranges, cranberries, pine sprigs, cloves, nutmeg, cinnamon, and anise stars.
Sliced fruits are dried in an air fryer or oven, then arranged inside the ornaments with various spices and pine sprigs. Finish by adding fresh pine, cinnamon, and a bow.
These ornaments can be hung for a fragrant touch or gifted with stovetop potpourri instructions.
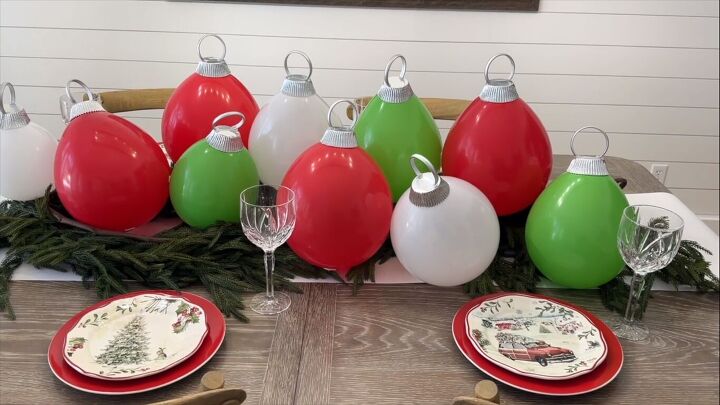
68. Balloon ornaments
This DIY project by Chloe Crabtree demonstrates how to create festive balloon Christmas ornaments using Dollar Tree supplies. The process involves painting shower curtain rings, cutting and shaping them, and attaching balloons to a table using foam mounting tape.
Cupcake liners serve as the tops for the ornaments, secured with low-temperature hot glue. The finished ornaments can be arranged on a Christmas tablescape, adding a playful touch to holiday decor.
The project is easy and budget-friendly, making it suitable for the kids' table during Christmas celebrations.
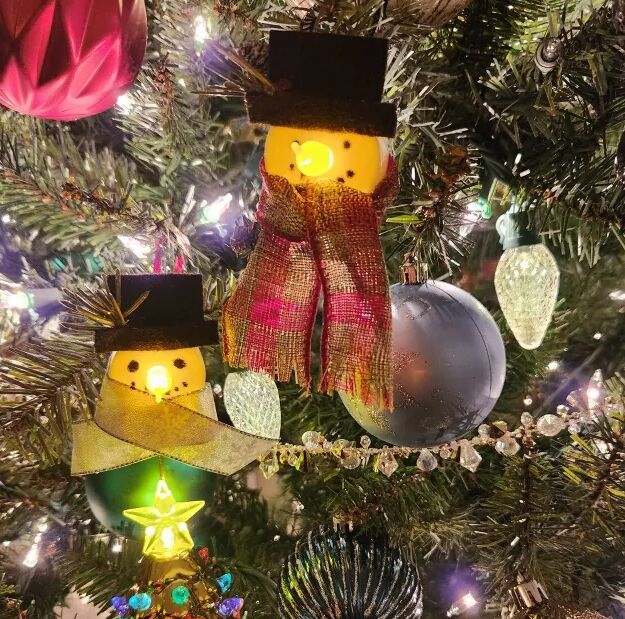
69. Light-up snowman ornaments
Next, Taylor | Casually Coastal Designs aims to create light-up snowman Christmas tree ornaments for a cozy holiday atmosphere.
Battery-operated tea lights serve as the base, with black felt used for the snowman's hat. A ribbon is added for the scarf, and a small piece of red ribbon acts as the hook for hanging.
The snowman's face is drawn on with a white sharpie, and an optional sprig of evergreen is added to the hat for extra flair.

70. Bird ornaments
This project by Pamela creates quick, budget-friendly bird ornaments using dollar-store feather birds and small branches. With the help of a hot glue gun, attach the bird to the branch, adjust the angle, and secure it in place.
Add a string or ribbon for hanging, making sure to find a spot on the tree where it's supported. This easy DIY takes less than 5 minutes per ornament.
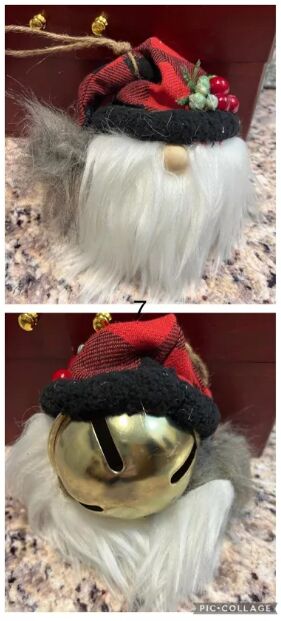
71. Jingle bell gnome ornaments
This DIY project by Judy Wyatt transforms a jingle bell into an adorable gnome ornament.
Starting with a bell from the dollar store, faux fur is measured, cut from the back, and hot glued onto the bell. A small hat is purchased from the dollar store, fitted, and glued on.
A half bead or similar object is used for the nose, along with wool for the beard. Berries from an old centerpiece or store-bought Christmas sprigs are added to the hat with hot glue. Twine is attached for hanging, ensuring it stays secure.
72. DIY aged iron ornaments
This project by Jenna Sue Design Co. is a tutorial for creating DIY vintage ornaments with an aged patina iron look. It involves six steps: attaching ornaments to skewers, applying drywall mud texture, spray-painting the ornaments black/dark, adding copper and gold paint/wax, adding a blue patina, and tying a ribbon.
73. Textured ornament with Epsom salt
This budget-friendly Christmas crafting project by Hannah.is.home entails replicating expensive textured ornaments inexpensively. Using clear plastic ornaments, acrylic paint, Mod Podge, Epsom salt, and creativity, you can recreate the same look.
The step-by-step guide includes preparing the ornaments, applying base and top coats, adding texture with Epsom salt, painting over it, and adding finishing touches.
Other ways to use Christmas ornaments
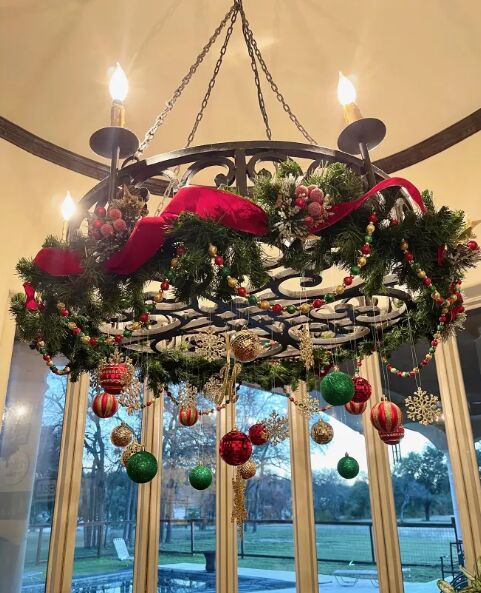
Floating Christmas ornaments
Transform your light fixtures into festive focal points with these DIY floating ornaments. Using a garland, fishing line, and various Christmas ornaments, create varying lengths and tie them securely.
Hang them from the fixture, incorporating snowflake ornaments for a whimsical touch. Drape coordinating beaded garlands around the fixture, and add floral berry picks for extra flair. Top it off with red velvet ribbon.
This simple yet impactful project is sure to receive compliments at your holiday gatherings.
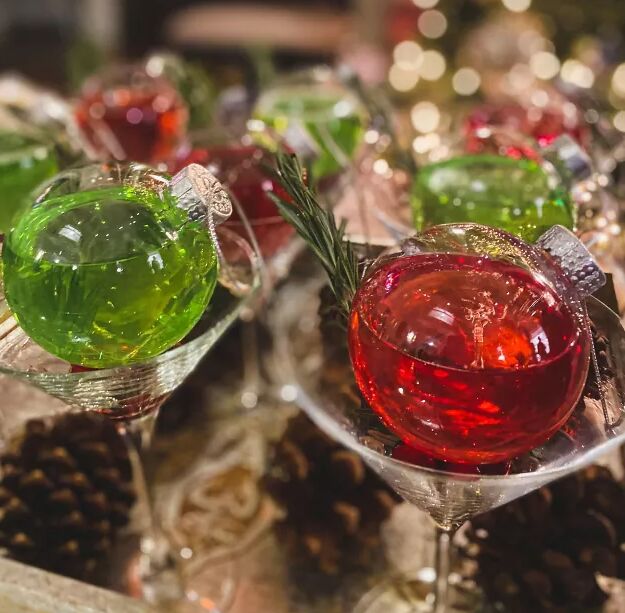
Ornamentinis
Create a festive and interactive centerpiece for your Christmas party with this ornamentini project. Get a set of clear plastic ornaments and fill them with your chosen cocktails - consider using green for apple martinis and red for cosmos.
Set them in martini glasses over frozen cranberries to keep the drinks cold. Arrange them on a tray alongside seasonal decor like pine cones for a stunning centerpiece.
When it's time to enjoy, simply open, pour, and cheers! The materials needed include clear fillable ornaments, martini glasses, a serving tray, and decorative pine cones.
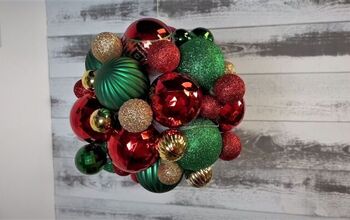
DIY ornament balls


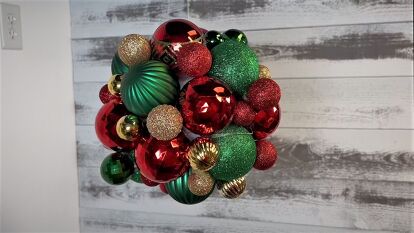
Ornament balls
In these DIY projects, Nick Kreticos guides you through crafting beautiful ornament balls, either with uniform ornaments or a mix of different shapes, sizes, and colors.
Firstly, ensure the tops of the ornaments are secure, making adjustments with hot glue if necessary. Then, insert the ornaments into a styrofoam ball, creating a pattern with alternating colors if you wish. Add a stem to the final ornament for a snug fit.
Craft a hook from wire and attach a string for easy hanging. Finally, securely insert the hook into the ornament ball. The end result is a stunning ornament ball, versatile for both hanging and topiary displays.
Christmas ornament storage hack
This Christmas tree ornament storage hack from Stacy Ling | Bricks 'n Blooms is a game-changer for hassle-free ornament organization.
Rather than individually wrapping ornaments, the trick involves layering them with an egg crate mattress pad at the base of an oversized storage container. The pad acts as a protective barrier, preventing ornaments from shifting and potential damage.
Note: While it works beautifully for fabric, wood, resin, or plastic ornaments, caution is advised for delicate glass or mercury ones.
This efficient method promises quicker setup and takedown for holiday decorating.
DIY Christmas ornaments
What did you think of this ultimate list of homemade Christmas ornaments? Did you save any to try out on your Christmas tree this year? Let us know in the comments below.
As you hang these carefully crafted ornaments on your tree, each one tells a story of creativity and holiday spirit.
We hope you enjoyed this guide on how to make your own Christmas ornaments. From all of us at Hometalk, we wish you a season filled with warmth, laughter, and the simple pleasures that make this time of year so special.
Comments
Join the conversation
-
Absoulutely beautiful!
-
Discover the joy of crafting this holiday season with 73+ DIY Christmas ornaments that are super-easy to make. From festive felt designs to sparkling popsicle stick creations, these projects bring a personal touch to your tree. Unleash creativity with homemade salt dough ornaments or embrace the charm of rustic cinnamon stick decorations. Engage the whole family in the process, creating cherished memories as you adorn your tree with unique, handmade treasures. These simple and delightful ornament ideas offer a wonderful blend of fun and festivity, allowing you to infuse your holiday décor with a heartfelt, DIY touch.


Frequently asked questions
Have a question about this project?